
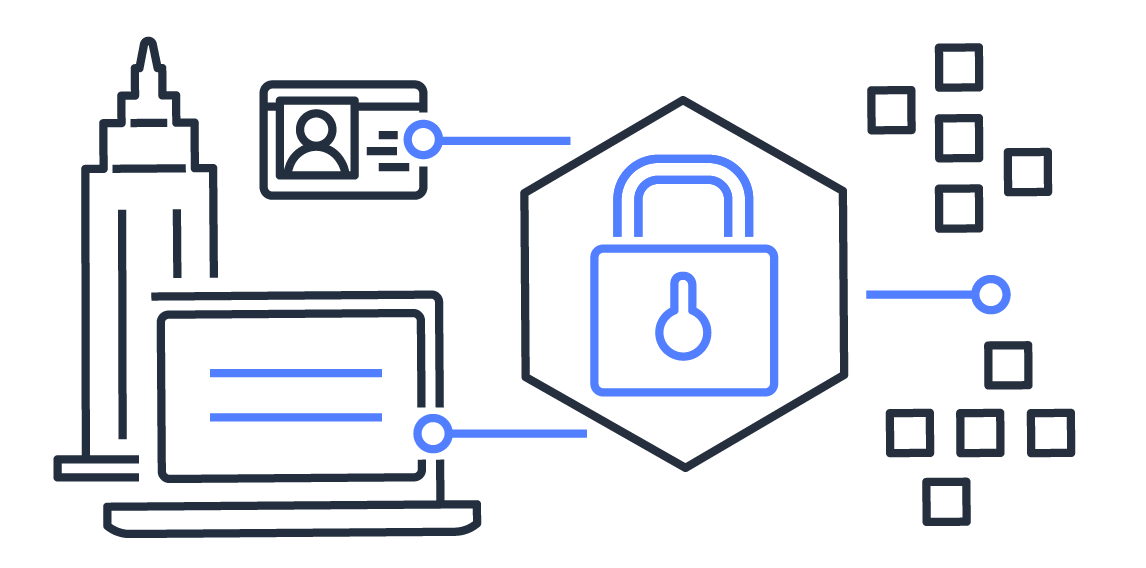
Creating a "Web App": Security Controls (1)
It's all fun and games until 'aws s3 ls' is run on you.

It has been fun to build this site from the ground up so far. But it will not be fun if someone lists all my objects in S3, or if I incur a big bill from AWS because someone was abusing one of my APIs. So me being a security professional, I had to configure the first set of security controls on my site to prevent abuse.
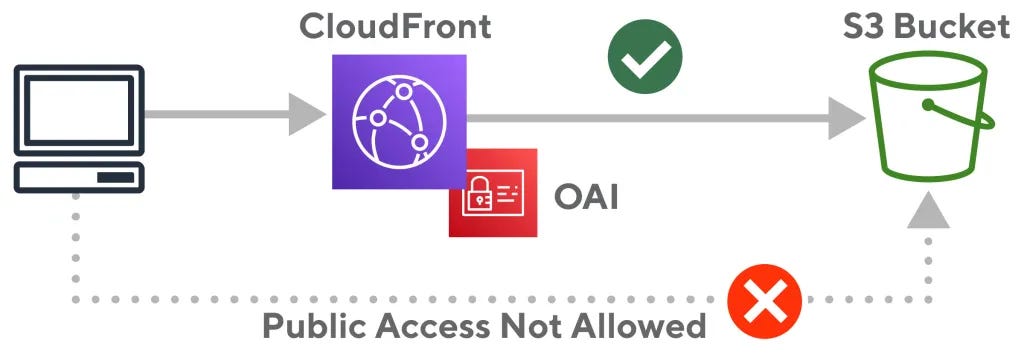
CloudFront OAC
As seen in the Terraform deployment in previous posts, and as every single YouTube video on creating a static site on S3 says, the S3 bucket holding the static content is set to public.
resource "aws_s3_bucket_public_access_block" "kwehen-access-block" {
  bucket                      = aws_s3_bucket.kwehen1.id
  block_public_acls           = false
  block_public_policy         = false
  ignore_public_acls          = false
  restrict_public_buckets     = false
}
This needed to be changed. With enough diligence, the origin of the CloudFront distribution hosting this site can be discovered and the S3 bucket can be accessed directly with all the objects being exposed as well.
CloudFront Origin Access Control (OAC) was implemented by AWS on top of Origin Access Identity to offer a way to secure “S3 origins by permitting access to the designated distributions only”. This will fix the public S3 bucket from being exposed to those meddling attackers.
resource "aws_cloudfront_origin_access_control" "kwehen-OAC" {
  name = "kwehen-OAC"
  description = "OAC for KweHen"
  origin_access_control_origin_type = "s3"
  signing_behavior = "always"
  signing_protocol = "sigv4"
}

resource "aws_s3_bucket_policy" "kwehen-policy" {
  bucket = aws_s3_bucket.kwehen1.id
  depends_on = [
    aws_s3_bucket_public_access_block.kwehen-access-block,
    aws_s3_bucket.kwehen1,
    aws_cloudfront_distribution.kwehen-cf
    ]

  policy = <<EOF
{
    "Version": "2008-10-17",
    "Id": "PolicyForCloudFrontPrivateContent",
    "Statement": [
        {
            "Sid": "AllowCloudFrontServicePrincipal",
            "Effect": "Allow",
            "Principal": {
                "Service": "cloudfront.amazonaws.com"
            },
            "Action": "s3:GetObject",
            "Resource": "${aws_s3_bucket.kwehen1.arn}/*",
            "Condition": {
                "StringEquals": {
                    "AWS:SourceArn": "${aws_cloudfront_distribution.kwehen-cf.arn}"
                }
            }
        }
    ]
}
EOF
}
Pre-signed URLs
The images for the site are hosted on a separate CloudFront distribution/S3 bucket than the one the site is in, to lower the S3 egress data charges, lower latency, and conceal the origin of some of the page elements. This adds a lot of positives but also adds some operational overhead for me as the admin.
This separate CloudFront distribution also has OAC enabled, but I would like to prevent attackers and negligent users from enumerating this site because the source of all the images can be seen in the HTML for the page. For this, the use of pre-signed URLs only allows access to the images that I specify. This process was somewhat tedious, being that a URL needs to be generated for every image. In the future, I’m going to find a better way to automate this process.
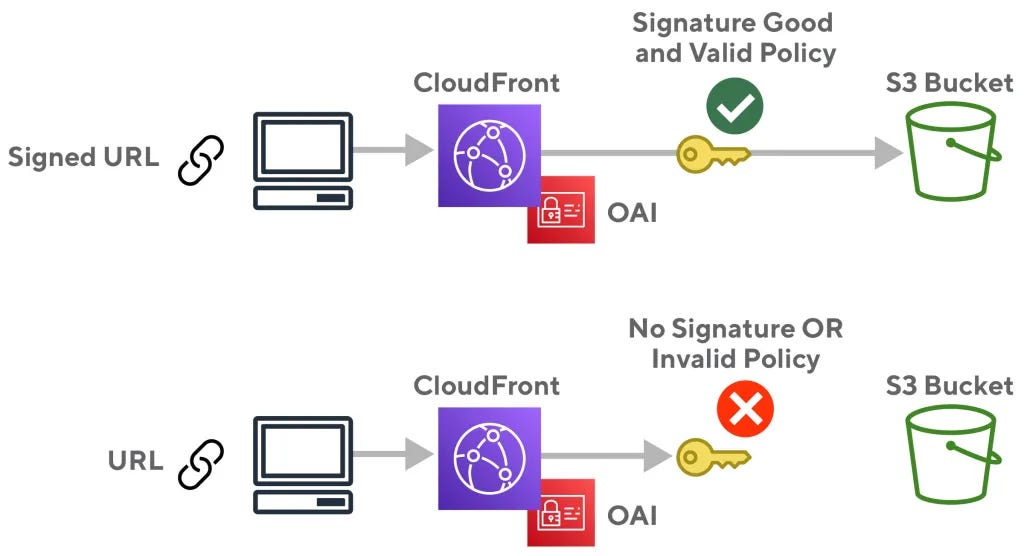
To start a private and public RSA key pair needs to be generated, then the public key is imported into AWS, a key group needs to be created with that public key, viewer access in CloudFront needs to be restricted to this key group, and a Python Lambda function needed to be created importing the private key in the function’s folder.
from boto.cloudfront.distribution import Distribution
from boto.cloudfront import CloudFrontConnection
from botocore.signers import CloudFrontSigner
import datetime
import rsa

def rsa_signer(message):
    private_key = open('NAME_OF_PRIVATE_KEY.pem', 'r').read()
    return rsa.sign(message, rsa.PrivateKey.load_pkcs1(private_key.encode('utf8')),'SHA-1')

def lambda_handler(event, context):
    url = "PLACE.URL.HERE"
    expire_date = datetime.datetime(2024, 8, 1)
    key_id = 'KEY_ID_HERE'
    cf_signer = CloudFrontSigner(key_id, rsa_signer)
    signed_url = cf_signer.generate_presigned_url(url, date_less_than=expire_date)
    print(signed_url)
    return True
With this Lambda function, a pre-signed URL can be generated by placing the original URL of the object from the CF distro and running a test. Doing this boosted the 4XX errors I received tremendously, all the bots trying to enumerate my site must be disappointed.
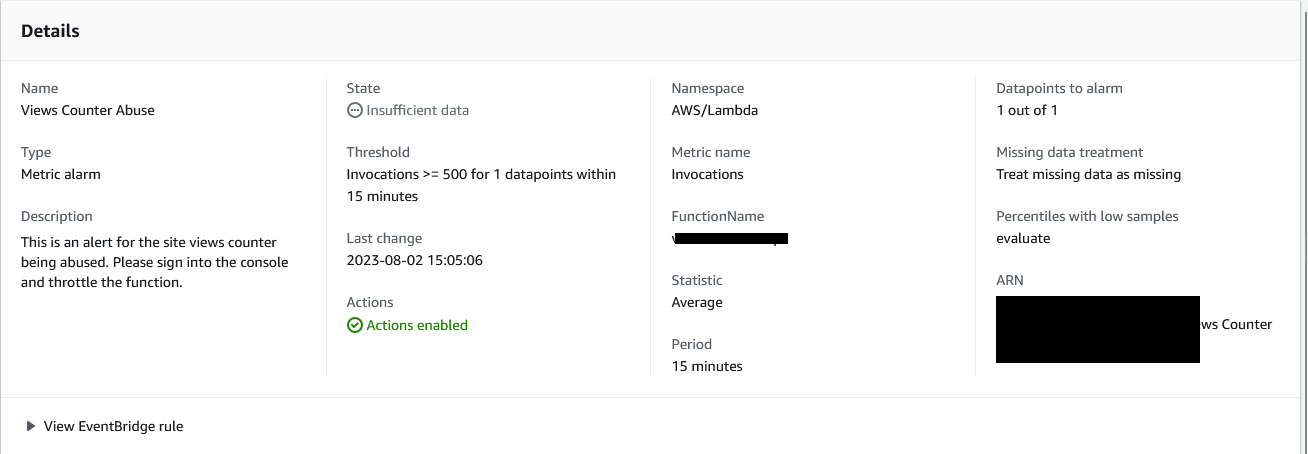
API Rate Limiting & Alarms
As seen in my previous post, the contact form on my site has a rate limit of 1 email per second and a hard cap of 200 emails per day. This configuration was pretty simple. There is also a visit counter on the site that I didn’t write about yet, this visit counter is a Lambda URL endpoint and a DynamoDB instance that communicate and inject some JavaScript into the webpage. This Lambda endpoint is essentially an API that should also be rate limited to prevent abuse. The default concurrency for these function URLs is 1000, which is way too high for the amount of traffic a photography portfolio will be getting, so I lowered this number to 50.
I also created a CloudWatch alarm for this function URL to send an email to me if there are more than 500 invocations within 15 minutes. Yes, I want to be a big photographer one day, but I would not like big bills from AWS one day. If this alarm were to go off, I could quickly take the site down, change 5 lines of code and get it back up, all within 20 minutes. That right there is the beauty of automation.
CloudFront Functions
In 2021, AWS introduced CloudFront Functions,
With Amazon CloudFront, you can securely deliver data, videos, applications, and APIs to your customers globally with low latency and high transfer speeds. To offer a customized experience and the lowest possible latency, many modern applications execute some form of logic at the edge. The use cases for applying logic at the edge can be grouped together in two main categories:
First are the complex, compute-heavy operations that are executed when objects are not in the cache. We launched Lambda@Edge in 2017 to offer a fully programmable, serverless edge computing environment for implementing a wide variety of complex customizations. Lambda@Edge functions are executed in a regional edge cache (usually in the AWS region closest to the CloudFront edge location reached by the client). For example, when you’re streaming video or audio, you can use Lambda@Edge to create and serve the right segments on-the-fly reducing the need for origin scalability. Another common use case is to use Lambda@Edge and Amazon DynamoDB to translate shortened, user-friendly URLs to full URL landing pages.
The second category of use cases are simple HTTP(s) request/response manipulations that can be executed by very short-lived functions. For these use cases, you need a flexible programming experience with the performance, scale, and cost-effectiveness that enable you to execute them on every request.
To help you with this second category of use cases, I am happy to announce the availability of CloudFront Functions, a new serverless scripting platform that allows you to run lightweight JavaScript code at the 218+ CloudFront edge locations at approximately 1/6th the price of Lambda@Edge.
TLDR; CloudFront functions are a faster, cheaper alternative to Lambda@Edge.
If you are “not the average user” like me, you have uBlock Origin as an extension in your browser. If you browse enough sites you can see all of the different domains you are connecting to when you browse the internet. Besides all of the horrid trackers, some that pique my interest are seeing all of the sites that are originating for AWS, CloudFront specifically. If you are to go to these sites CloudFront domain “*.cloudfront.net” usually you will get an access denied error. For my site, I want this same functionality, I only want users to connect to my domain name, and not the horrific dnjkldjgjk.cloudfront.net domain. This is somewhat a practice of Security through obscurity, and there is a better way of doing this which I will find down the road.
This process was much easier than I thought it would be, just an ask on Reddit, some Terraform, and JavaScript. The function below will redirect all users attempting to access the site through the cloudfront.net domain name to the alternate domain name which I bought.
function handler(event) {
    var request = event.request;
    var headers = request.headers;
    var uri = request.uri;
    var mainDomain = "website.come";

    if (headers.host.value !== mainDomain) {
        return {
            statusCode: 301,
            statusDescription: "Moved Permanently",
            headers: {
                location: { value: "https://" + mainDomain + uri },
            },
        };
    }

    return request;
}
Then setting this up in Terraform looks as such:
resource "aws_cloudfront_function" "CF-Redirect" {
  name = "CF-Redirect"
  runtime = "cloudfront-js-1.0"
  comment = "Function to Redirect to Domain Name"
  publish = true
  code = file("/path/to/file/cf-function.js")
}

resource "aws_cloudfront_distribution" "kwehen-cf"
...
...

  default_cache_behavior {
    cache_policy_id = aws_cloudfront_cache_policy.S3-Optimized.id
    allowed_methods = ["DELETE", "GET", "HEAD", "OPTIONS", "PATCH", "POST", "PUT"]
    viewer_protocol_policy = "https-only"
    cached_methods = ["GET", "HEAD"]
    target_origin_id = local.s3_origin_id

    function_association {
      event_type = "viewer-request"
      function_arn = aws_cloudfront_function.CF_Redirect.arn
    }
    }
This creates the function and distribution with the function association, specifying that this function is supposed to be run on the viewer’s request.
What’s Next?
Yes, these posts are out of order I know. But I hope whoever is reading this is enjoying it so far. Going to keep building this site out and securing it as I go. It’s starting to get tedious, but the next security checks post is going to be interesting!