
Monitoring Your AWS VPC with Traffic Mirroring and Security Onion: A Step-by-Step Guide
Maximizing Security and Visibility in Your AWS VPC

I recently completed my AWS Solutions Architect Associate exam and am looking for ways to improve my understanding and apply my learning of AWS. Recently, I decided to create a cybersecurity homelab inside AWS to practice my skills and experiment with new techniques.
One of the challenges I faced was finding a way to effectively monitor my VPC's traffic without sending logs to a third-party tool like Splunk (this will be another section of my lab creation). That's when I discovered the power of traffic mirroring and Security Onion, this provides a comprehensive solution for VPC traffic monitoring and analysis. With Security Onion, I was able to gain increased visibility into the logs in my VPC, allowing me to detect and respond to security threats more effectively. Although I could have just used Suricata as an out-of-band IDS, Security Onion comes packaged with many more tools (including Suricata), making it a more powerful and versatile option for VPC security monitoring.
In this blog post, I'll share my experience and insights on using traffic mirroring and Security Onion to monitor my VPC's security and traffic. Whether you're looking to improve your AWS skills, build a cybersecurity homelab, or enhance your VPC security posture, this guide will provide you with practical tips and step-by-step instructions to get started.
What even is Security Onion?
Security Onion is a Linux distribution that includes a collection of open-source tools for network security monitoring and analysis. It is designed to provide a comprehensive solution for intrusion detection, network security monitoring, and log management. The distribution includes several well-known tools, such as Suricata, Zeek, and Elastic Stack, and is highly customizable and extensible. Security Onion is commonly used by security professionals, researchers, and hobbyists to monitor network traffic and detect security threats in real time.
Prerequisites:
A valid AWS account and basic knowledge of AWS services
A VPC (Virtual Private Cloud) in which to deploy the EC2 instances
Remote Desktop Protocol (RDP)
Three EC2 instances which we’ll configure in this guide:
One instance running Security Onion
One instance which acts as a management instance for Security Onion and other tools
One instance for testing traffic mirroring and traffic monitoring
The monitored instances must be Nitro-based, as Traffic Mirroring is only supported on Nitro-based instances. More info on Nitro-based instances can be found here
A basic understanding of networking concepts, such as IP addresses, subnets, and routing
Familiarity with SSH and basic Linux command-line operations
Basic knowledge of Security Onion and how it is used for network security monitoring and analysis (Security Onion Documentation)
Security Onion Instance Configuration:
You can find the Security Onion AMI in the AWS Marketplace. Subscribe to Security Onion 2, you’ll get a 30-day free trial
You’ll now want to begin launching an instance from this AMI. The AMI will come pre-configured as a t3a.2xlarge. We’ll name this instance ‘SO-MirrorInstance’
Next, you’ll want to select your desired key pair to SSH into the instance
Now we’ll have to select the desired VPC and Subnet for our instance. In this lab, I’ll be using ‘seconiontest-vpc’ and placing this instance in a public subnet. Auto-assign public IP should be enabled to avoid the additional cost of allocating an elastic IP
This instance requires two network interfaces. One for sniffing traffic and another for management. These interfaces require separate also Security Groups.
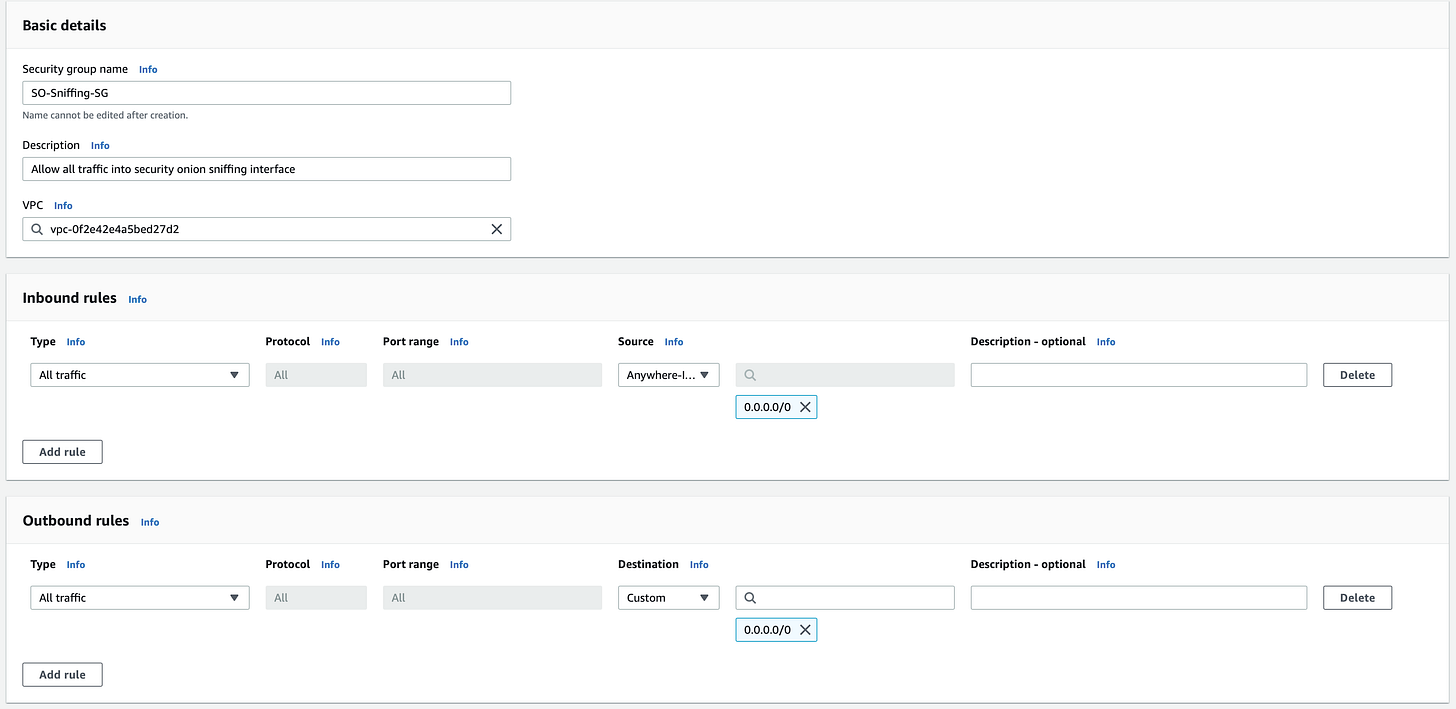
First, in another tab, create a Security Group for the sniffing interface allowing all traffic on all ports from 0.0.0.0/0 inbound and outbound. For this example, we’ll call this SG ‘SO-Sniffing-SG’
Second, Security Onion’s AMI comes preconfigured with a Security Group allowing SSH and HTTPS Traffic. Since this is a lab and not a production environment, you can leave the source IP as 0.0.0.0/0 and use your key pair as a layer of security. This security should have a name similar to ‘Security Onion 2-2.3.220-AutogenByAWSMP—1’
Under common security groups, select the out-of-box SG, ‘Security Onion 2-2.3.220-AutogenByAWSMP—1’ for our first interface. After launching this instance, we’ll create and attach our sniffing interface

Lastly, to meet Security Onion’s hardware requirements, change this instance’s Root volume to 250 GiB (200 will work), instead of the default 100 GiB that comes with this instance type
Go ahead and launch the instance, we still have one more step!
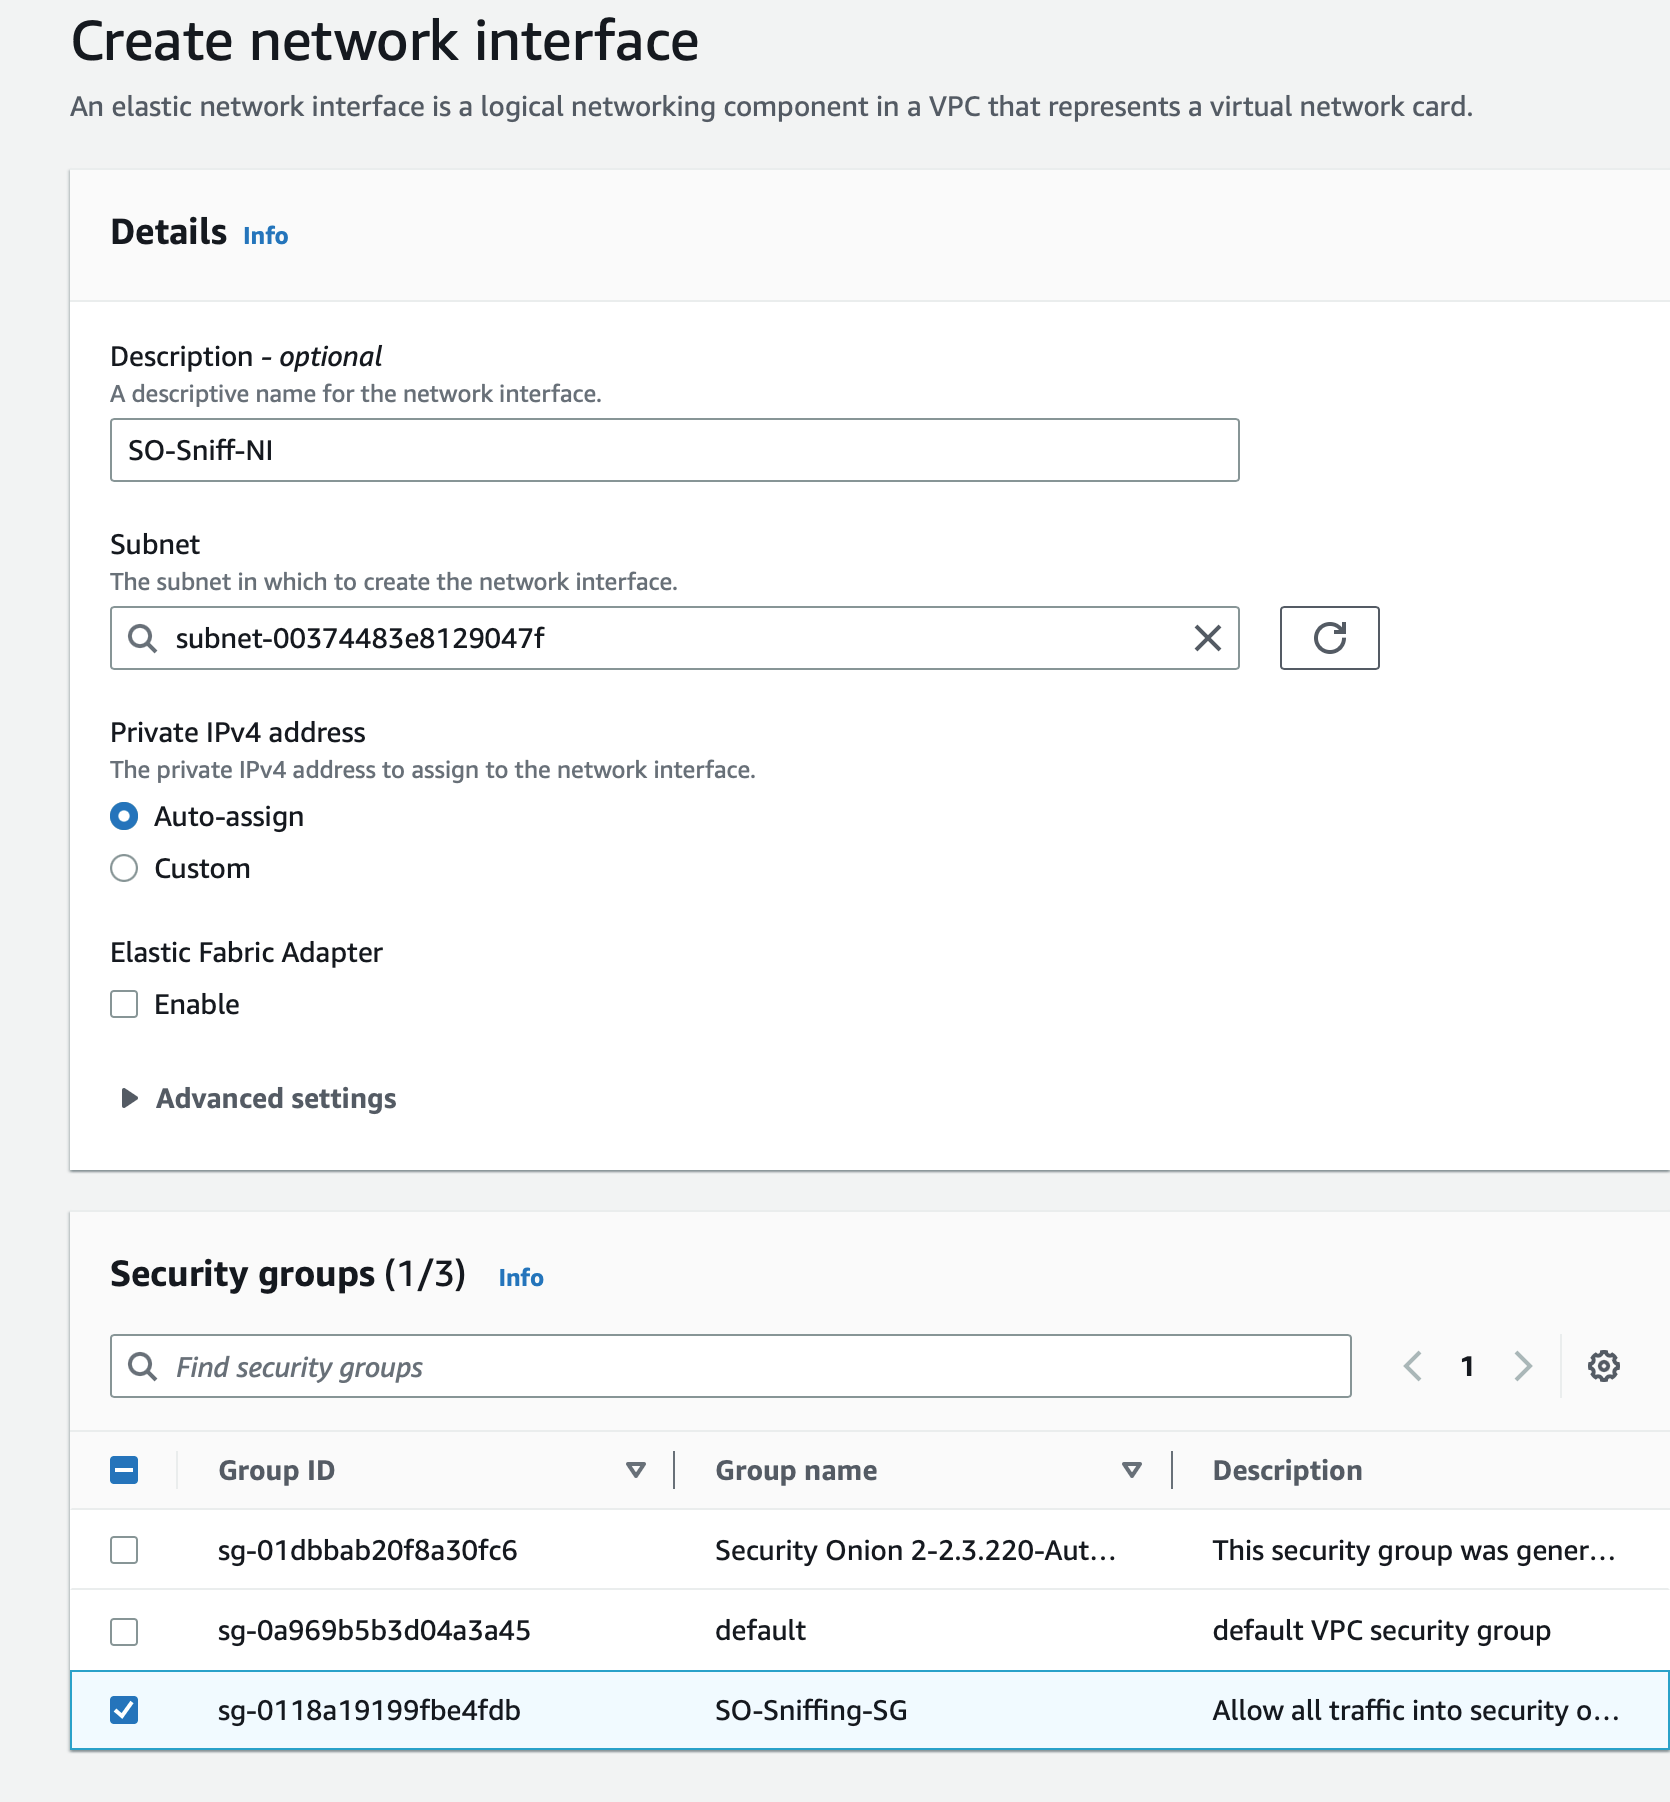
Still in the EC2 Management Console, under Network & Security, select network interfaces, and create a network interface. We’ll name this interface ‘SO-Sniff-NI’. Create the interface in the same subnet as our instance ‘seconiontest’, and ensure it is in the public subnet. Apply our ‘SO-Sniffing-SG’ to the interface, and create the network interface
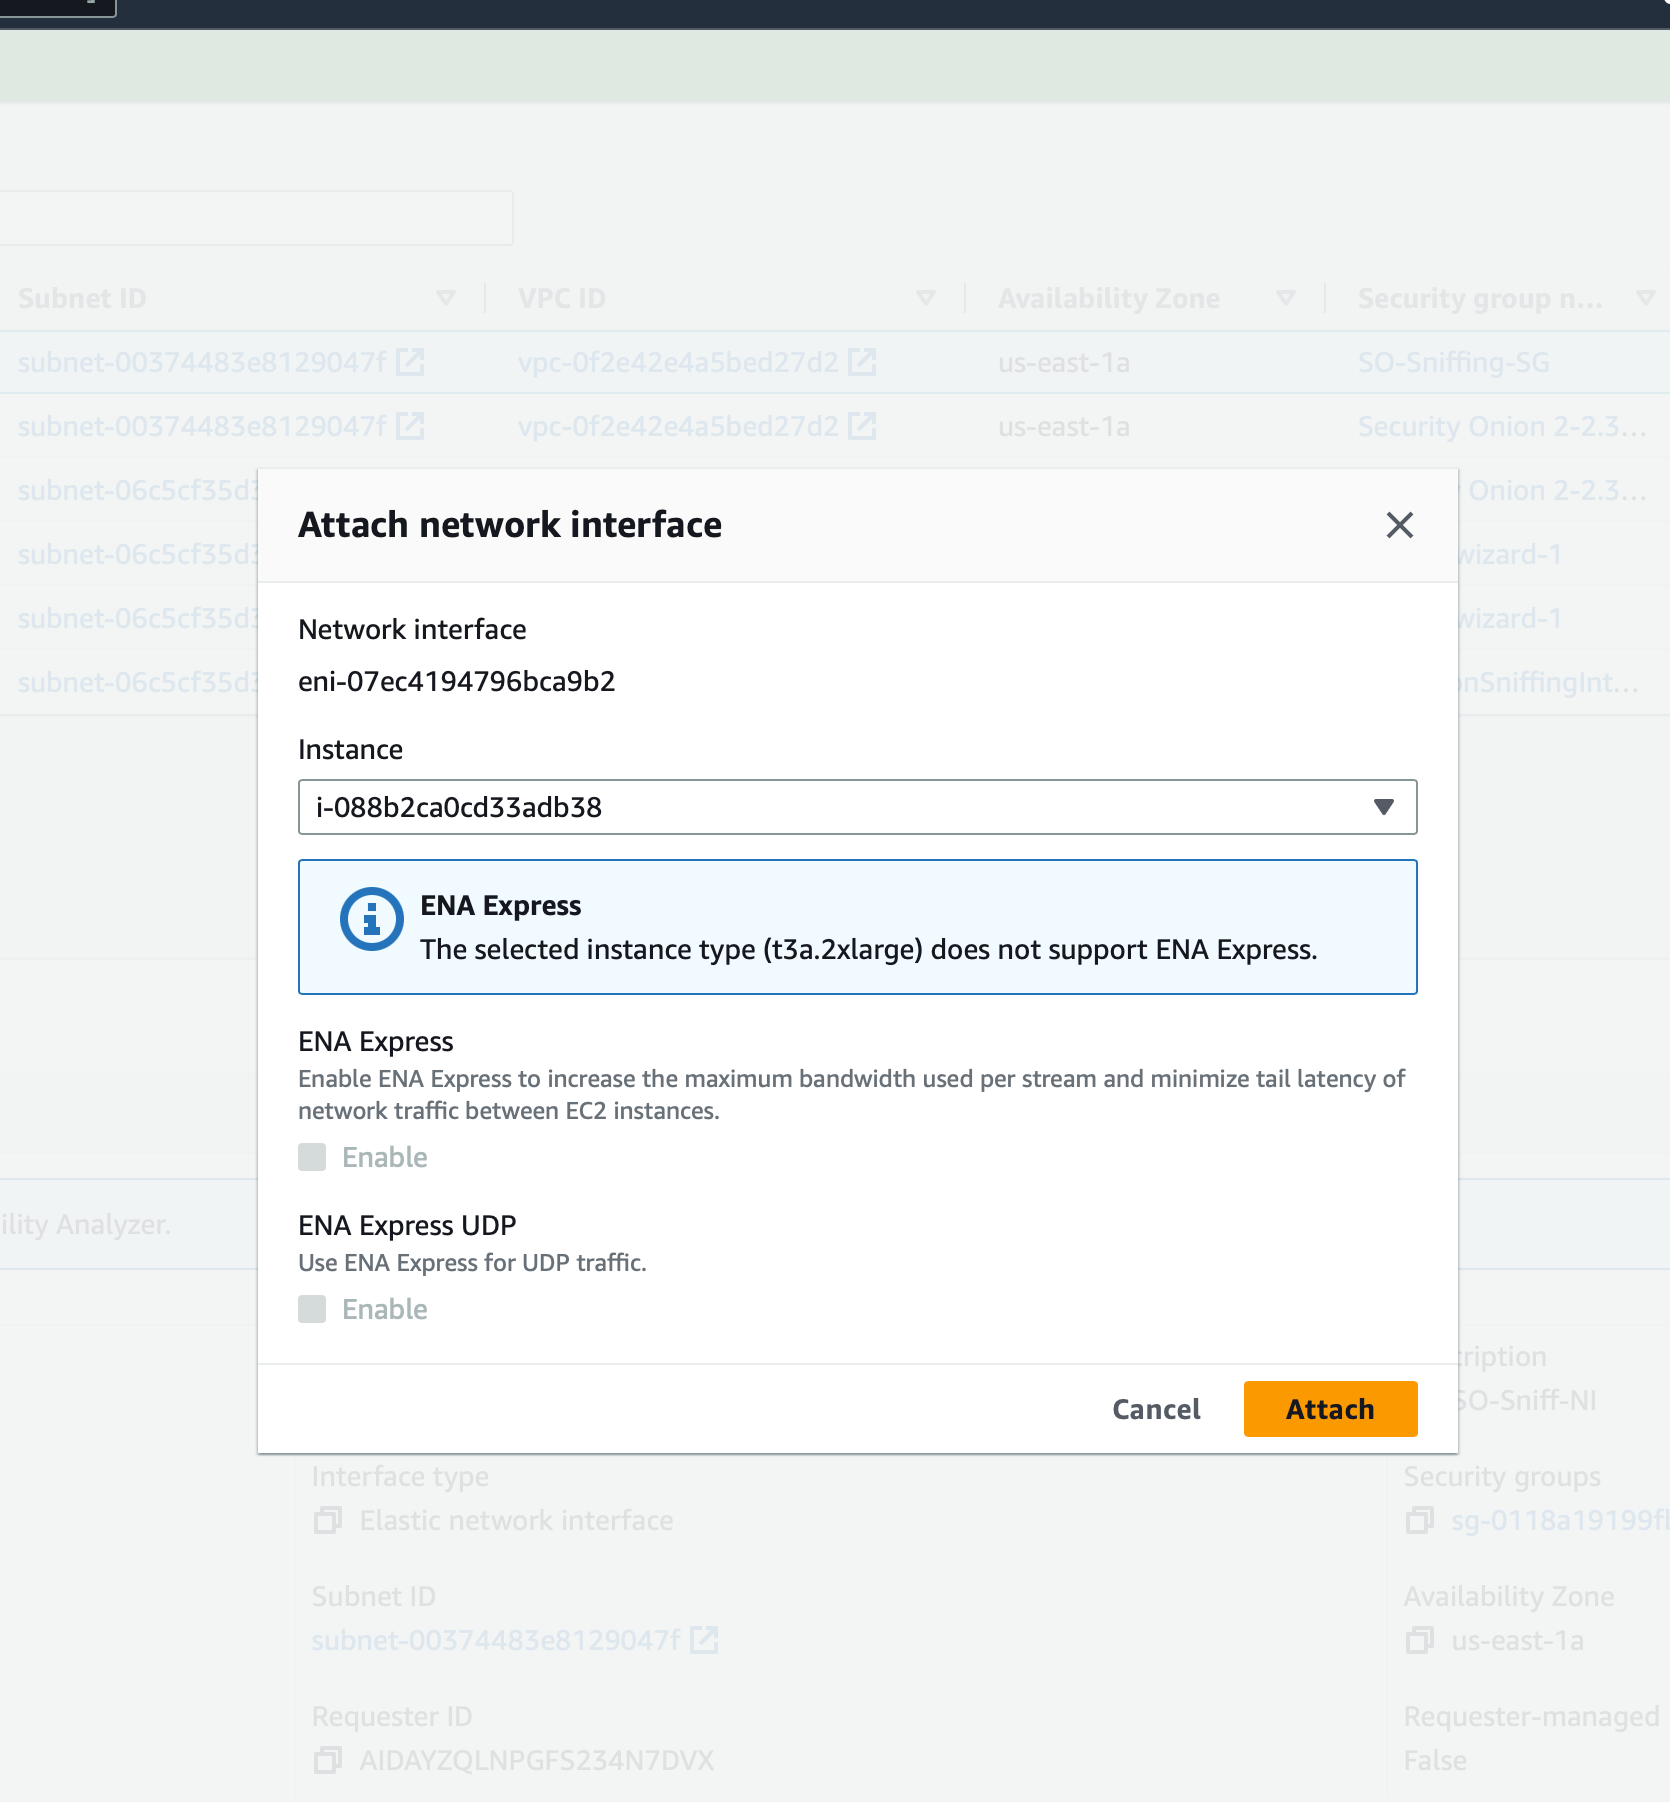
Finally, select the interface you just created, choose actions, attach, and attach the network interface to ‘SO-MirrorInstance’
Management and Test Instances:
Next, we’ll want to launch our management and test instances:
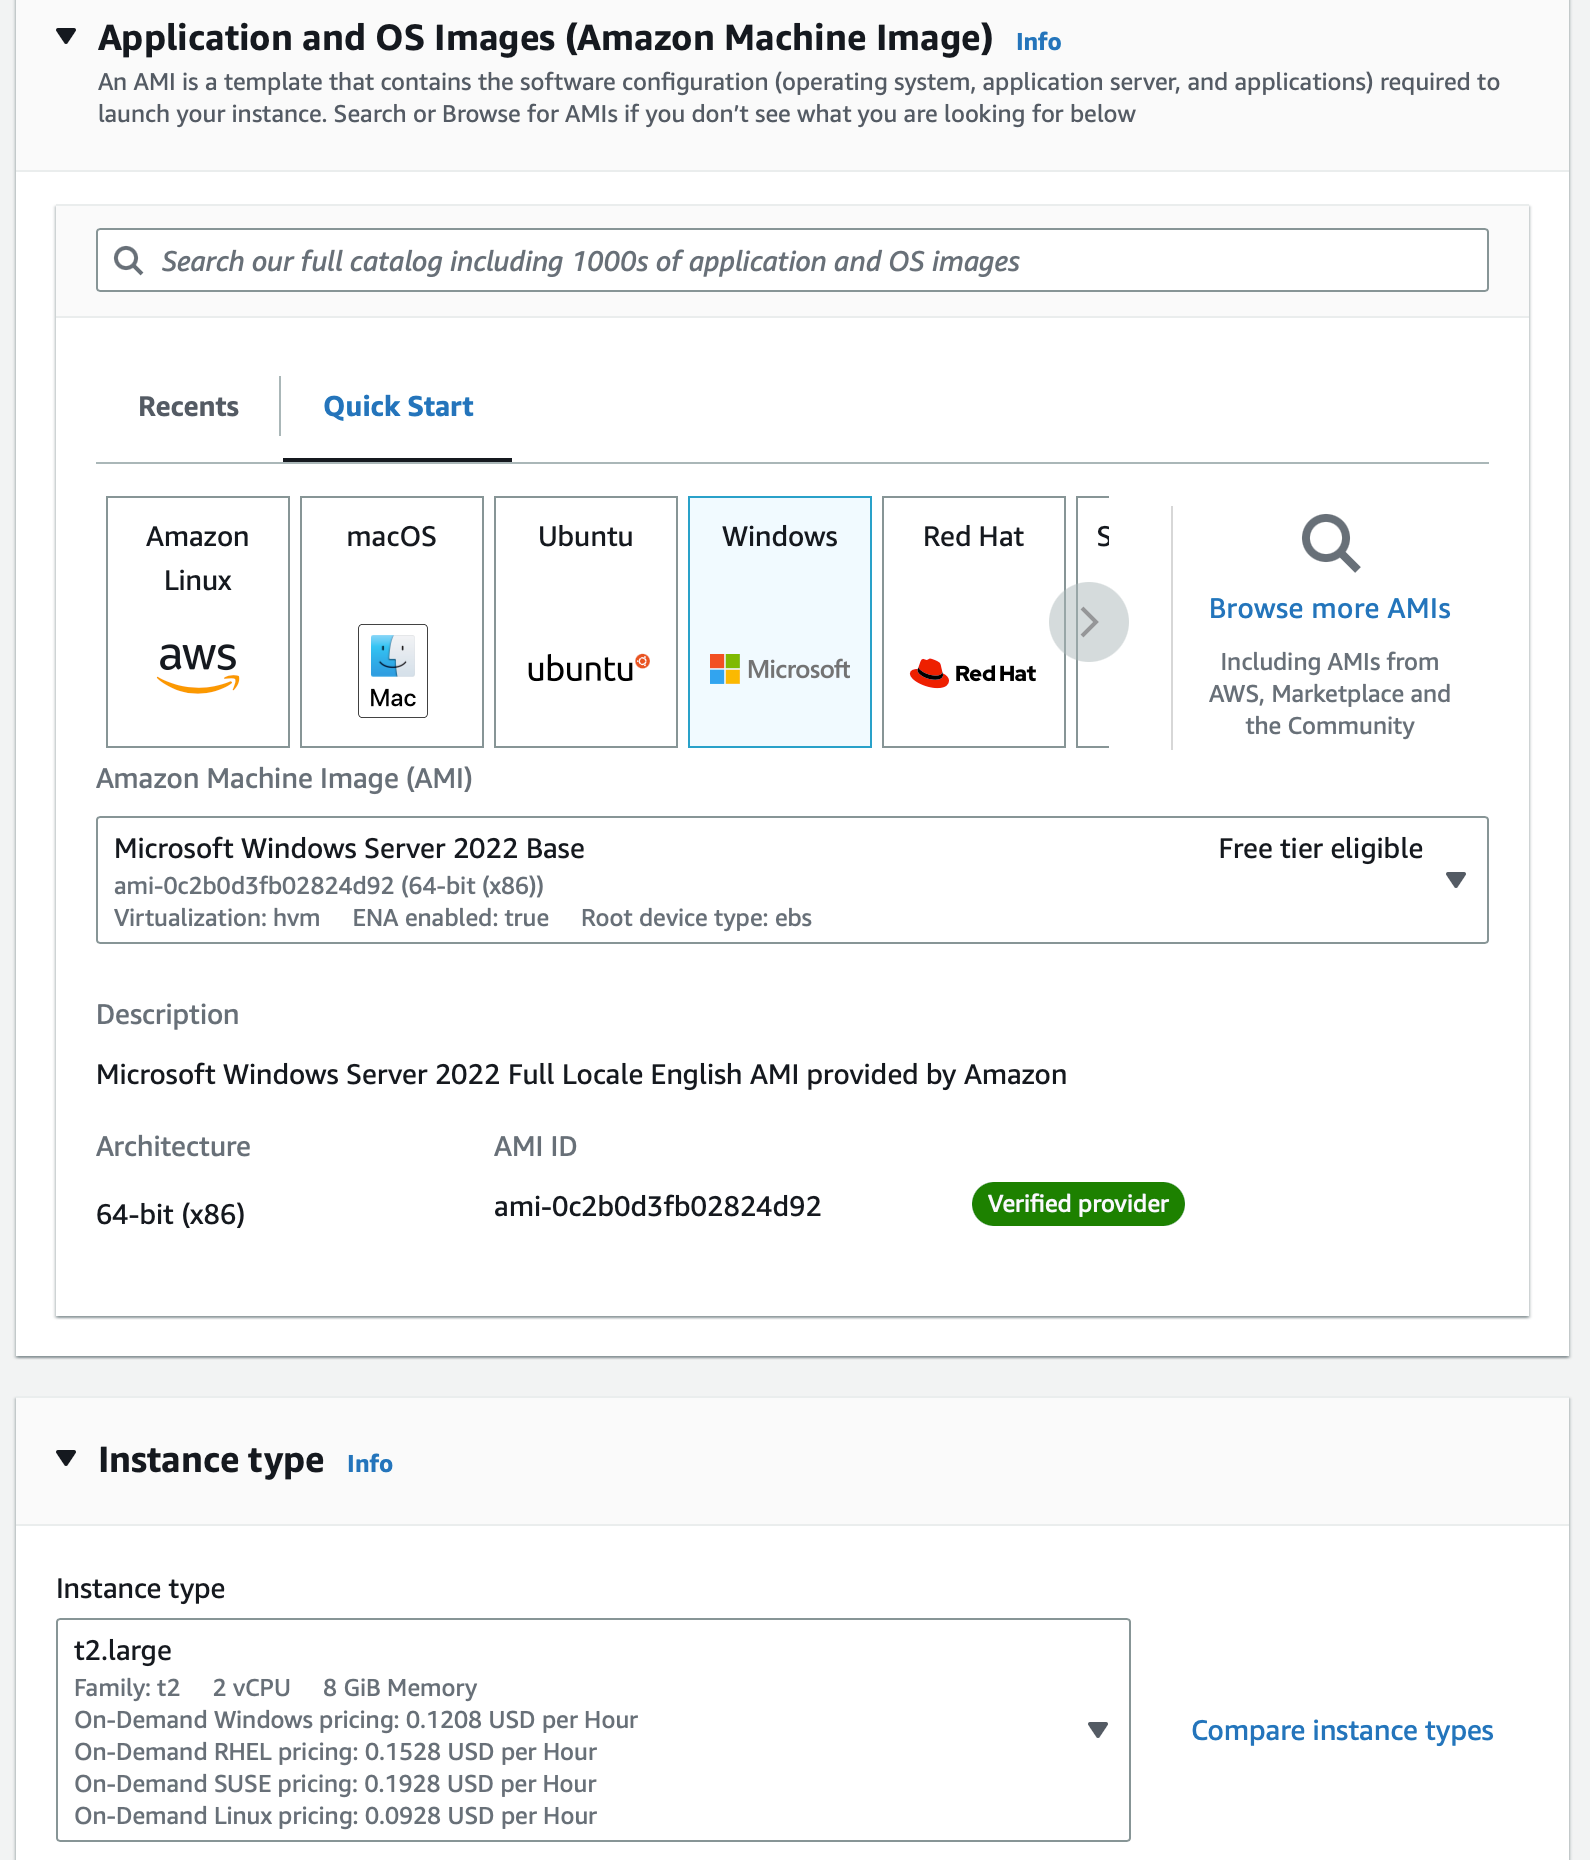
For our management instance, we’ll want to launch a Windows Server AMI because we’ll have a GUI to access Security Onion from. This instance must be in the same subnet as our Security Onion instance, as you won’t be able to connect to the instance from a Public IP.
Let’s go back to the EC2 Management Console!
First, we’re going to launch an instance. You can name this Instance ‘SO-MGMT’
Select Windows, under AMI, select Windows Server 2022 Base (Core base does not have a GUI)
Under instance type, choose any instance you’d like. I chose a t2.large for the additional computing power (who wants to do log analysis with 1GB of RAM?)
Use your created key pair for login
Ensure this instance is in the same VPC and subnet as ‘SO-MirrorInstance’
Enable Auto-assign public IP so we can RDP into this instance from our host PC
Create a Security Group allowing RDP on port 3389 from 0.0.0.0/0 and attach it to this instance
Launch the instance!
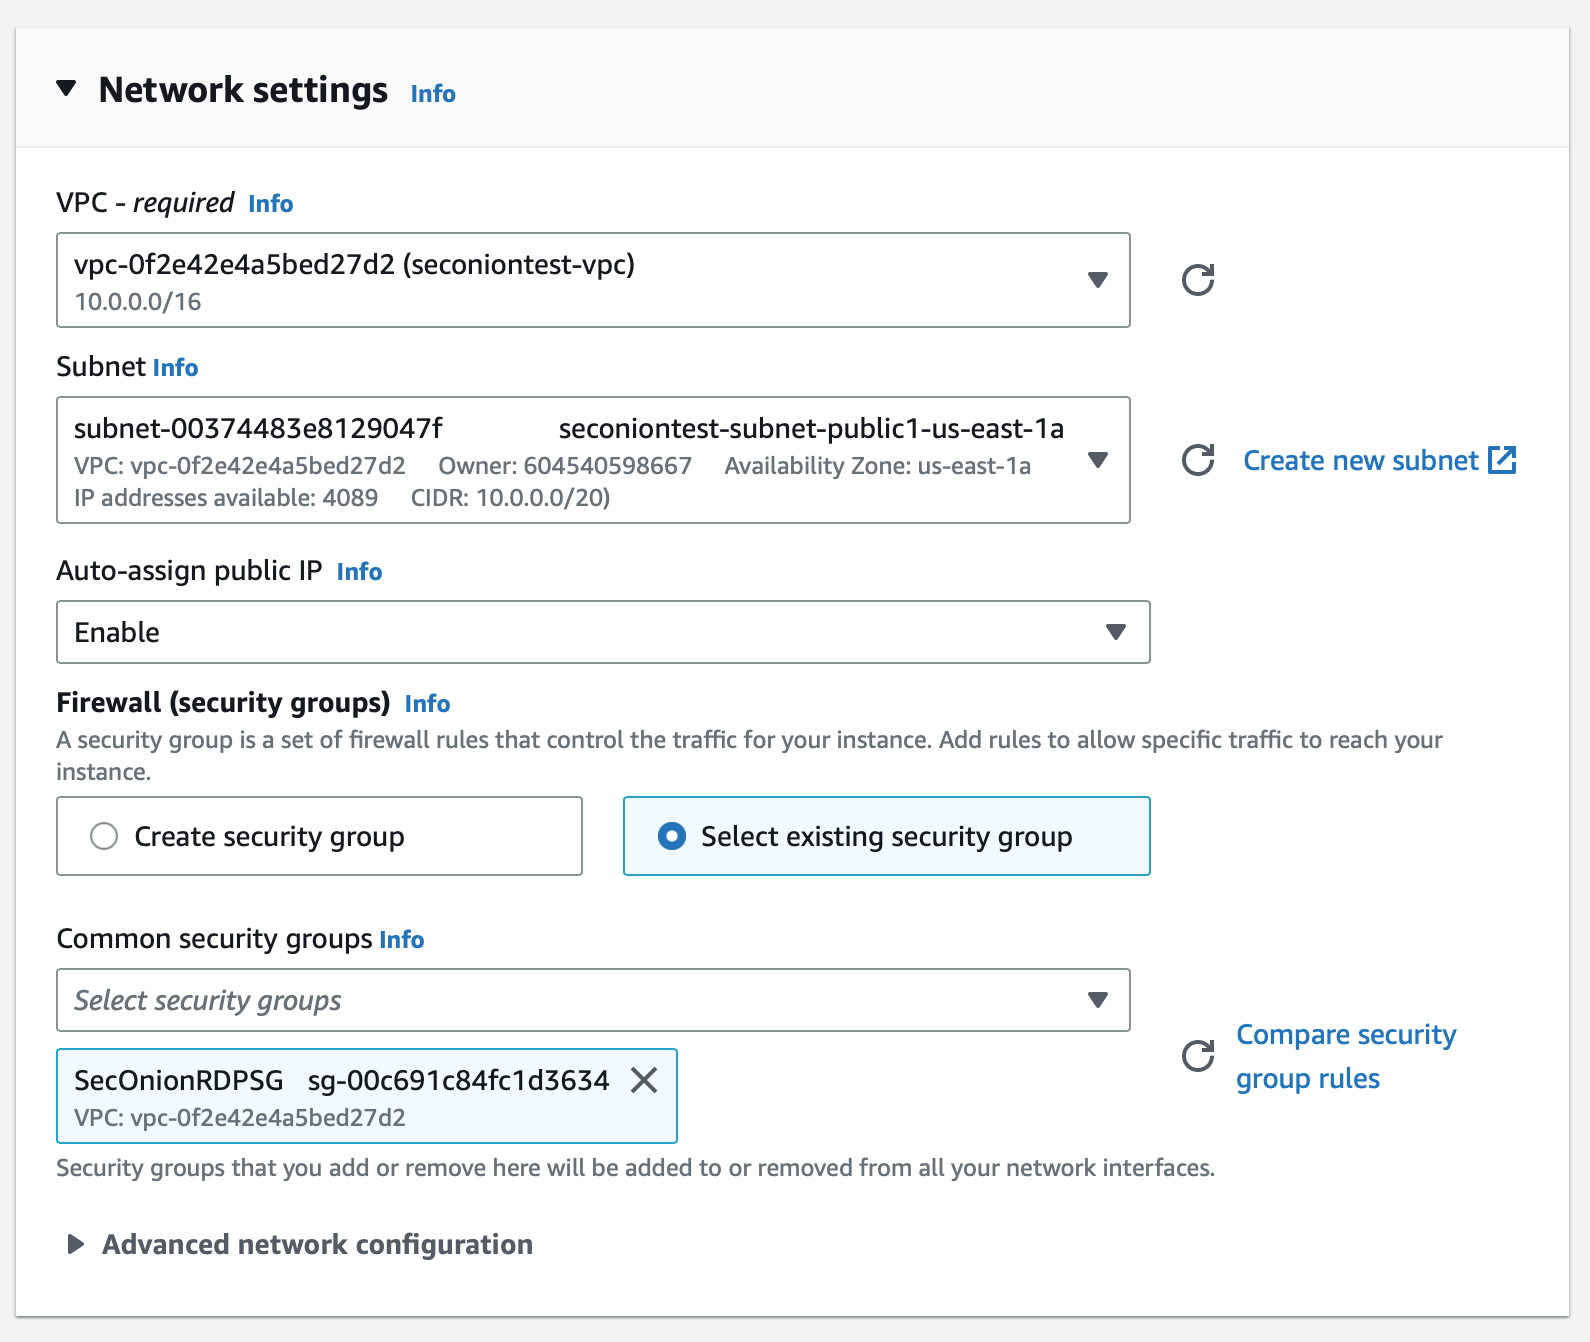
As stated previously, our test instance must be Nitro-based for traffic to be mirrored. For the sake of this lab, our instance must be in the same Subnet as ‘SO-MirrorInstance’ and ‘SO-MGMT’.
Launch an instance from the EC2 Management Console, we’ll name this instance ‘SO-Test-INST’
We can use an Amazon Linux 2 or 2023 as the AMI for this instance
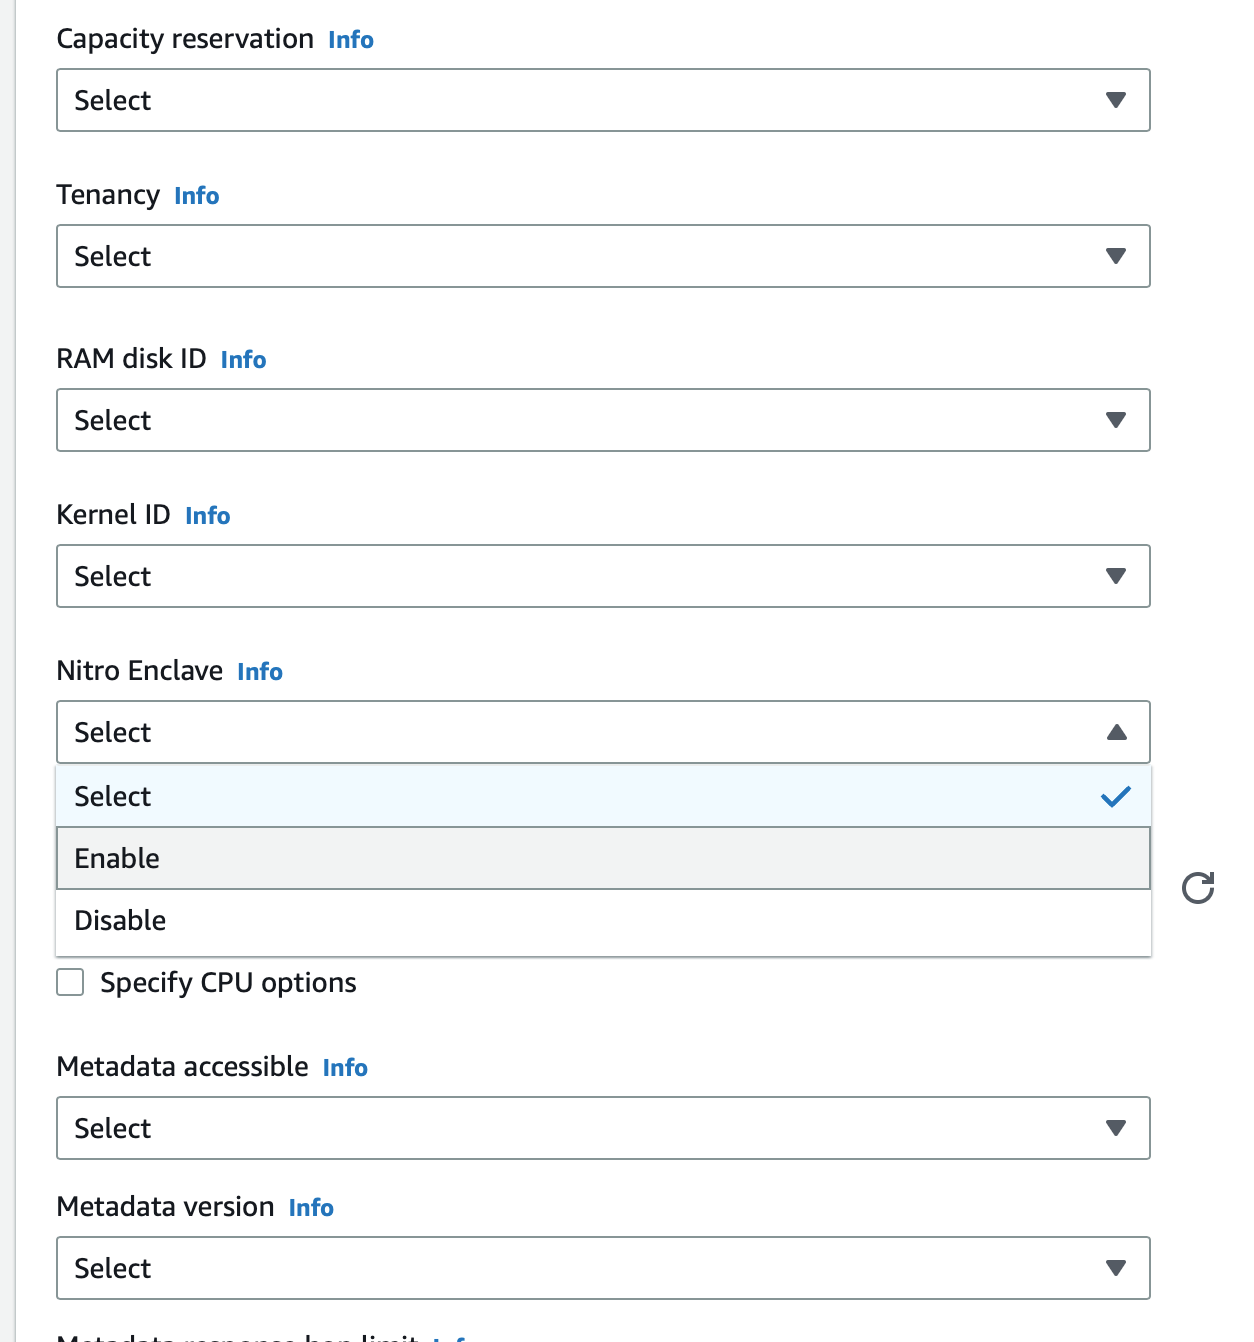
Our instance type should be c5.xlarge so that Nitro Enclave can be enabled
Use our same key pair for login
Ensure this instance is in the same VPC and Subnet as ‘SO-MirrorInstance’ and ‘SO-MGMT’
Create a security group allowing SSH access from 0.0.0.0/0

Most importantly, under Advanced details, enable Nitro Enclave
Launch this instance!
Now, the Real Fun Starts…
Now that we have our three EC2 instances configured, we can begin configuring Security Onion. To do this, we will SSH into the Security Onion instance which will start the setup wizard. This will guide us through the initial configuration process too. get Security Onion up and running in our VPC
Navigate to the directory in which your key pair resides and use the command: “ssh -i “KeyPairName.pem” onion@ec2-x.x.x.x.compute-1.amazonaws.com” (please note that your key pair’s name and instances IP address should be changed)
Security Onion’s setup will automatically start, if configured properly this process should be pretty smooth. You can continue to follow this guide, or you can watch this setup here
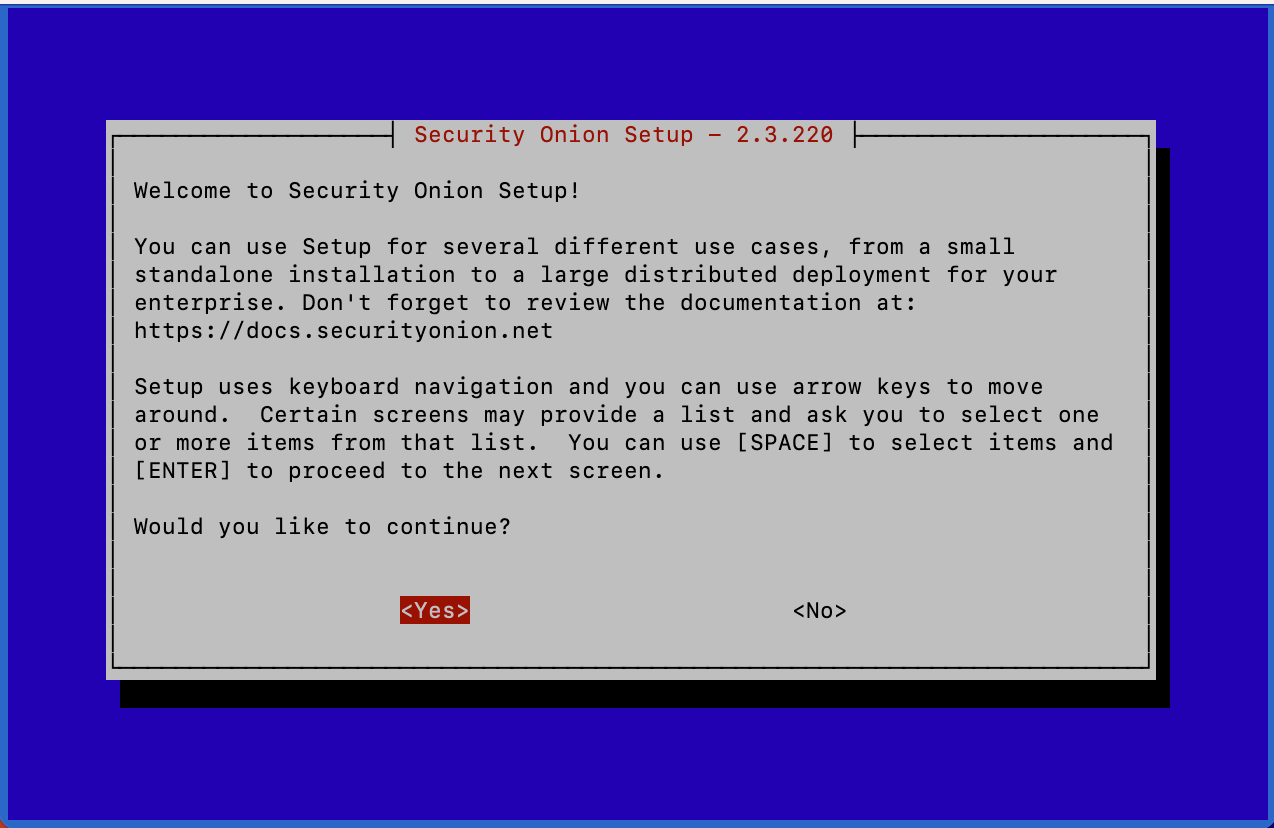
Security Onion’s install type should be EVAL - this is evaluation mode and is not used in production deployments
Agree to the license terms
Create a hostname for your instance
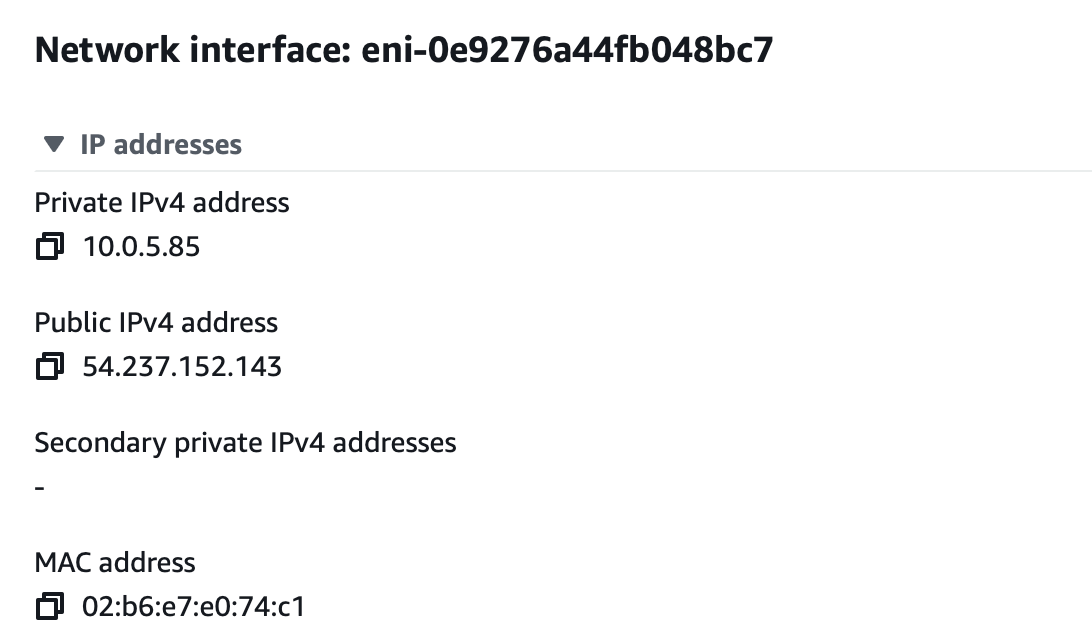
Select the management NIC for Security Onion, this should be the interface that was designated to the instance upon creation, you can be verified by navigating to Network Interfaces in the EC2 Console, selecting the desired NIC, and verifying the MAC Address listed in Security Onion matches
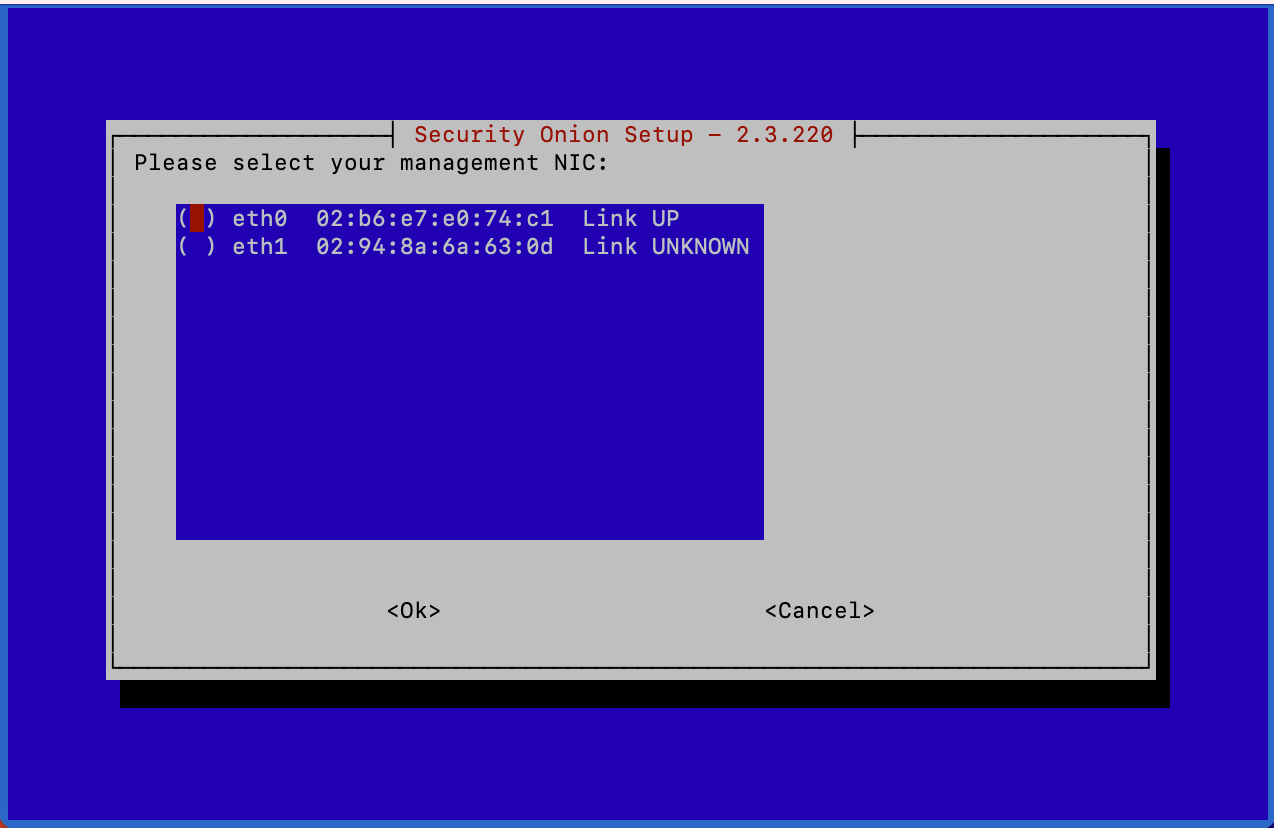
Setup will now begin to initialize networking
“Direct” can be used to connect to the Internet
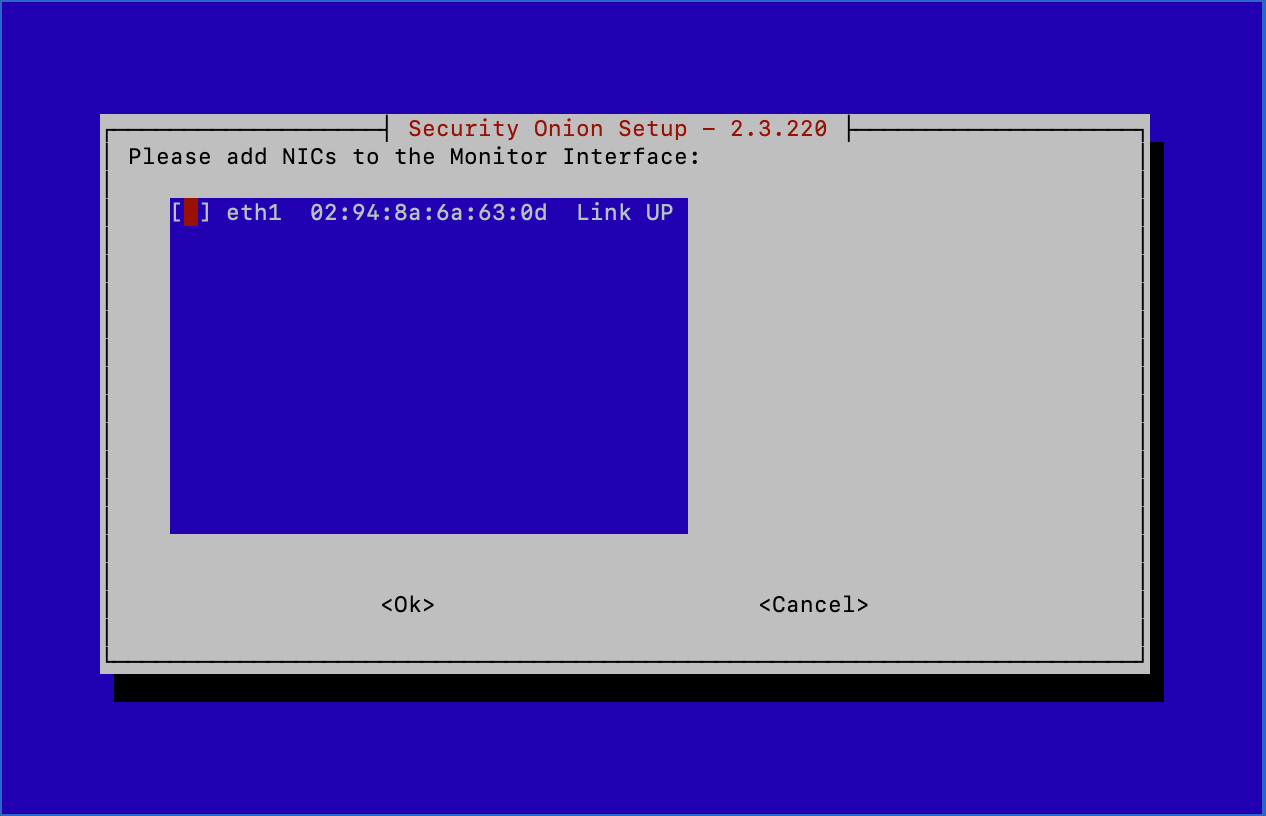
Our outstanding interface, ‘SO-Sniff-NI’, can be selected as the Monitoring Interface
Patches can be scheduled as automatic
Home Network(s) can be left at their defaults
All services should be enabled
Select ‘Yes’ for keeping the Docker IP range
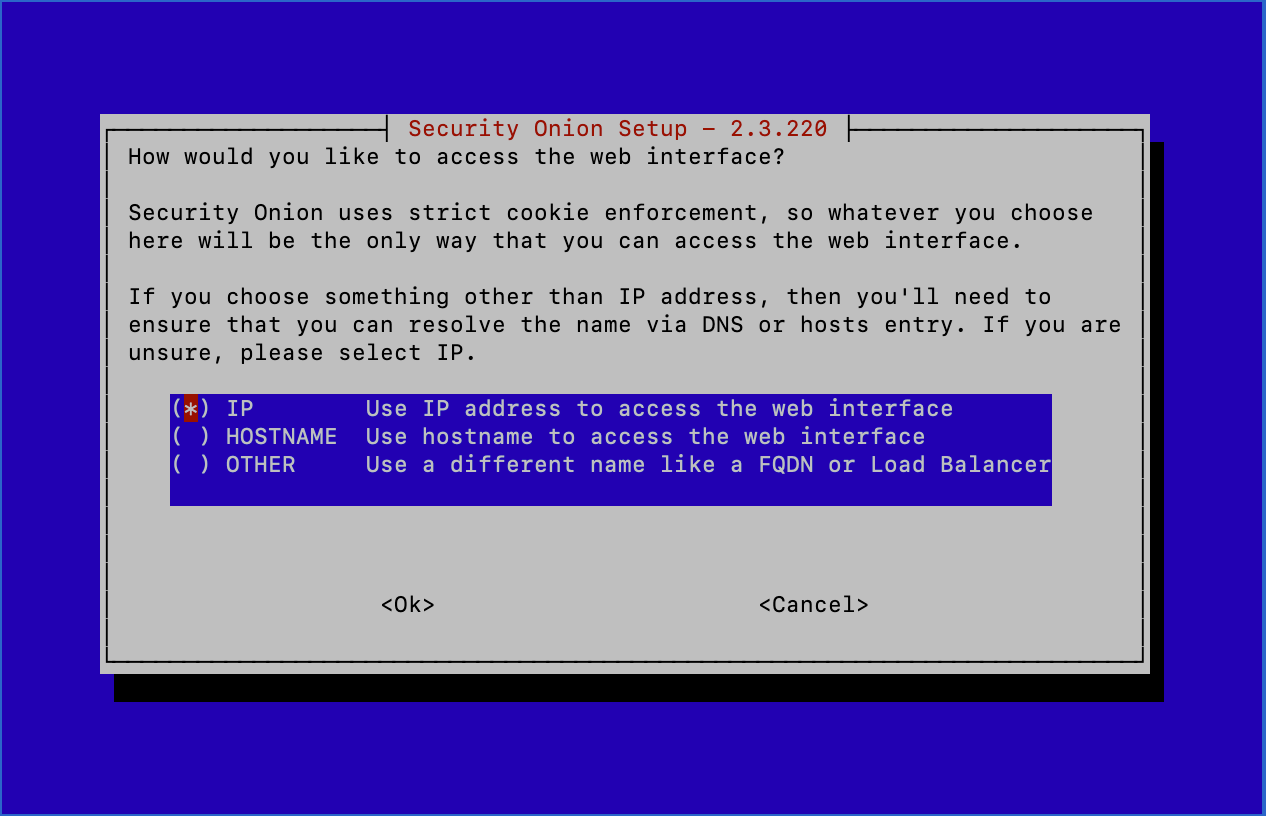
Enter a valid username and password to log in to the Web Interface
For my preference, I use an IP address to connect to the Web Interface
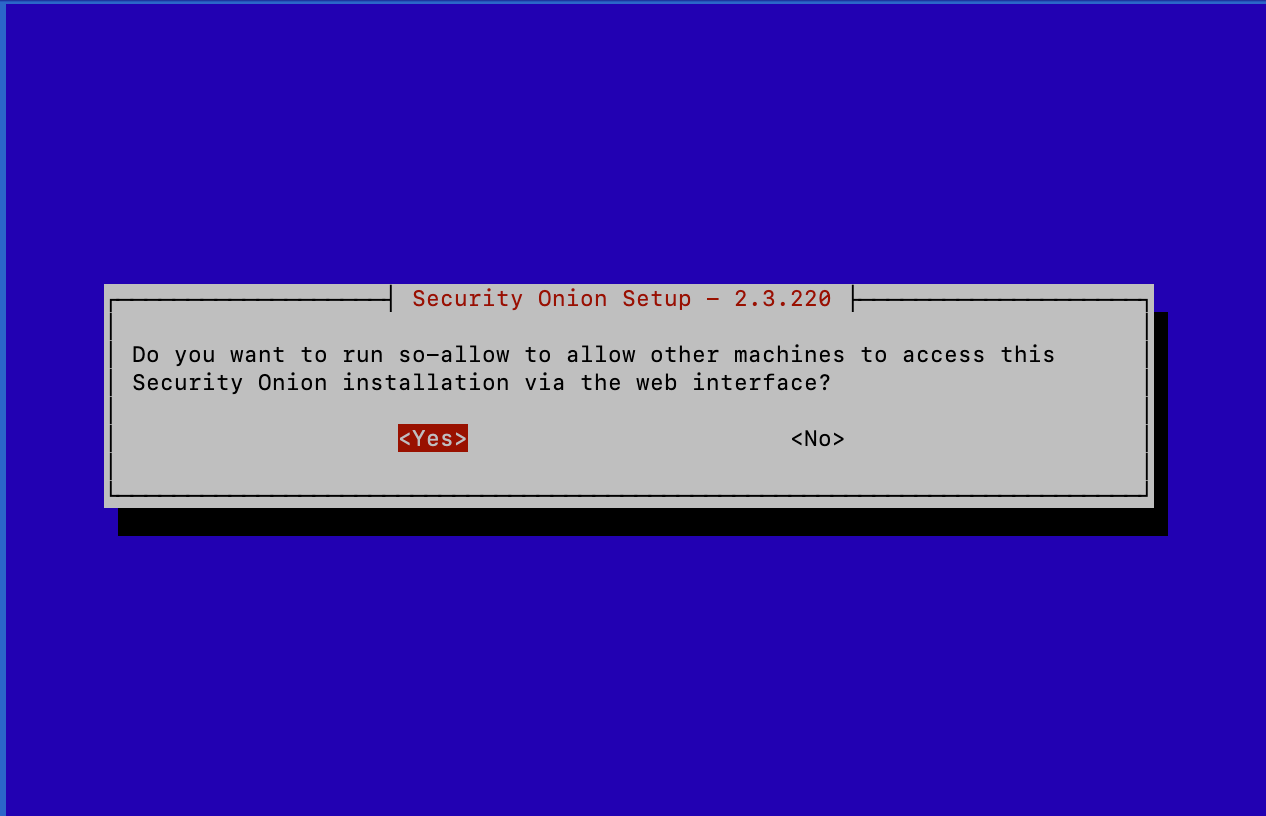
You’ll now be prompted to run so-allow to allow a certain IP or CIDR range to connect to this instance’s Web Interface. Select ‘Yes’
In the VPC Console, under Virtual private cloud, select subnets
Select the subnet in which these instances are located and locate the IPv4 CIDR
My subnet’s CIDR is 10.0.0.0/20

Enter this CIDR range into Security Onion and continue
You’ll now see this screen:
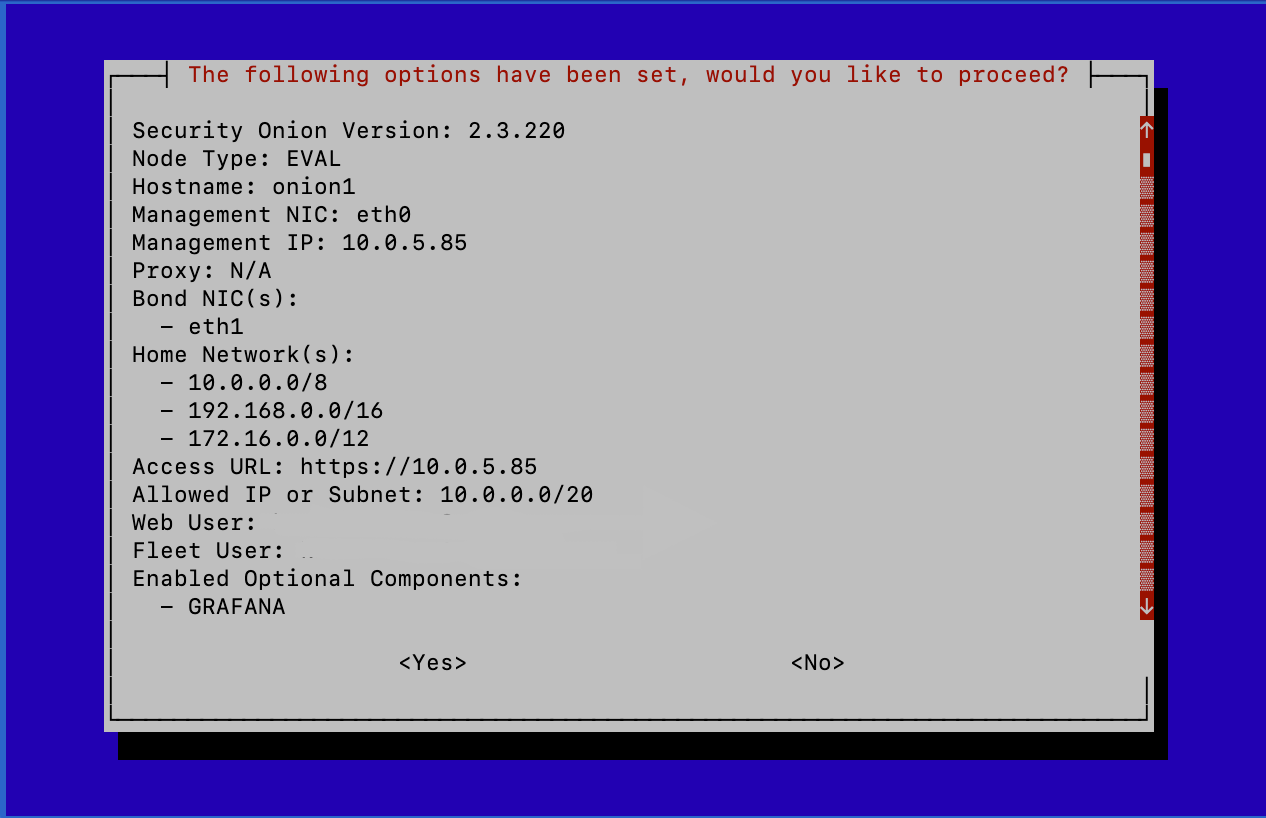
Select ‘Yes’ and continue
Security Onion will begin to install. This is going to take a while…
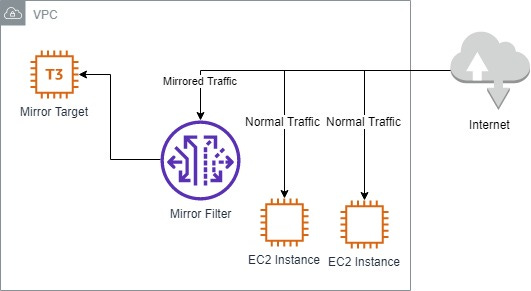
While Security Onion Installs, Let’s Configure Traffic Mirroring:
To configure Traffic Mirroring, we’ll have to navigate to the VPC Management Console inside of AWS. Scroll down on the left side to Traffic Mirroring, you’ll see Mirror sessions, Mirror targets, and Mirror filters. We’ll configure these sections one by one to properly mirror the traffic from our VPC.
Navigate to Mirror targets, and create a traffic mirror target
Under Target settings, we’ll name this target ‘SO-Sniff-Target’
Under Choose target, the Target type should be Network Interface, and the Target will be our sniffing interface ‘SO-Sniff-NI’
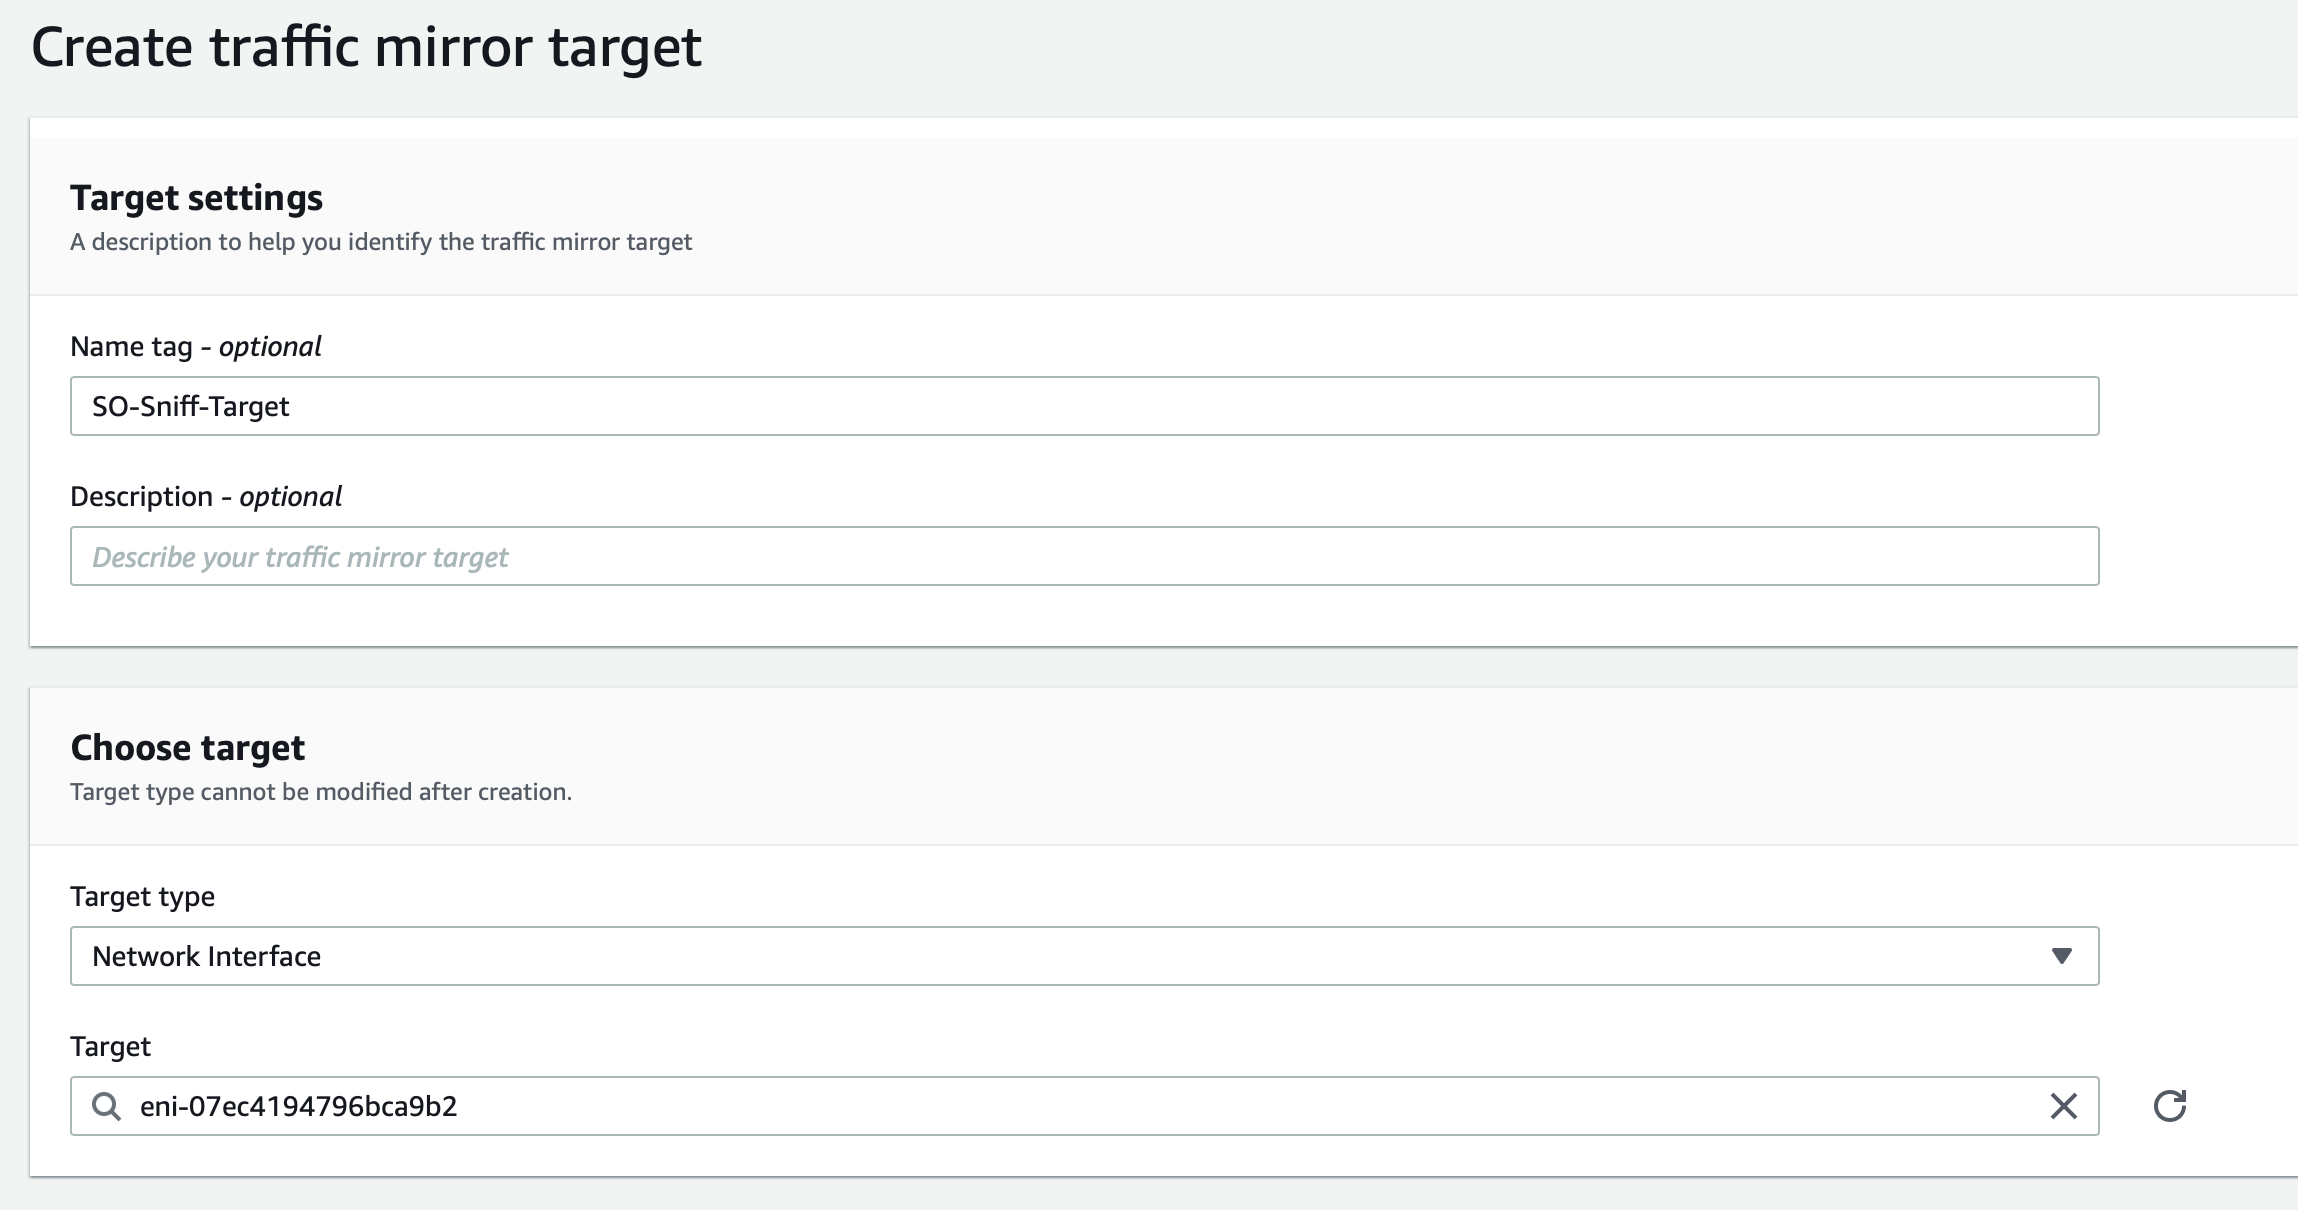
Create this mirror target
Next, navigate to Mirror filters, then Create traffic mirror filter
Under Filter settings, we’ll name this filter ‘SO-Filter’
Inbound rules should allow for all protocols from 0.0.0.0/0 - this is so that we can have visibility over all traffic coming into our VPC
Outbound rules should also allow all protocols from 0.0.0.0/0
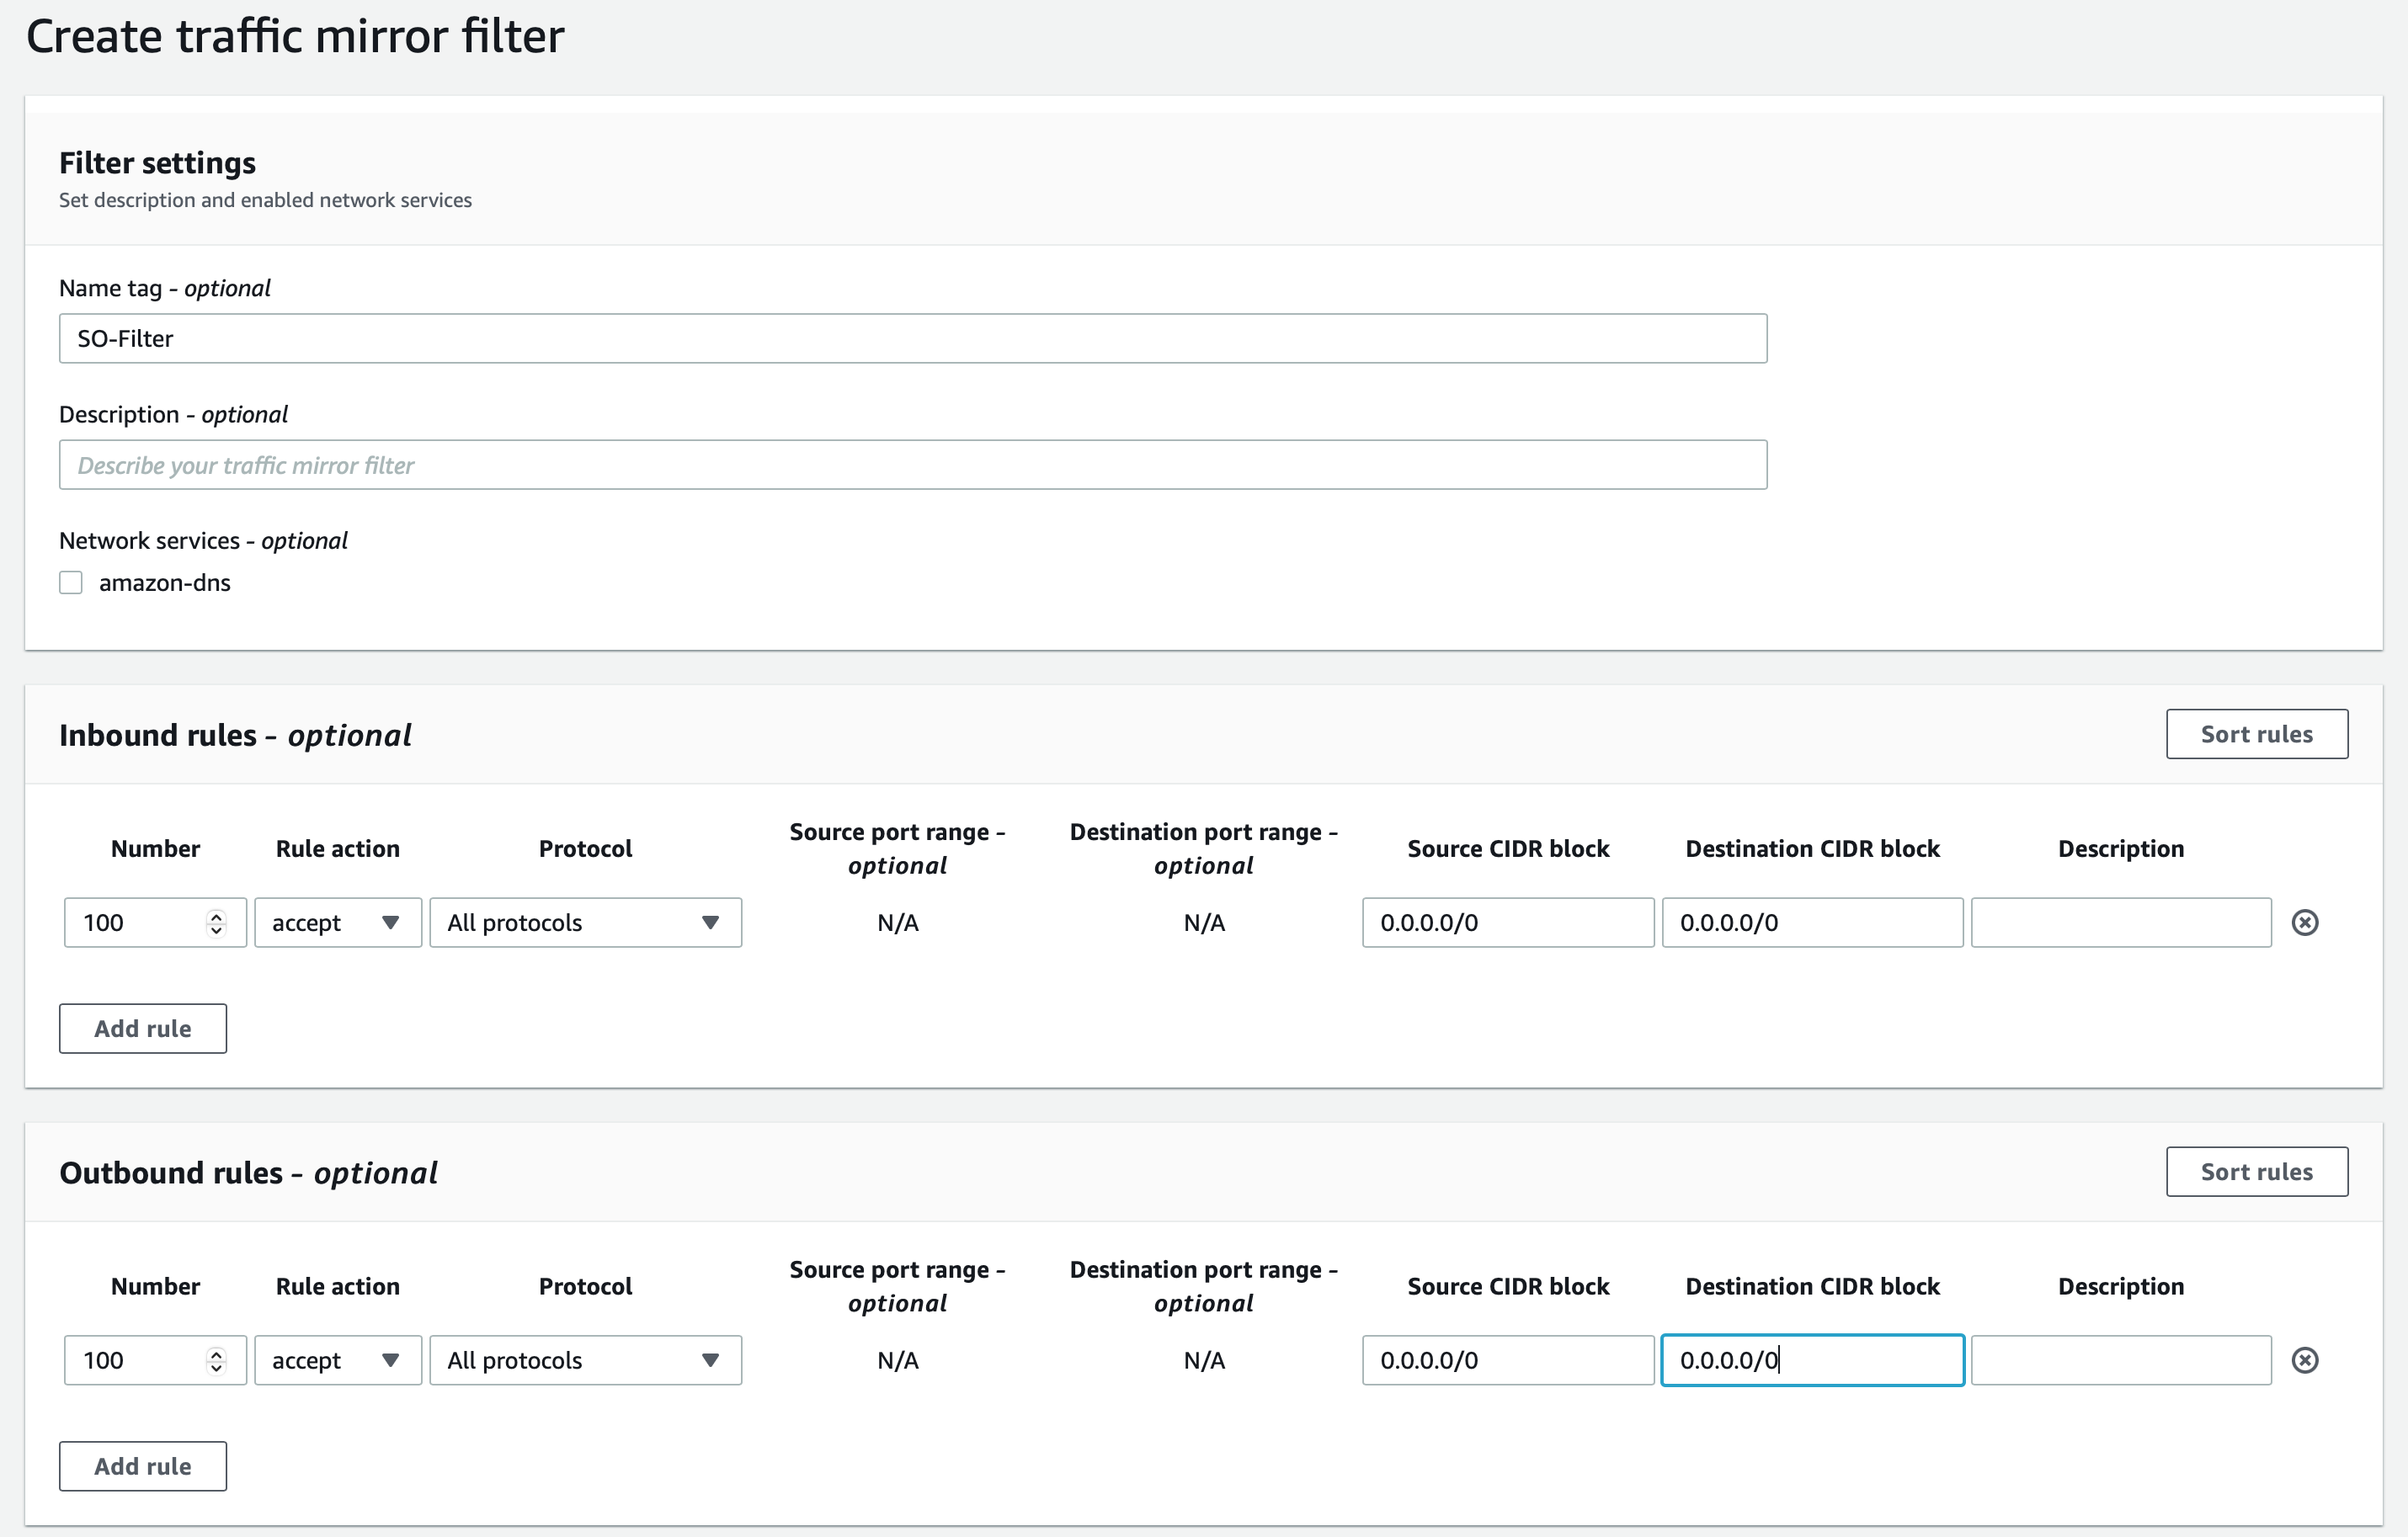
Create this traffic mirror filter
Lastly, navigate to Mirror sessions
Under session settings, we’ll name this session ‘SO-MS1’
The mirror source should be the NIC of ‘SO-Test-INST’, the Interface ID can be found by selecting this instance in the EC2 Console, selecting Networking, and scrolling down to Network Interfaces
The Mirror target should be ‘SO-Sniff-Target’
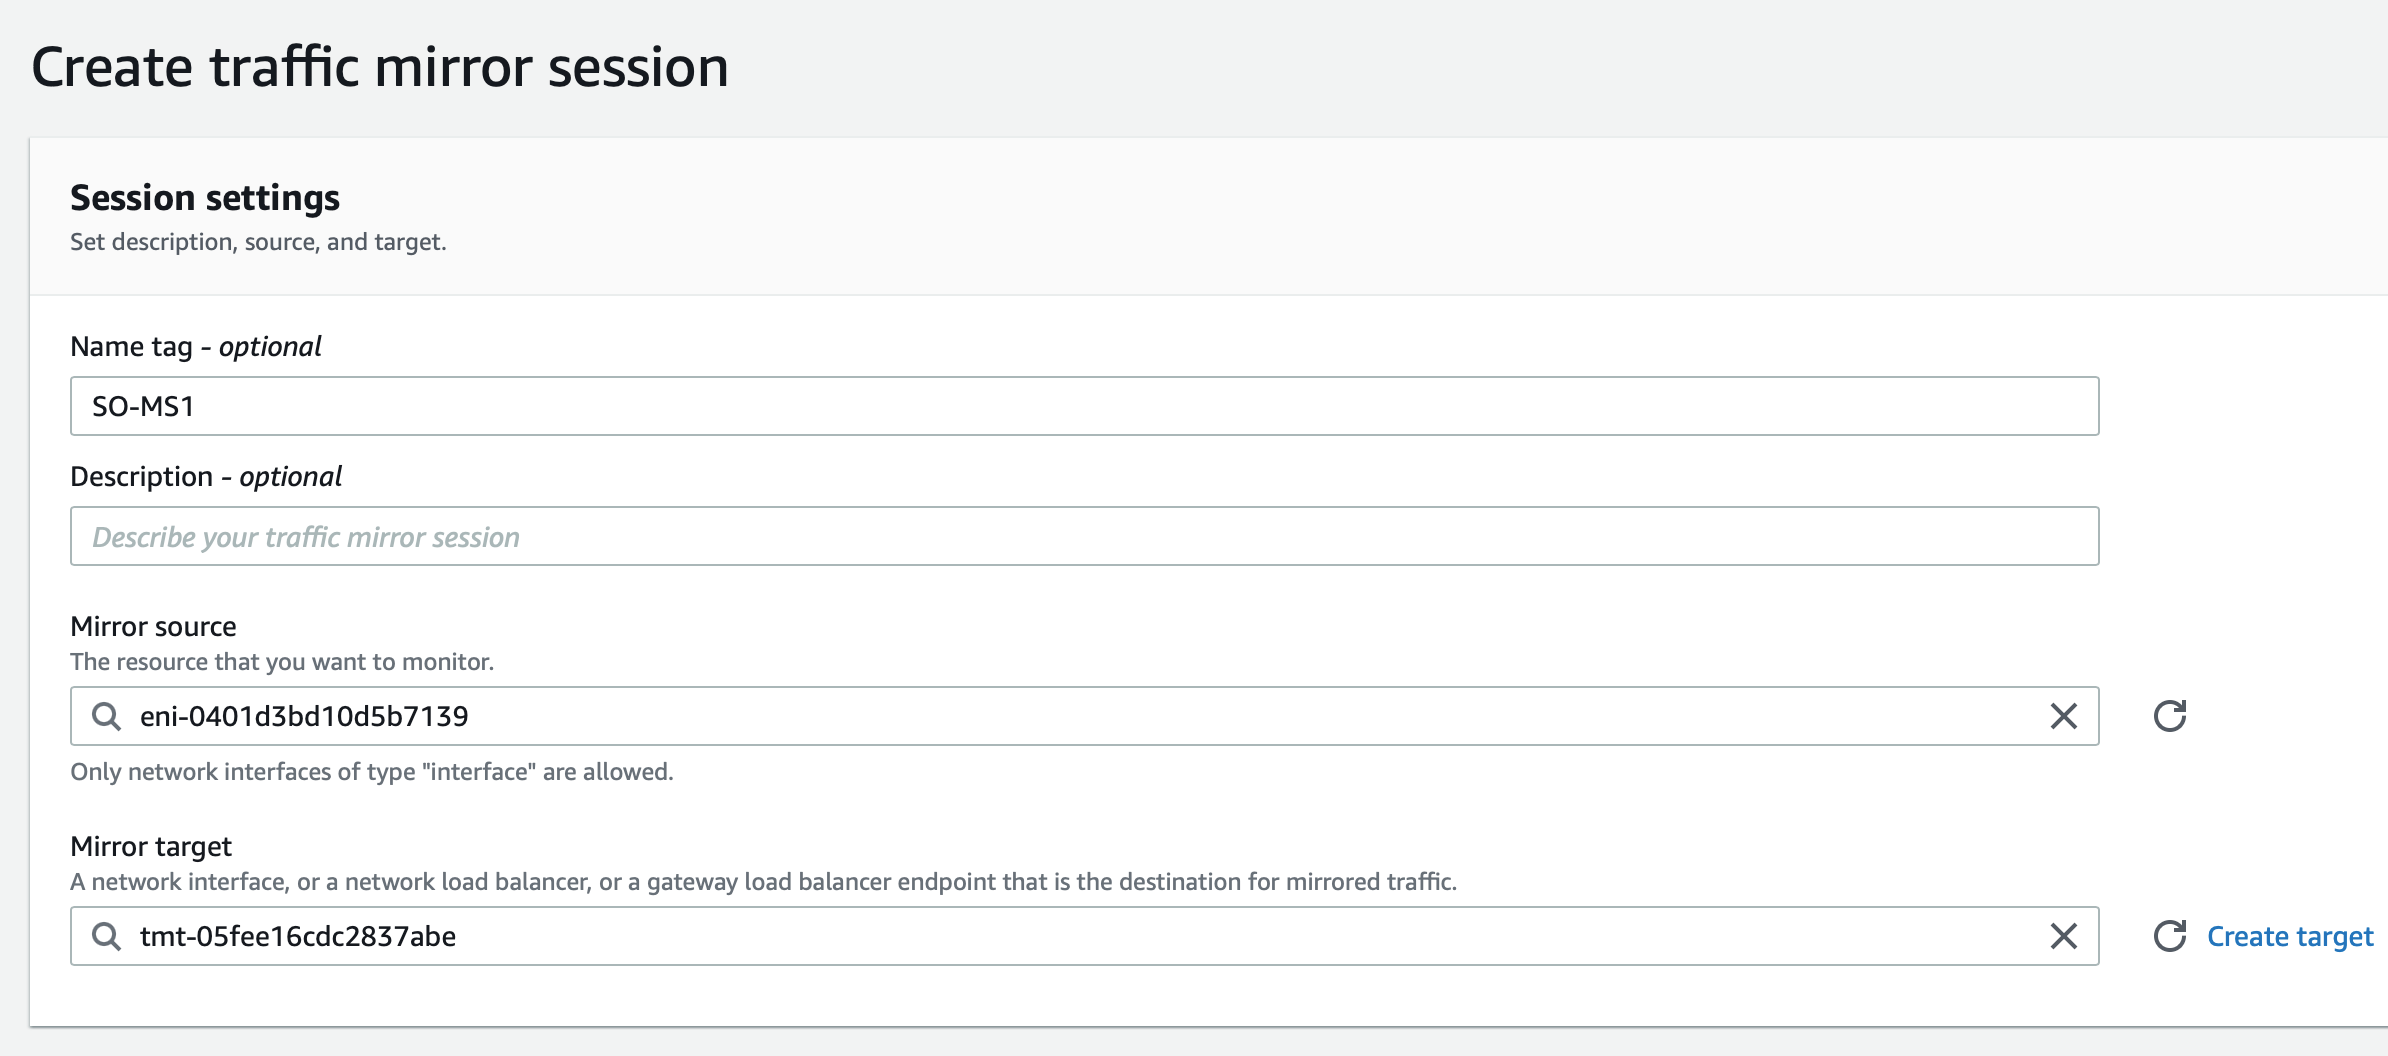
The session number should be 1
SO-Filter should be applied for the Filter

Create this traffic mirror session
Traffic mirroring is now configured properly, once Security Onion finishes installing, we’ll be on to our final steps.
Connect to Security Onion via SO-MGMT:
We can RDP into ‘SO-MGMT’ and connect to Security Onion via the web interface because these two instances belong in the same subnet. From ‘SO-MGMT’ we can view and investigate alerts that are generated in Security Onion. Navigate back to the EC2 Management Console to follow along.
Select ‘SO-MGMT’ and press ‘Connect’ in the top right corner
Select RDP Client under Connect to instance
Download the remote desktop file which will connect you to the instance in RDP once opened
Select ‘Get password’ for RDP. Upload your private key file and decrypt your password
Open to remote desktop file and input your decrypted password, you now have access to ‘SO-MGMT’
Security Onion’s web interface should be accessible from your management interface’s private IP address. For my example, I can access the web interface at https://10.0.5.85.
Enter https://x.x.x.x into your browser
Bypass this connection being unsafe by selecting advanced, and continue to the site anyway
You should now see the login screen for Security Onion
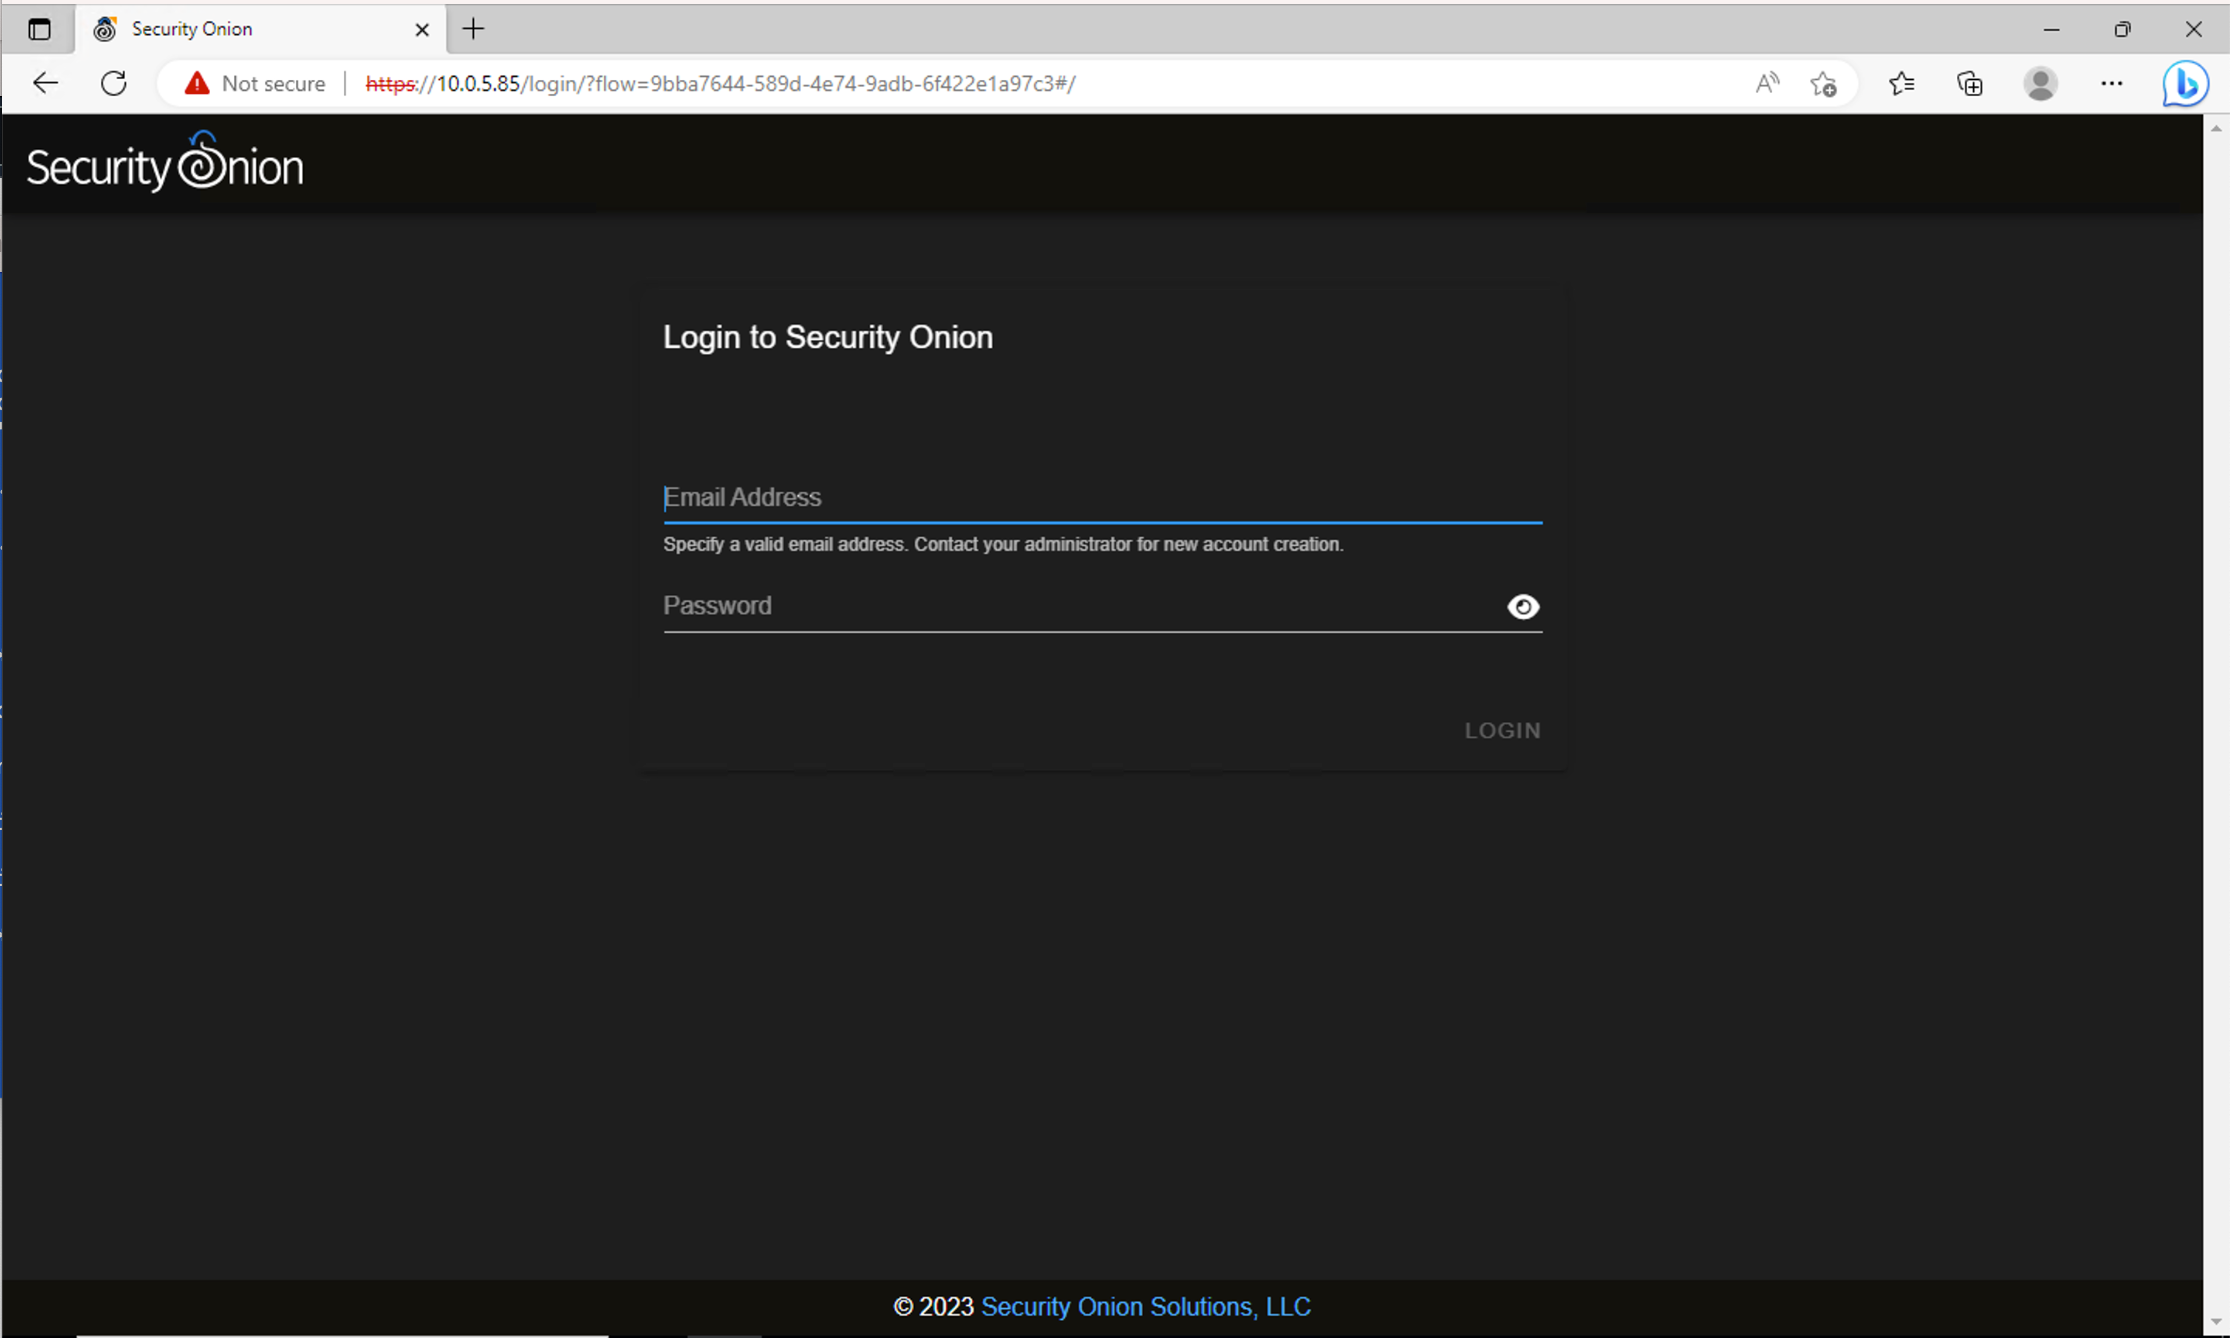
Login to Security Onion using the email and password you assigned to the instance during the setup
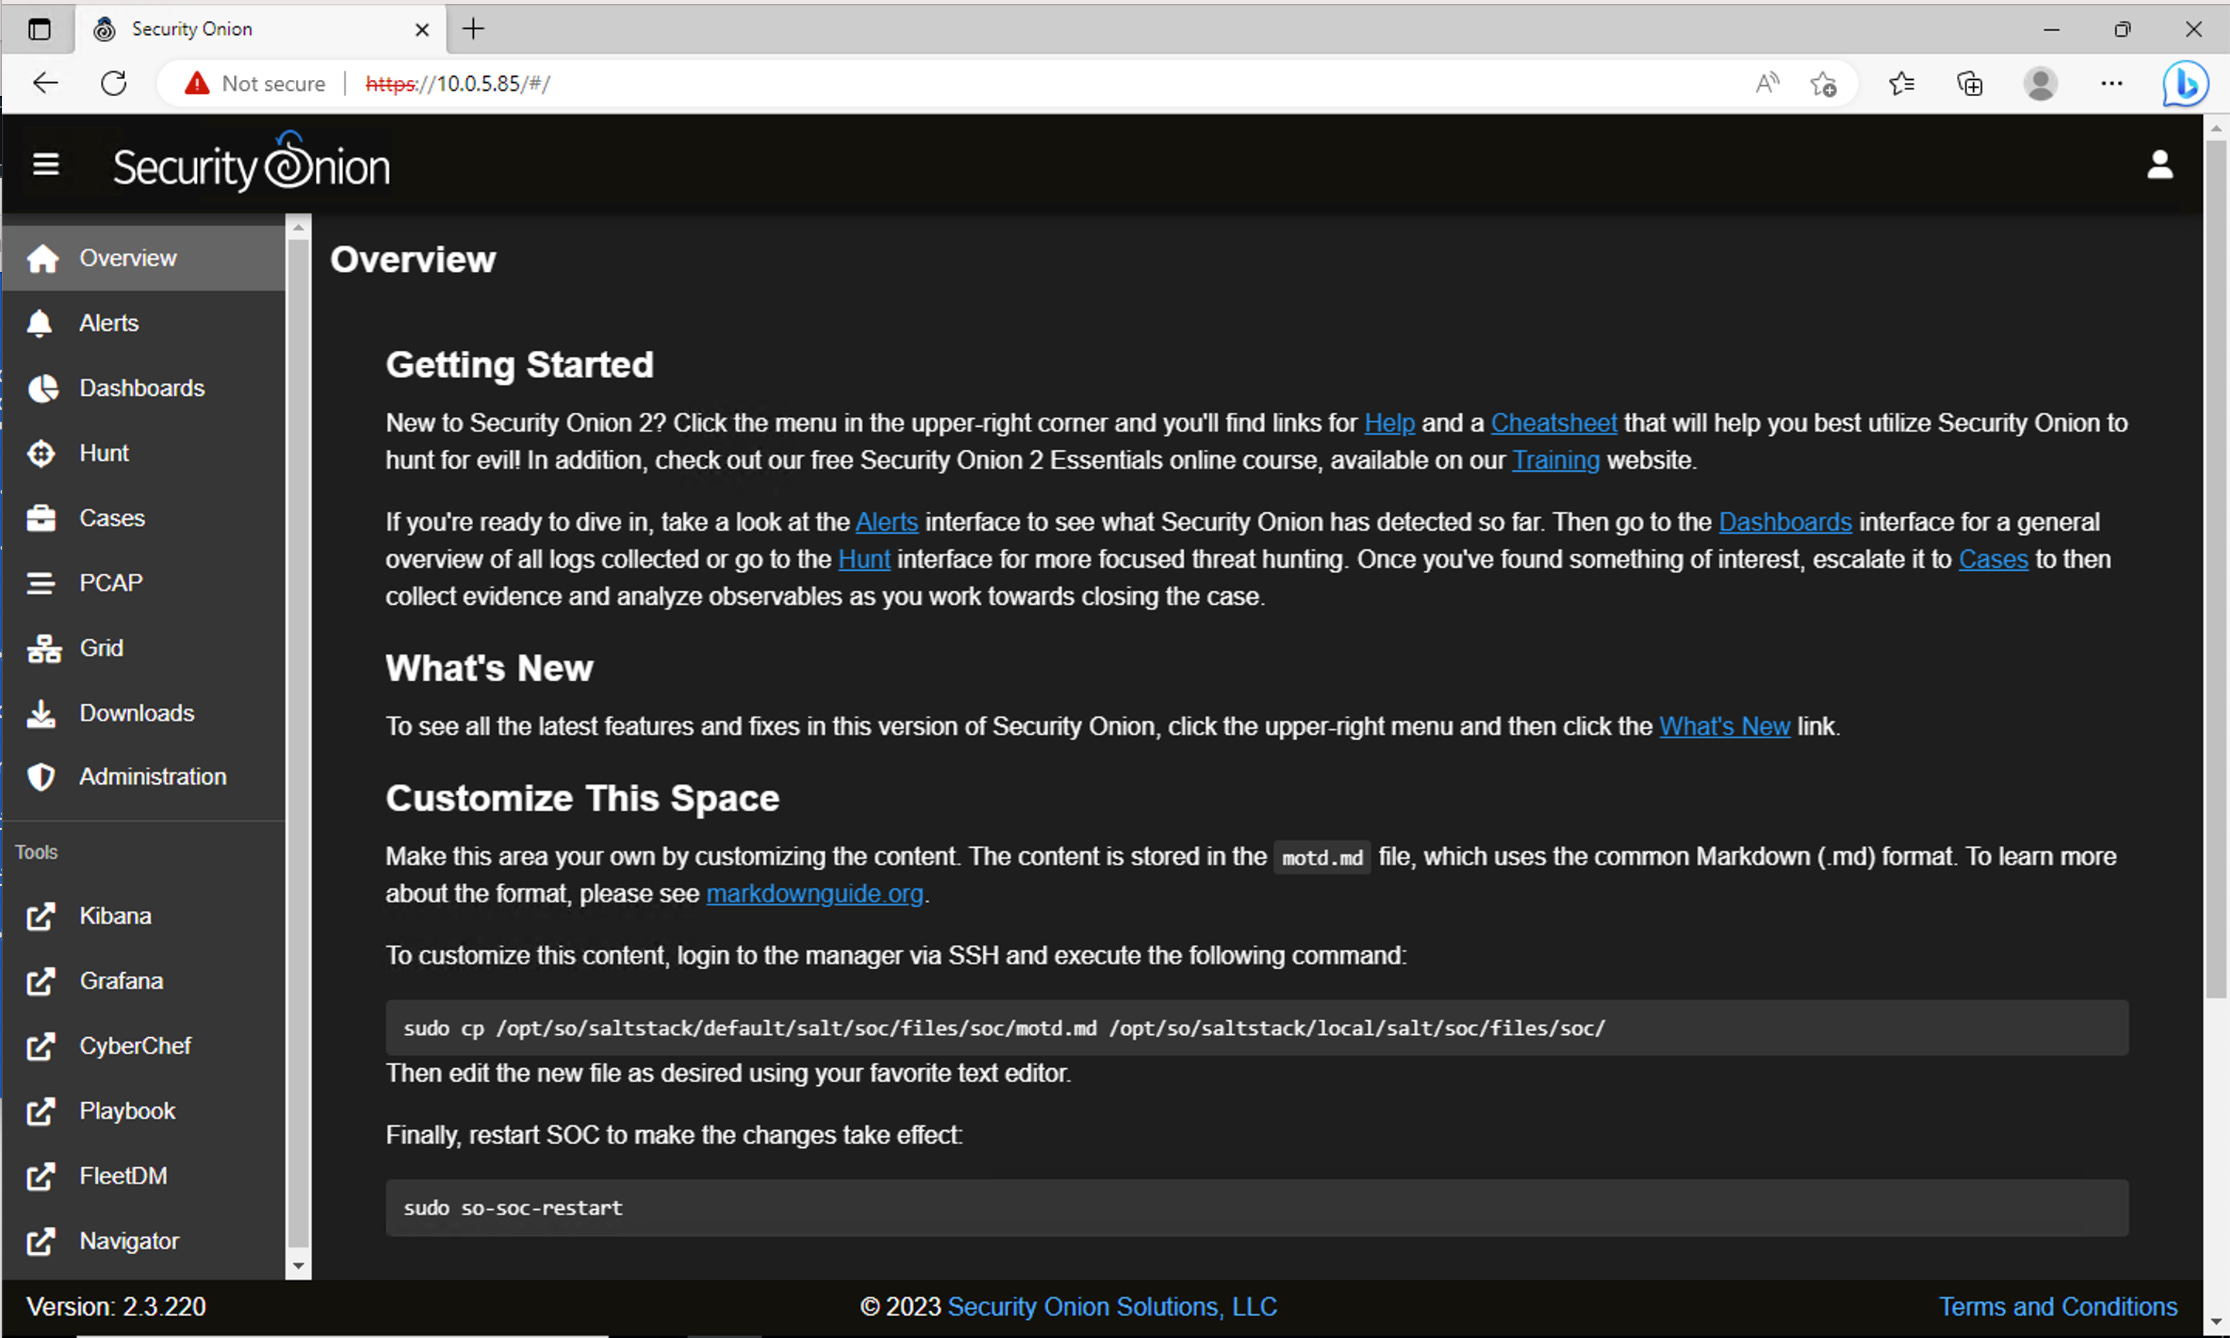
We now have access to Security Onion!
Let’s See if it Works…
Though we now have access to Security Onion, who’s to say it actually works? Or if we misconfigured our Traffic Mirroring? We’re going to put it to the test.
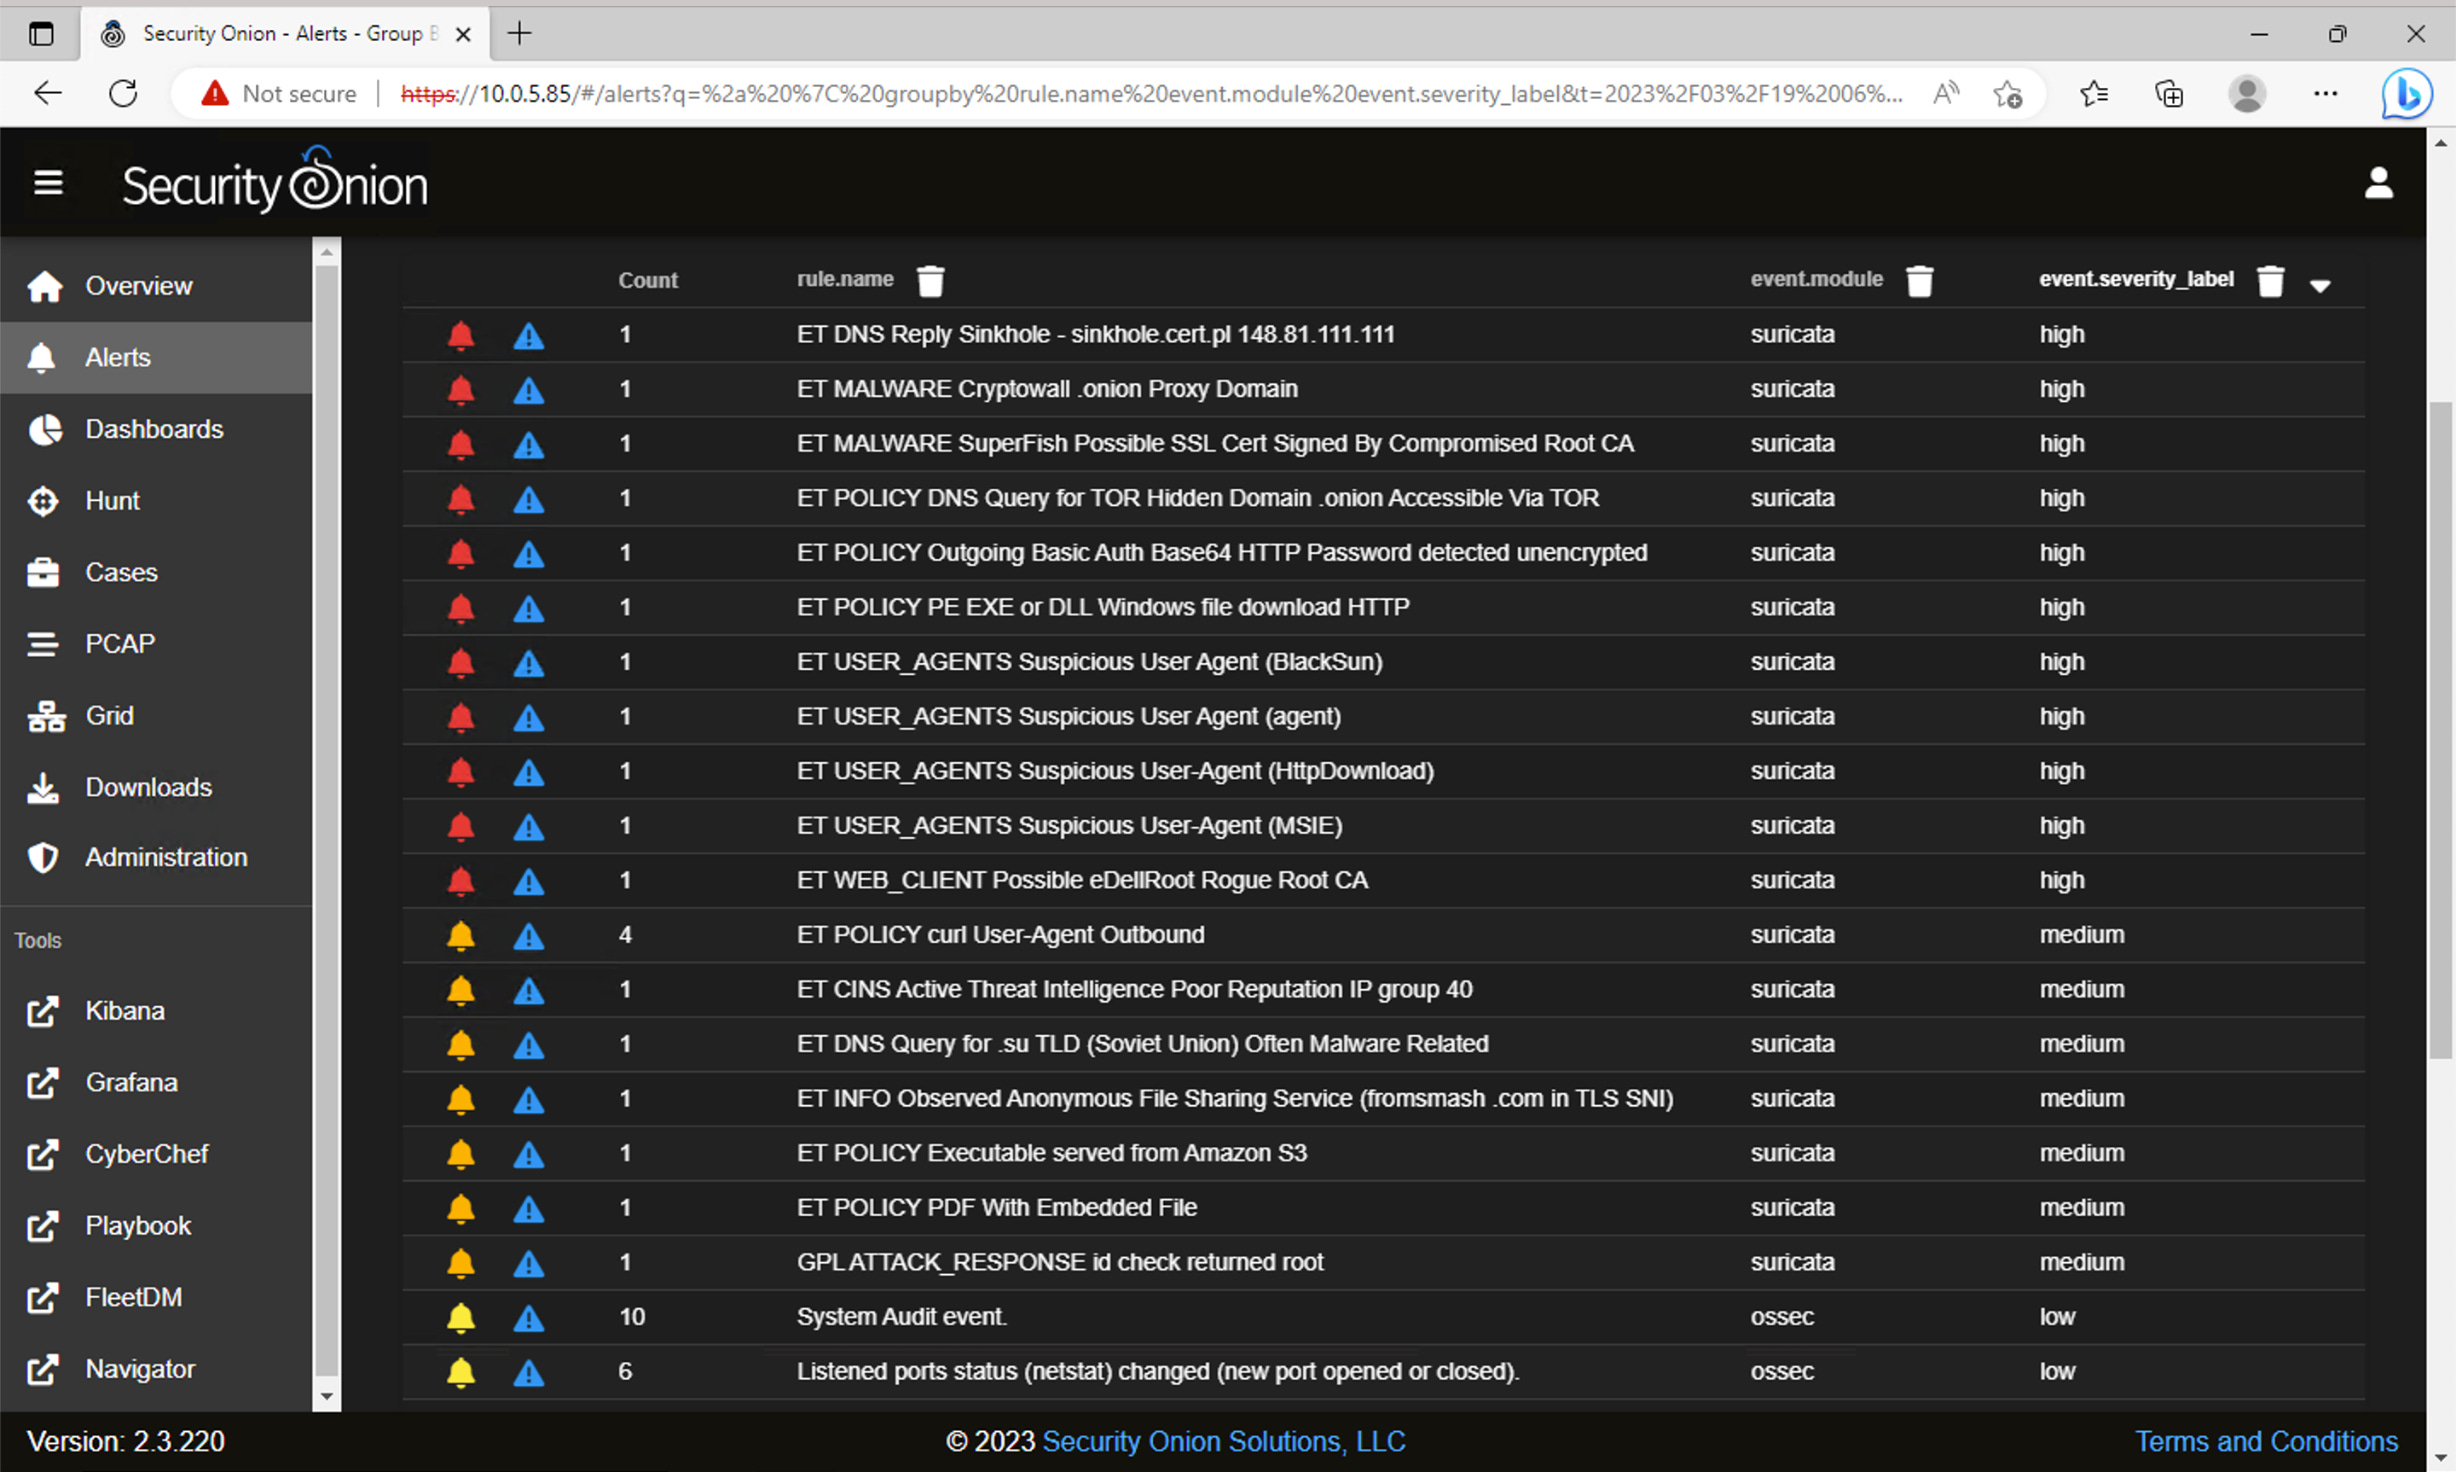
Navigate to ‘Alerts’ in Security Onion, and your screen should look similar to this:
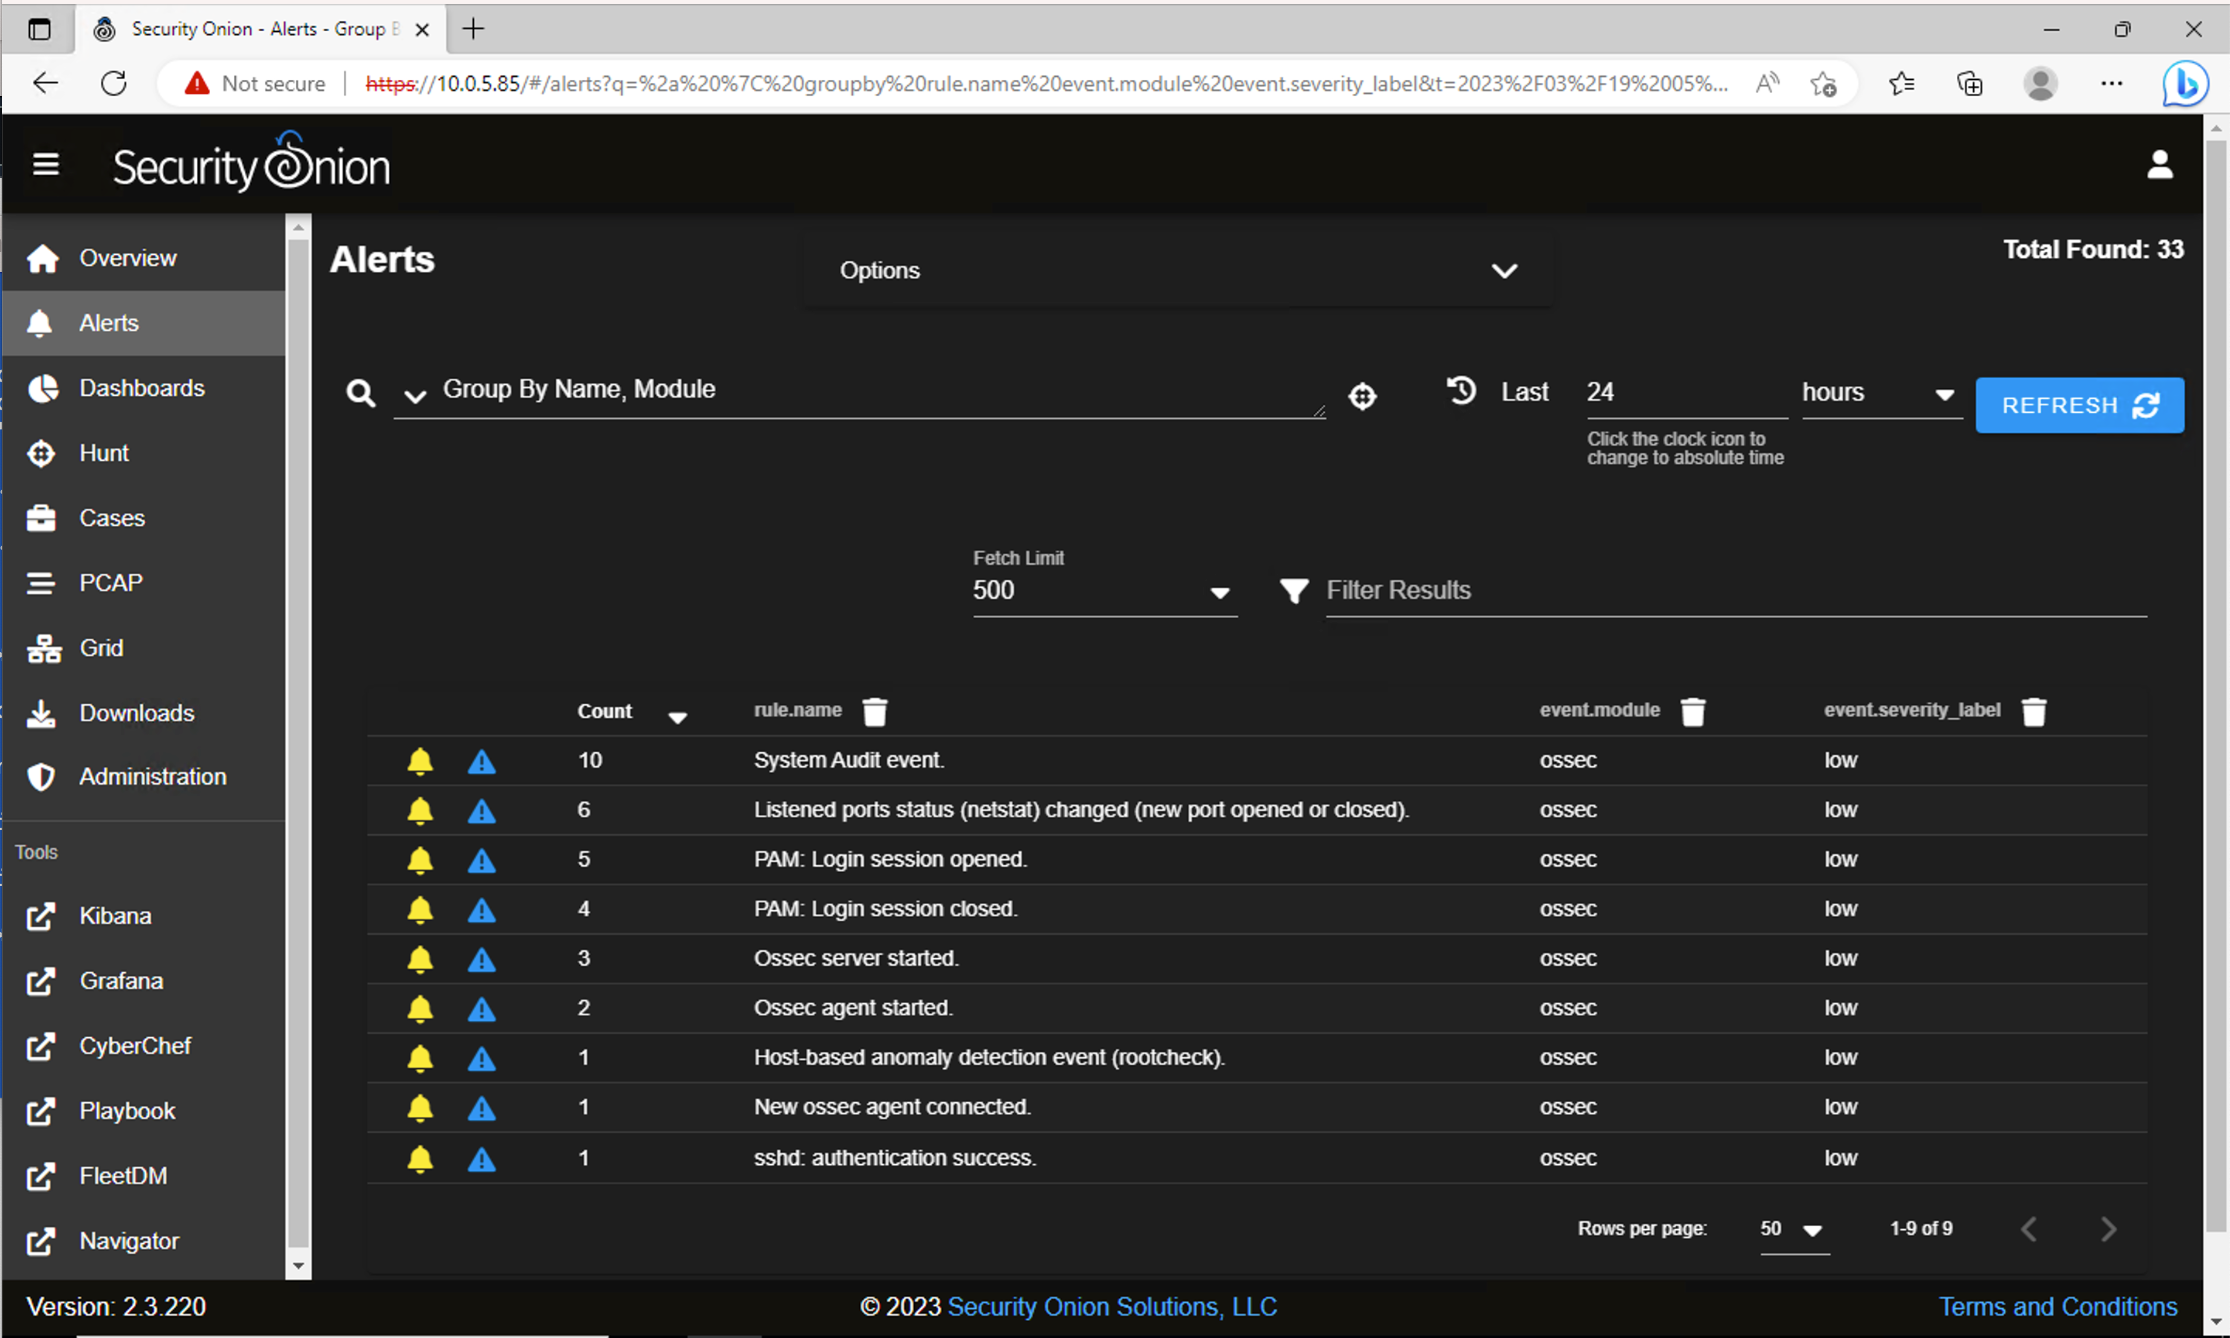
All of these alerts were generated during setup, it’s time to simulate some malicious network traffic and see if alerts are generated. Leave this connection open, navigate back to the EC2 Management Console on your host machine, and follow along.
Under Instances, select ‘SO-Test-INST’, then ‘Connect’ in the top right corner
Select EC2 Instance Connect
Connect to this EC2 Instance
Testmynids is a framework by 3CORESec built for testing Network Intrusion Detection Systems. We’re going to use this framework on ‘SO-Test-INST’ to generate alerts in Security Onion, and verify our lab was configured properly. I want to thank 3CORESec for creating this framework and recommend giving it a look for yourself on Github!
In EC2 Instance Connect, run the command: curl -sSL https://raw.githubusercontent.com/3CORESec/testmynids.org/master/tmNIDS -o /tmp/tmNIDS && chmod +x /tmp/tmNIDS && /tmp/tmNIDS
You should now see Testmynids in an interactive mode:
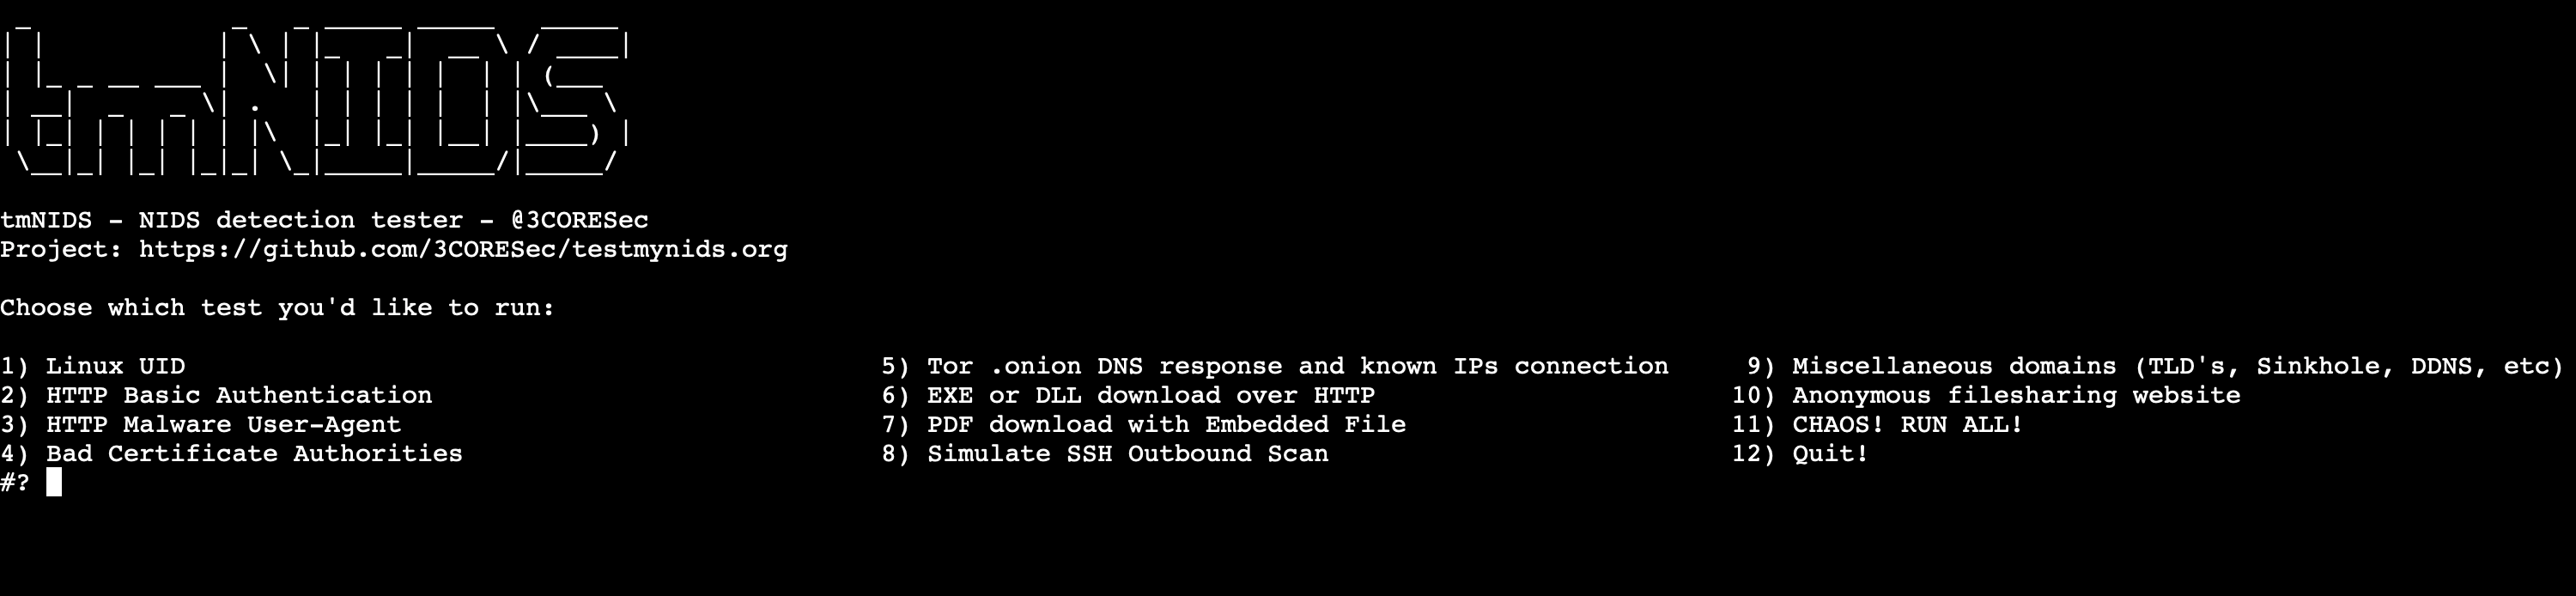
Type ‘11’ for CHAOS! Which will run all 10 malicious events.
Enter!
A script will run quickly and disappear. Now we must steer back to Security Onion to see if any alerts were generated.
Refresh Security Onion
Sort event.severity_label to high severity alerts
We can see that 18 alerts (11 high severity, 7 medium) were generated by Suricata, meaning that Security Onion is working!
We could do deeper dive and investigate these alerts but that is out of the scope of this guide. Don’t worry, an investigation in Security Onion is coming soon!
Thank you for taking the time to read this blog post on setting up a cybersecurity homelab in AWS with Traffic Mirroring and Security Onion. I hope you found it informative and useful in your security monitoring efforts. Be sure to stay tuned for more cybersecurity blog content coming soon, including tips and tricks, best practices, and in-depth tutorials on a variety of topics. I welcome your constructive criticism, feedback, and suggestions for future blog topics, so please don't hesitate to reach out with any comments or questions. If you enjoyed this post or found it helpful, be sure to subscribe to and share my blog, and stay on the lookout for upcoming blog content. Thanks again for reading, and I look forward to continuing to show my learning and assist others in their learning as well!